2.2 Zoo Learning Activity

Zoo 2.2 — Animal Pen Arrays

Continue from your completed Zoo 2.1. Use the diagrams to implement a four-space pen for each zoo. Each pen stores the existing featured animal reference and displays its position automatically.

1.Copy the previous version
A Copy your completed Zoo 2.1 folder, rename the copy and its solution for Zoo 2.2 using your last name, open the copied solution, and restore NuGet packages

The existing window title already identifies Programming Concepts 2; keep it unchanged.
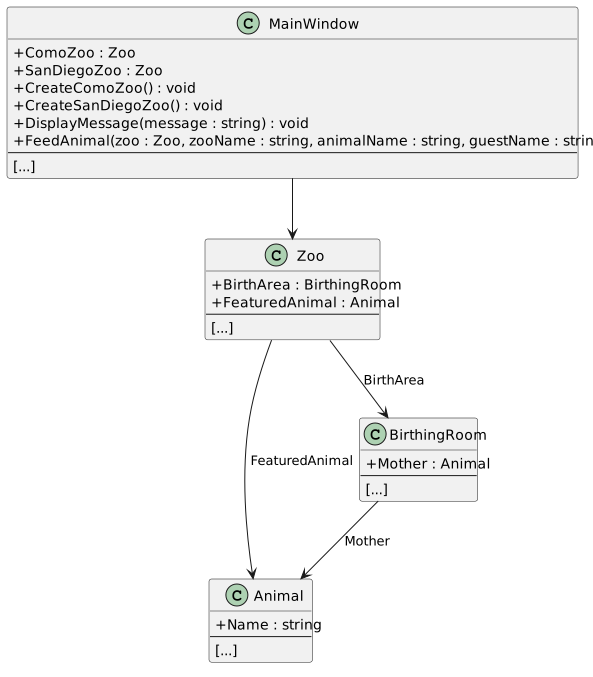
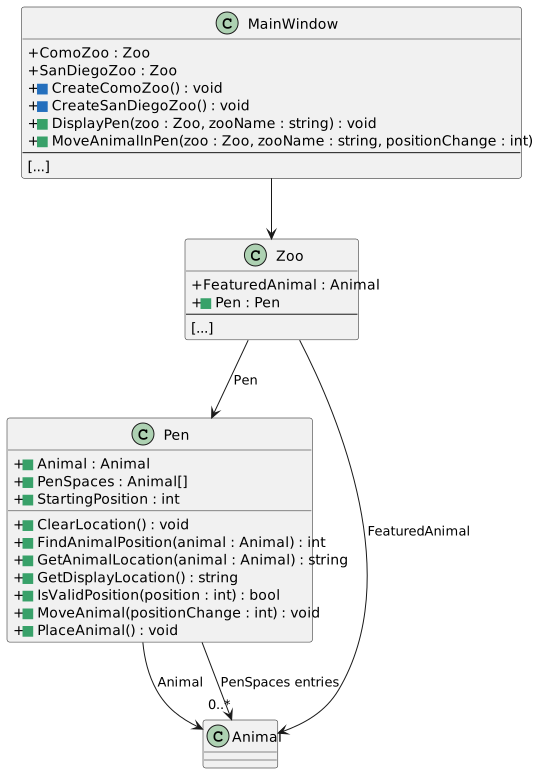
Focused starting structure from Zoo 2.1 End. Unchanged fields and methods are abbreviated; event methods appear below the separator.
Starting structure — Zoo 2.1 End
  • New
  • Changed
  • Removed
Show and Move an Animal in Its Pen
Acceptance Criteria
  • Creating either zoo automatically displays - X - - in that zoo’s pen box.
  • The left and right buttons update only their own zoo’s pen.
  • An animal cannot move outside indexes 0 through 3.
  • The array stores the same animal already referenced by the zoo.
Give Each Zoo Its Own Pen
Acceptance Criteria
  • Each zoo has a separate Pen and four-space array.
  • The pen refers to the zoo’s existing animal rather than creating a duplicate.
2.Create the Pen class and connect it to Zoo
A Add Pen.cs to Business Classes and declare its fields
1 Add the Pen class in Business Classes.
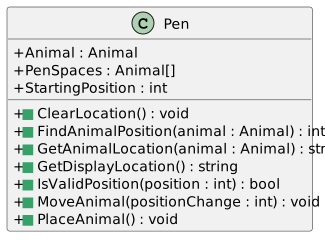
2 Use the class diagrams to add the Animal, PenSpaces, and StartingPosition fields with their specified types.
3 In Zoo.cs, add a field named Pen whose type is Pen, as shown in the ending class diagram.
New Pen class, Zoo.Pen, and window helpers have green markers. Changed creation methods have blue markers. Existing event methods are abbreviated below the separator.
Ending structure — new and changed members
  • New
  • Changed
  • Removed
All Pen fields and method signatures match the approved source and retain alphabetical ordering.
Pen fields and method signatures
  • New
  • Changed
  • Removed
B Check Your Work
1 In Solution Explorer, confirm Pen.cs is included in the project.
2 Open the class and confirm Pen.Animal has type Animal.
3 Confirm Pen.PenSpaces has type Animal[] and Pen.StartingPosition has type int.
Clear and Find an Animal’s Location
Acceptance Criteria
  • Clearing a location empties the matching array entries without losing the animal reference.
  • Searching returns the first matching index or -1 when the animal is absent.
  • A readable location description uses position numbers starting at one.
3.ClearLocation() — Clear the animal’s location
A Implement ClearLocation in Pen.cs
1 Use the class diagram to determine the return type and parameters, then add ClearLocation to Pen.cs.
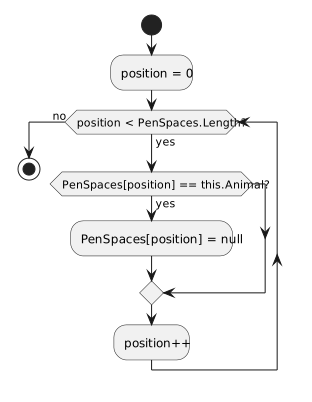
2 Use the activity diagram to write the for loop that checks each position in PenSpaces.
3 Inside the loop, follow the diagram’s decision to empty positions containing this.Animal.
ClearLocation follows the approved 2.2 method, including its conditions, loop updates, and returns.
ClearLocation activity
  • New
  • Changed
  • Removed

The loop continues checking the other positions automatically. Emptying an array position does not change Pen.Animal; the pen still knows which animal it manages.

Trace the ClearLocation activity diagram alongside your method. Confirm each matching array position is cleared while the Animal field is left unchanged. The Watch task later shows the same reference behavior during movement.

4.FindAnimalPosition() — Find the animal’s array index
A Implement FindAnimalPosition in Pen.cs
1 Use the class diagram to add FindAnimalPosition to Pen.cs.
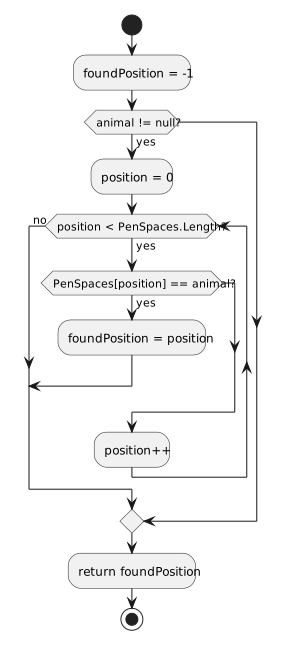
2 Follow the activity diagram to search PenSpaces for the animal parameter. Use the diagram to determine when to search and when to stop.
3 Return the result shown in the diagram. It must identify the matching index or indicate that the animal was not found.
FindAnimalPosition follows the approved 2.2 method, including its conditions, loop updates, and returns.
FindAnimalPosition activity
  • New
  • Changed
  • Removed
B Check Your Work
1 Open Pen.FindAnimalPosition in the source. Follow its statements from top to bottom using the sample values below; this is a paper/source trace, so do not run or edit the application for this check.
2 Use a four-entry this.PenSpaces array with Dolly at index 1 and the other entries null. Search using Dolly’s reference.
3 Confirm the initial search result is -1, index 0 does not match and index 1 matches. Confirm the method returns 1.
4 Trace a separate call with the animal argument null. Confirm the result remains -1.
5 Trace a separate call with a different Animal reference that is absent from the array. Confirm every comparison fails and the result is -1.
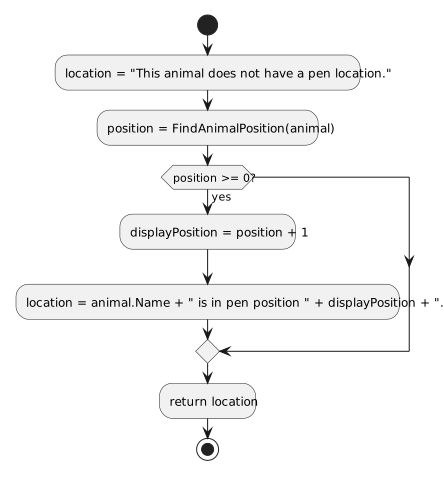
5.GetAnimalLocation() — Describe the animal’s location
A Implement GetAnimalLocation in Pen.cs
1 Use the class diagram to add GetAnimalLocation to Pen.cs.
2 Follow the activity diagram to call FindAnimalPosition and decide which description to build.
3 Use the diagram’s exact messages and return the description. Remember that a displayed position number starts at one, while an array index starts at zero.
GetAnimalLocation follows the approved 2.2 method, including its conditions, loop updates, and returns.
GetAnimalLocation activity
  • New
  • Changed
  • Removed
B Check Your Work
1 Open Pen.GetAnimalLocation in the source. Follow its statements from top to bottom using the sample values below; this is a paper/source trace, so do not run or edit the application for this check.
2 For Dolly at this.PenSpaces[1], follow the successful search and confirm the returned text is Dolly is in pen position 2..
3 For an animal absent from the array, confirm This animal does not have a pen location..
4 Trace Dolly at index 0. Confirm the text uses position 1, while array access still uses index 0.
See Which Pen Spaces Are Occupied
Acceptance Criteria
  • X marks an occupied space and - marks an empty space.
  • The map includes every space, separated by single spaces.
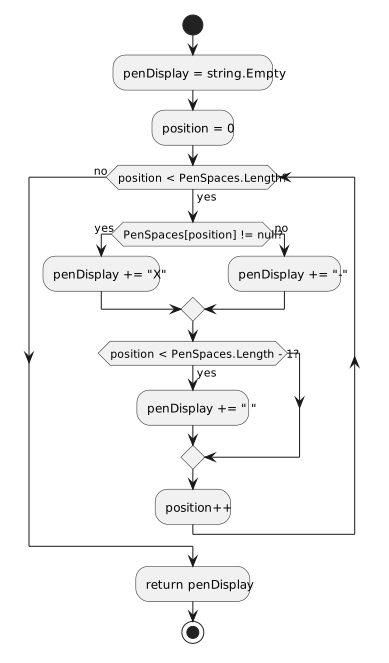
6.GetDisplayLocation() — Build the pen map
A Implement GetDisplayLocation in Pen.cs
1 Use the class diagram to add GetDisplayLocation to Pen.cs.
2 Follow the activity diagram to build the map as the loop checks each array position. Identify the string that stores the growing result.
3 Use the diagram’s second decision to place spaces between the markers, then return the completed map.
GetDisplayLocation follows the approved 2.2 method, including its conditions, loop updates, and returns.
GetDisplayLocation activity
  • New
  • Changed
  • Removed
B Check Your Work
1 Open Pen.GetDisplayLocation in the source. Follow its statements from top to bottom using the sample values below; this is a paper/source trace, so do not run or edit the application for this check.
2 Use four entries with Dolly only at this.PenSpaces[1]. Follow each loop iteration and confirm returned text - X - -.
3 Count the separators: confirm there is one space between markers and no space after the final marker.
4 Trace a separate array of four null entries. Confirm - - - -.
5 Trace Dolly at index 2 with the other entries empty. Confirm - - X -.
Move Within the Pen Boundaries
Acceptance Criteria
  • The first and last array indexes are valid destinations.
  • An attempt to move beyond either end leaves the array unchanged.
  • Placement uses the configured StartingPosition.
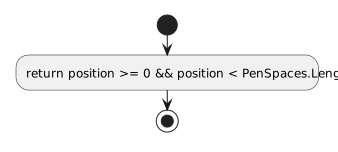
7.IsValidPosition() — Check an array index
A Implement IsValidPosition in Pen.cs
1 Use the class diagram to add IsValidPosition to Pen.cs.
2 Use the activity diagram to write the Boolean expression that determines whether position is a valid array index, and return its result.
IsValidPosition follows the approved 2.2 method, including its conditions, loop updates, and returns.
IsValidPosition activity
  • New
  • Changed
  • Removed
B Check Your Work
1 Open Pen.IsValidPosition in the source. Follow its statements from top to bottom using the sample values below; this is a paper/source trace, so do not run or edit the application for this check.
2 Use this.PenSpaces.Length equal to 4. Trace requested indexes 0 and 3 separately: both must return true.
3 Trace index -1: confirm false.
4 Trace index 4: confirm false because the final valid index is 3.
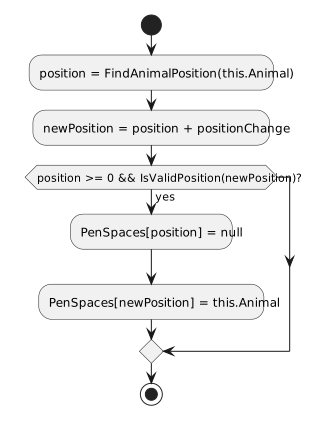
8.MoveAnimal() — Move the animal
A Implement MoveAnimal in Pen.cs
1 Use the class diagram to add MoveAnimal to Pen.cs.
2 Follow the activity diagram to find the animal’s current index and calculate the index it would move to.
3 Use the diagram’s decision to determine whether the array can be changed.
4 Inside that decision, follow the two assignments in the order shown to move the same animal reference.
MoveAnimal follows the approved 2.2 method, including its conditions, loop updates, and returns.
MoveAnimal activity
  • New
  • Changed
  • Removed
B Check Your Work
1 Open Pen.MoveAnimal in the source. Follow its statements from top to bottom using the sample values below; this is a paper/source trace, so do not run or edit the application for this check.
2 Start with Dolly at this.PenSpaces[1] and this.Animal referring to Dolly. Trace one right move.
3 Confirm the destination is index 2. After the move, this.PenSpaces[1] is null and this.PenSpaces[2] refers to Dolly.
4 Confirm this.Animal still refers to Dolly; the move must not create another Animal.
5 Trace a left move from index 0. Confirm the invalid destination -1 leaves every entry unchanged.
6 Trace a right move from index 3. Confirm destination 4 leaves every entry unchanged.
7 Trace a search result of -1 for an absent animal. Confirm no array entry changes.
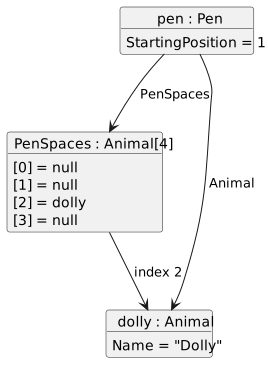
After moving right once, Dolly moves from array index one to index two. Pen.Animal still refers to Dolly.
The same animal reference after a right move
  • New
  • Changed
  • Removed
9.PlaceAnimal() — Place the animal at its starting position
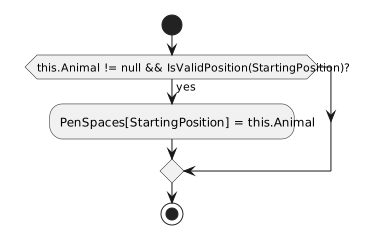
A Implement PlaceAnimal in Pen.cs
1 Use the class diagram to add PlaceAnimal to Pen.cs.
2 Use the activity diagram to determine when the animal can be placed in its starting space.
3 Inside that decision, use the assignment shown in the diagram to store the existing animal reference in PenSpaces.
PlaceAnimal follows the approved 2.2 method, including its conditions, loop updates, and returns.
PlaceAnimal activity
  • New
  • Changed
  • Removed
B Check Your Work
1 Open Pen.PlaceAnimal in the source. Follow its statements from top to bottom using the sample values below; this is a paper/source trace, so do not run or edit the application for this check.
2 Use an allocated four-space this.PenSpaces, this.StartingPosition of 1 and this.Animal referring to Dolly.
3 Confirm this.PenSpaces[1] receives the existing Dolly reference; indexes 0, 2 and 3 remain null.
4 Trace separately with this.Animal equal to null. Confirm no entry changes.
5 Trace invalid starting positions -1 and 4 separately. Confirm neither changes an entry.
Keep Each Pen Display Current
Acceptance Criteria
  • Each zoo has its own pen TextBox and left and right buttons.
  • Creating or moving an animal refreshes only the matching zoo’s pen.
  • General messages continue to use the information box.
10.Add the two pen displays and their arrow buttons
A In MainWindow.xaml, insert this complete block after birthDingoButton and before comoZooStackPanel.Resources
Como Zoo pen controls
<TextBlock Text="Animal pen:" Margin="3,10,3,0"/>
<StackPanel Orientation="Horizontal">
    <TextBox x:Name="penDisplayTextBox" Margin="5,5,10,5" Padding="5" FontFamily="Consolas" FontSize="24" Height="42" Width="109" IsReadOnly="True" TextWrapping="NoWrap" HorizontalScrollBarVisibility="Disabled"/>
    <Button x:Name="moveComoZooAnimalLeftButton" Margin="5" Width="25" Height="25" FontSize="16" FontWeight="Bold" Content="&lt;" Click="moveComoZooAnimalLeftButton_Click"/>
    <Button x:Name="moveComoZooAnimalRightButton" Margin="5" Width="25" Height="25" FontSize="16" FontWeight="Bold" Content="&gt;" Click="moveComoZooAnimalRightButton_Click"/>
</StackPanel>
B In sanDiegoZooStackPanel, insert this complete block after birthPlatypusButton and before the birthing-room temperature controls
San Diego Zoo pen controls
<TextBlock Text="Animal pen:" Margin="3,10,3,0"/>
<StackPanel Orientation="Horizontal">
    <TextBox x:Name="sanDiegoPenDisplayTextBox" Margin="5,5,10,5" Padding="5" FontFamily="Consolas" FontSize="24" Height="42" Width="109" IsReadOnly="True" TextWrapping="NoWrap" HorizontalScrollBarVisibility="Disabled"/>
    <Button x:Name="moveSanDiegoZooAnimalLeftButton" Margin="5" Width="25" Height="25" FontSize="16" FontWeight="Bold" Content="&lt;" Click="moveSanDiegoZooAnimalLeftButton_Click"/>
    <Button x:Name="moveSanDiegoZooAnimalRightButton" Margin="5" Width="25" Height="25" FontSize="16" FontWeight="Bold" Content="&gt;" Click="moveSanDiegoZooAnimalRightButton_Click"/>
</StackPanel>
1 Keep the sizes, spacing, arrow Content, x:Name values, and Click names exactly as supplied.
2 Show each pen map in that zoo’s read-only TextBox. Continue to use informationTextBox for general messages.
C Check Your Work
1 Open MainWindow.xaml. Confirm penDisplayTextBox is inside Como Zoo’s StackPanel and sanDiegoPenDisplayTextBox is inside San Diego Zoo’s StackPanel.
2 Compare both control blocks with the supplied XAML: verify display size, margins, font settings and each arrow’s Content.
3 Confirm every x:Name is unique and each arrow’s Click value names its corresponding handler.
4 Confirm San Diego’s temperature controls remain below its pen controls.
11.DisplayPen() — Refresh the matching pen display
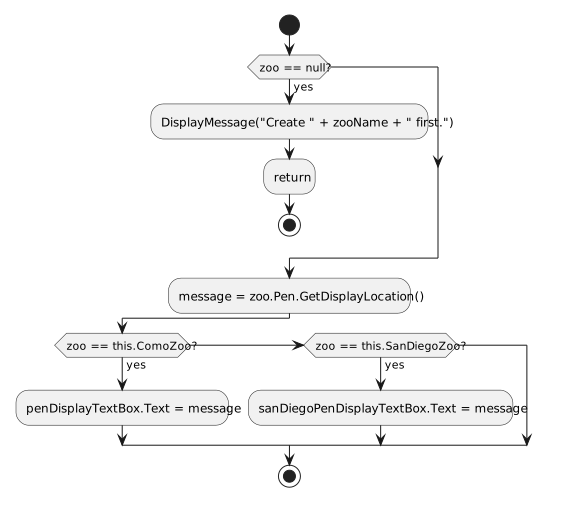
A Implement DisplayPen in MainWindow.xaml.cs
1 Use the class diagram to add DisplayPen to MainWindow.xaml.cs.
2 Follow the activity diagram’s first decision to handle a zoo that has not been created.
3 For an existing zoo, follow the diagram to obtain its pen map.
4 Use the remaining decisions to put the map in that zoo’s dedicated TextBox.
DisplayPen follows the approved 2.2 method, including its conditions, loop updates, and returns.
DisplayPen activity
  • New
  • Changed
  • Removed
B Check Your Work
1 Open MainWindow.DisplayPen in the source. Follow its statements from top to bottom using the sample values below; this is a paper/source trace, so do not run or edit the application for this check.
2 Follow the Como branch: confirm the map is written to this.penDisplayTextBox.Text and not to this.sanDiegoPenDisplayTextBox.Text.
3 Follow the San Diego branch: confirm only this.sanDiegoPenDisplayTextBox.Text is updated.
4 Trace zoo equal to null with zooName of Como Zoo. Confirm Create Como Zoo first. is displayed without accessing zoo.Pen.
5 After the later creation and handler tasks are complete, create both zoos and feed once. Confirm the maps stay visible while the information-box message changes.
12.MoveAnimalInPen() — Coordinate movement and display
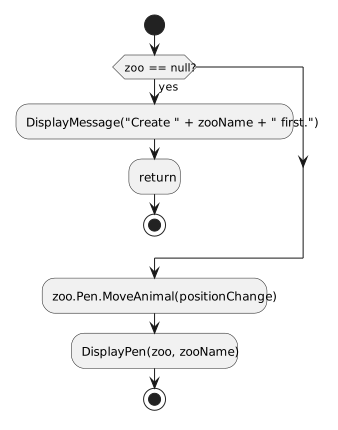
A Implement MoveAnimalInPen in MainWindow.xaml.cs
1 Use the class diagram to add MoveAnimalInPen to MainWindow.xaml.cs.
2 Follow the activity diagram to handle a zoo that has not been created.
3 For an existing zoo, make the two method calls in the order shown so the displayed map reflects the movement.
MoveAnimalInPen follows the approved 2.2 method, including its conditions, loop updates, and returns.
MoveAnimalInPen activity
  • New
  • Changed
  • Removed
B Check Your Work
1 Open MainWindow.MoveAnimalInPen in the source. Follow its statements from top to bottom using the sample values below; this is a paper/source trace, so do not run or edit the application for this check.
2 Confirm the zoo == null guard runs before any zoo.Pen access.
3 Follow a valid move: confirm MoveAnimal runs before DisplayPen and both use the same zoo reference.
4 Follow a boundary-blocked move: confirm DisplayPen still runs after the movement attempt.
5 After event wiring is complete, restart and click each zoo’s arrow before creating that zoo. Confirm the matching create-first message appears without an exception.
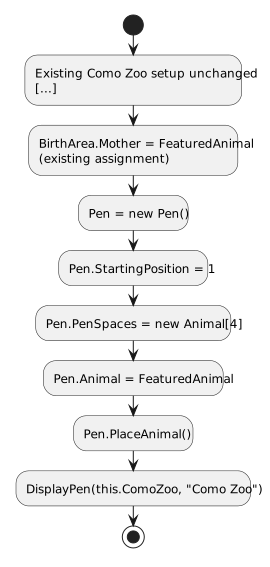
13.CreateComoZoo() — Initialize Como Zoo’s pen
A Implement CreateComoZoo in MainWindow.xaml.cs
1 Keep the existing setup in CreateComoZoo. Add the pen setup immediately after the BirthArea.Mother assignment.
2 Follow the activity diagram to create the pen, configure its starting position, and create its array.
3 Assign the zoo’s existing FeaturedAnimal to the pen as shown in the diagram; this shares the reference rather than creating another animal.
4 Finish with the placement and display calls in the order shown. Use this.ComoZoo and the exact name Como Zoo for the display call.
Existing Como Zoo setup is followed by pen allocation, reference assignment, placement, and automatic display.
CreateComoZoo activity
  • New
  • Changed
  • Removed
B Check Your Work
1 In MainWindow.xaml.cs, set a breakpoint on the closing brace of CreateComoZoo by clicking its left margin.
2 Press F5 to start or continue the application. Click New Como Zoo.
3 When Visual Studio pauses, open Debug > Windows > Watch > Watch 1. Enter each full expression below in a separate Watch row.
4 Confirm this.ComoZoo.Pen.PenSpaces.Length is 4.
5 Confirm this.ComoZoo.Pen.StartingPosition is 1.
6 Confirm this.ComoZoo.Pen.PenSpaces[0] is null.
7 Confirm this.ComoZoo.Pen.PenSpaces[2] is null.
8 Confirm this.ComoZoo.Pen.PenSpaces[3] is null.
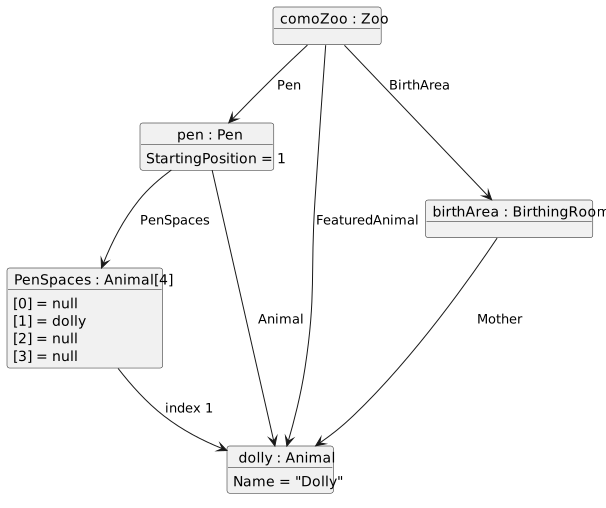
9 Expand this.ComoZoo.Pen.PenSpaces[1], this.ComoZoo.Pen.Animal and this.ComoZoo.FeaturedAnimal. Confirm all reach Dolly.
10 Continue. Confirm the matching zoo’s pen display reads - X - -.
11 After movement is wired, move this zoo’s animal and click its New Zoo button again. Confirm its map resets to - X - - while the other zoo’s map stays unchanged.
12 Press F5 to continue. Stop debugging and remove the breakpoint before the next check.
After Como Zoo creation, array index one, Pen.Animal, Zoo.FeaturedAnimal and BirthArea.Mother refer to Dolly; other array entries are null.
Initial array and shared animal references
  • New
  • Changed
  • Removed
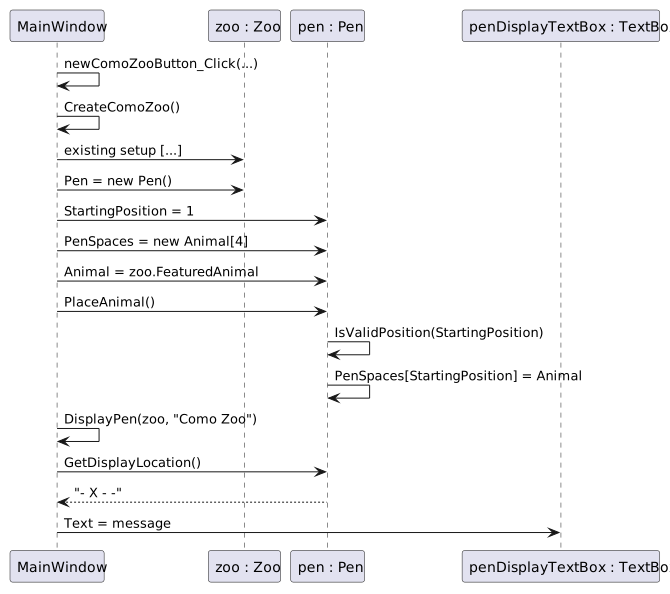
MainWindow creates the zoo and pen, places its existing featured animal at index one, and displays the pen map.
Creation and automatic map display
  • New
  • Changed
  • Removed
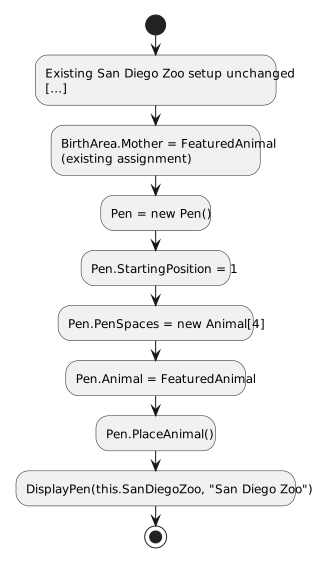
14.CreateSanDiegoZoo() — Initialize San Diego Zoo’s pen
A Implement CreateSanDiegoZoo in MainWindow.xaml.cs
1 Keep the existing setup in CreateSanDiegoZoo. Add the pen setup immediately after the BirthArea.Mother assignment.
2 Follow the activity diagram to create the pen, configure its starting position, and create its array.
3 Assign the zoo’s existing FeaturedAnimal to the pen as shown in the diagram; this shares the reference rather than creating another animal.
4 Finish with the placement and display calls in the order shown. Use this.SanDiegoZoo and the exact name San Diego Zoo for the display call.
Existing San Diego Zoo setup is followed by pen allocation, reference assignment, placement, and automatic display.
CreateSanDiegoZoo activity
  • New
  • Changed
  • Removed
B Check Your Work
1 In MainWindow.xaml.cs, set a breakpoint on the closing brace of CreateSanDiegoZoo by clicking its left margin.
2 Press F5 to start or continue the application. Click New San Diego Zoo.
3 When Visual Studio pauses, open Debug > Windows > Watch > Watch 1. Enter each full expression below in a separate Watch row.
4 Confirm this.SanDiegoZoo.Pen.PenSpaces.Length is 4.
5 Confirm this.SanDiegoZoo.Pen.StartingPosition is 1.
6 Confirm this.SanDiegoZoo.Pen.PenSpaces[0] is null.
7 Confirm this.SanDiegoZoo.Pen.PenSpaces[2] is null.
8 Confirm this.SanDiegoZoo.Pen.PenSpaces[3] is null.
9 Expand this.SanDiegoZoo.Pen.PenSpaces[1], this.SanDiegoZoo.Pen.Animal and this.SanDiegoZoo.FeaturedAnimal. Confirm all reach Patti.
10 Continue. Confirm the matching zoo’s pen display reads - X - -.
11 After movement is wired, move this zoo’s animal and click its New Zoo button again. Confirm its map resets to - X - - while the other zoo’s map stays unchanged.
12 Press F5 to continue. Stop debugging and remove the breakpoint before the next check.
Control Each Animal With Its Own Arrows
Acceptance Criteria
  • Left passes -1 and right passes 1.
  • Arrows used before zoo creation report which zoo must be created.
15.Connect the four arrow events
A Add the first complete handler inside MainWindow
First movement event handler
private void moveComoZooAnimalLeftButton_Click(object sender, RoutedEventArgs e)
{
    this.MoveAnimalInPen(this.ComoZoo, "Como Zoo", -1);
}
B Set up the other three handlers using the same pattern

Use the first handler’s signature pattern and the following exact names and arguments. Each handler body contains one call to MoveAnimalInPen.

Remaining movement handlers
Handler name Zoo argument zooName argument positionChange argument
moveComoZooAnimalRightButton_Click this.ComoZoo "Como Zoo" 1
moveSanDiegoZooAnimalLeftButton_Click this.SanDiegoZoo "San Diego Zoo" -1
moveSanDiegoZooAnimalRightButton_Click this.SanDiegoZoo "San Diego Zoo" 1

Keep all older event handlers unchanged.

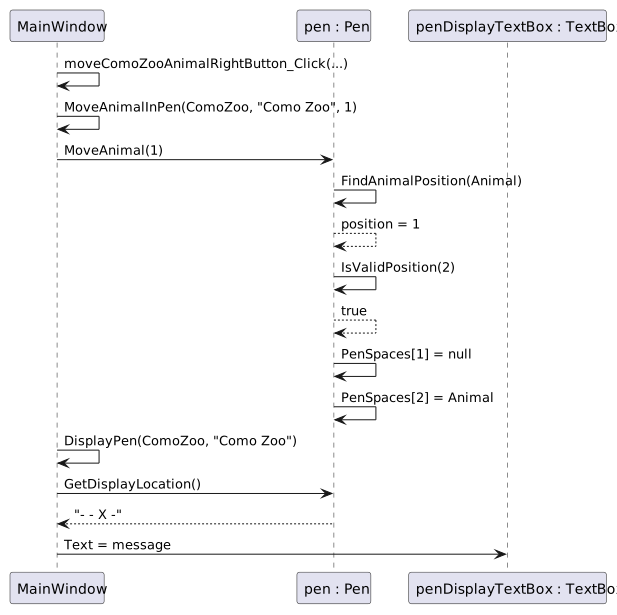
MainWindow receives the right-button click, moves the animal through Pen, and refreshes only the corresponding pen text box.
From arrow click to array update and display refresh
  • New
  • Changed
  • Removed
C Check Your Work
1 Compare each of the four arrow Click values in MainWindow.xaml with the handler table above. Confirm each has one method with exactly the same spelling and capitalization.
2 Create both zoos. Click Como’s right arrow once: confirm Como - - X - - becomes - - X -.
3 Click Como’s left arrow once: confirm Como returns to - X - -.
4 Click San Diego’s left arrow once: confirm San Diego becomes X - - -.
5 Click San Diego’s right arrow once: confirm San Diego returns to - X - -.
16.Check that both pens work together and inspect the loops
A Check Your Work
1 Select Build > Build Solution. Open View > Error List and resolve any errors introduced by this task.
2 Create both zoos. Click Como’s right arrow once. Confirm this.penDisplayTextBox.Text is - - X - and this.sanDiegoPenDisplayTextBox.Text is - X - -.
3 Click San Diego’s left arrow once. Confirm its display becomes X - - - while Como stays - - X -.
4 Recreate both zoos. Feed each animal once and confirm its success message. Refill each machine and confirm its bag-count message.
5 Recreate both zoos. Give birth once in each zoo. Confirm the birth succeeds but the newborn is not added to Pen.PenSpaces in this checkpoint.
6 Recreate San Diego Zoo. Click temperature increase then decrease; confirm 77.5 then 77.0.
B Set a breakpoint inside GetDisplayLocation and inspect position and PenSpaces in Autos and Watch while stepping through the loop
1 Before the loop begins, inspect position and confirm its starting value is 0.
2 Inspect position < PenSpaces.Length and determine whether the loop body will run.
3 Step through the statements inside the loop and watch position increase when position++ runs.
4 Watch the loop use index 3, the last valid index. Then confirm the loop ends when position becomes 4.

Use Watch if an expression is not currently shown in Autos.

C In a temporary edit, change the GetDisplayLocation loop condition to <=, observe the invalid index, and restore < before submission
D Check Your Work
1 Remove temporary source edits used for testing and save all files.
2 Read CreateComoZoo and confirm this.ComoZoo.Pen.PenSpaces is allocated with four entries and this.ComoZoo.Pen.StartingPosition is 1.
3 Read CreateSanDiegoZoo and confirm the equivalent San Diego array has four entries and starting position 1.
4 Select Build > Build Solution. Open View > Error List and resolve any errors introduced by this task.
17.Step into the pen methods and watch the values change

Follow a right-arrow click through the methods it calls. Use Step Into (F11) to enter a method and Step Over (F10) when you want to run a statement without entering its method calls. Watch shows values at the currently highlighted statement, before that statement runs.

A Pause inside the Como Zoo right-arrow handler
1 In MainWindow.xaml.cs, set a breakpoint on the MoveAnimalInPen call inside moveComoZooAnimalRightButton_Click.
2 Start debugging and create both zoos. Each pen should show - X - -.
3 Click Como Zoo’s right arrow to reach the breakpoint.
B Open Debug > Windows > Watch > Watch 1 and add these expressions
Watch in the button handler
Expression Expected value
this.ComoZoo.Pen.PenSpaces Length 4; index 1 contains Dolly and the other positions are null
this.ComoZoo.Pen.Animal.Name "Dolly"
zoo.Name Unavailable in the button handler; becomes "Como Zoo" inside MoveAnimalInPen
positionChange Unavailable in the button handler; becomes 1 inside MoveAnimalInPen
C Press F11 to enter MoveAnimalInPen
1 In Watch, observe zoo.Name and positionChange become available after entering MoveAnimalInPen. Confirm their values are "Como Zoo" and 1.
2 Step through the null check until the call to zoo.Pen.MoveAnimal(positionChange) is highlighted.
3 Press F11 on that call to enter Pen.MoveAnimal.
D In Watch, add this.PenSpaces, this.Animal.Name, and positionChange
1 Confirm the array still has Dolly at index 1, this.Animal.Name is "Dolly", and positionChange is 1.
E When FindAnimalPosition(this.Animal) is highlighted, press F11 to enter the search method
1 Add animal.Name, foundPosition, and position to Watch. Step to the foundPosition assignment, then execute it and confirm foundPosition becomes -1. A local may be unavailable until its declaration runs.
2 Step through the null check and loop initialization. Confirm position becomes 0 and inspect this.PenSpaces[position], which is null.
3 Continue stepping through the comparison and loop update. Confirm position changes to 1, where this.PenSpaces[position] refers to Dolly.
4 Execute the matching assignment and confirm foundPosition changes from -1 to 1. Follow break to the return statement.
5 Execute the return and continue until the position assignment in MoveAnimal has completed. Confirm its local position now contains the returned value 1.
F Step through the destination calculation and its validation
1 Add newPosition to Watch. Execute its assignment and confirm its value becomes 2 while position remains 1.
2 Use F11 to enter IsValidPosition(newPosition) when the condition is evaluated. In that method, inspect position and this.PenSpaces.Length; their values are 2 and 4.
3 Follow the return to MoveAnimal. The valid destination allows execution to enter the if statement.
G Step through the two assignments that move the animal
1 Execute the first assignment. Expand this.PenSpaces in Watch and confirm index 1 becomes null while this.Animal.Name remains "Dolly".
2 Execute the next assignment. Confirm index 2 now contains Dolly and index 1 remains null.
H Continue back to MoveAnimalInPen and use F11 to enter DisplayPen(zoo, zooName)
1 Add message to Watch in DisplayPen. Step Over the GetDisplayLocation call and confirm message becomes "- - X -".
2 Add this.penDisplayTextBox.Text to Watch. Step through the zoo comparison and the Text assignment; confirm the Text value changes to "- - X -".
I Check Your Work
1 Review the paused search from the preceding walkthrough. Confirm the search result begins at -1 and becomes 1 when it finds Dolly.
2 Confirm the right-move destination is 2. After the assignments, inspect this.ComoZoo.Pen.PenSpaces[1] as null and this.ComoZoo.Pen.PenSpaces[2].Name as Dolly.
3 Remove the breakpoint and press F5. Confirm Como’s map is - - X - and San Diego’s map remains - X - -.
4 Click New Como Zoo. Confirm Como resets to - X - -.
18.Submit Zoo 2.2
A Save your solution, confirm the approved method and field names, and submit the completed Zoo 2.2 project using your course’s submission procedure