2.1 Zoo Learning Activity

Zoo 2.1 — Decisions, Results, and Repetition
1.Download the starting code
A Download the 2.1 Zoo starting zip file
B Extract the contents of the zip file to a Zoo OneDrive folder
C Rename the "Zoo 2.1 LastName" folder, replacing LastName with your last name
D Within the folder renamed in the previous step, rename the file "Zoo 2.1 LastName.sln" file, replacing LastName with your last name
E Right click the Solution and select 'Restore NuGet Packages'
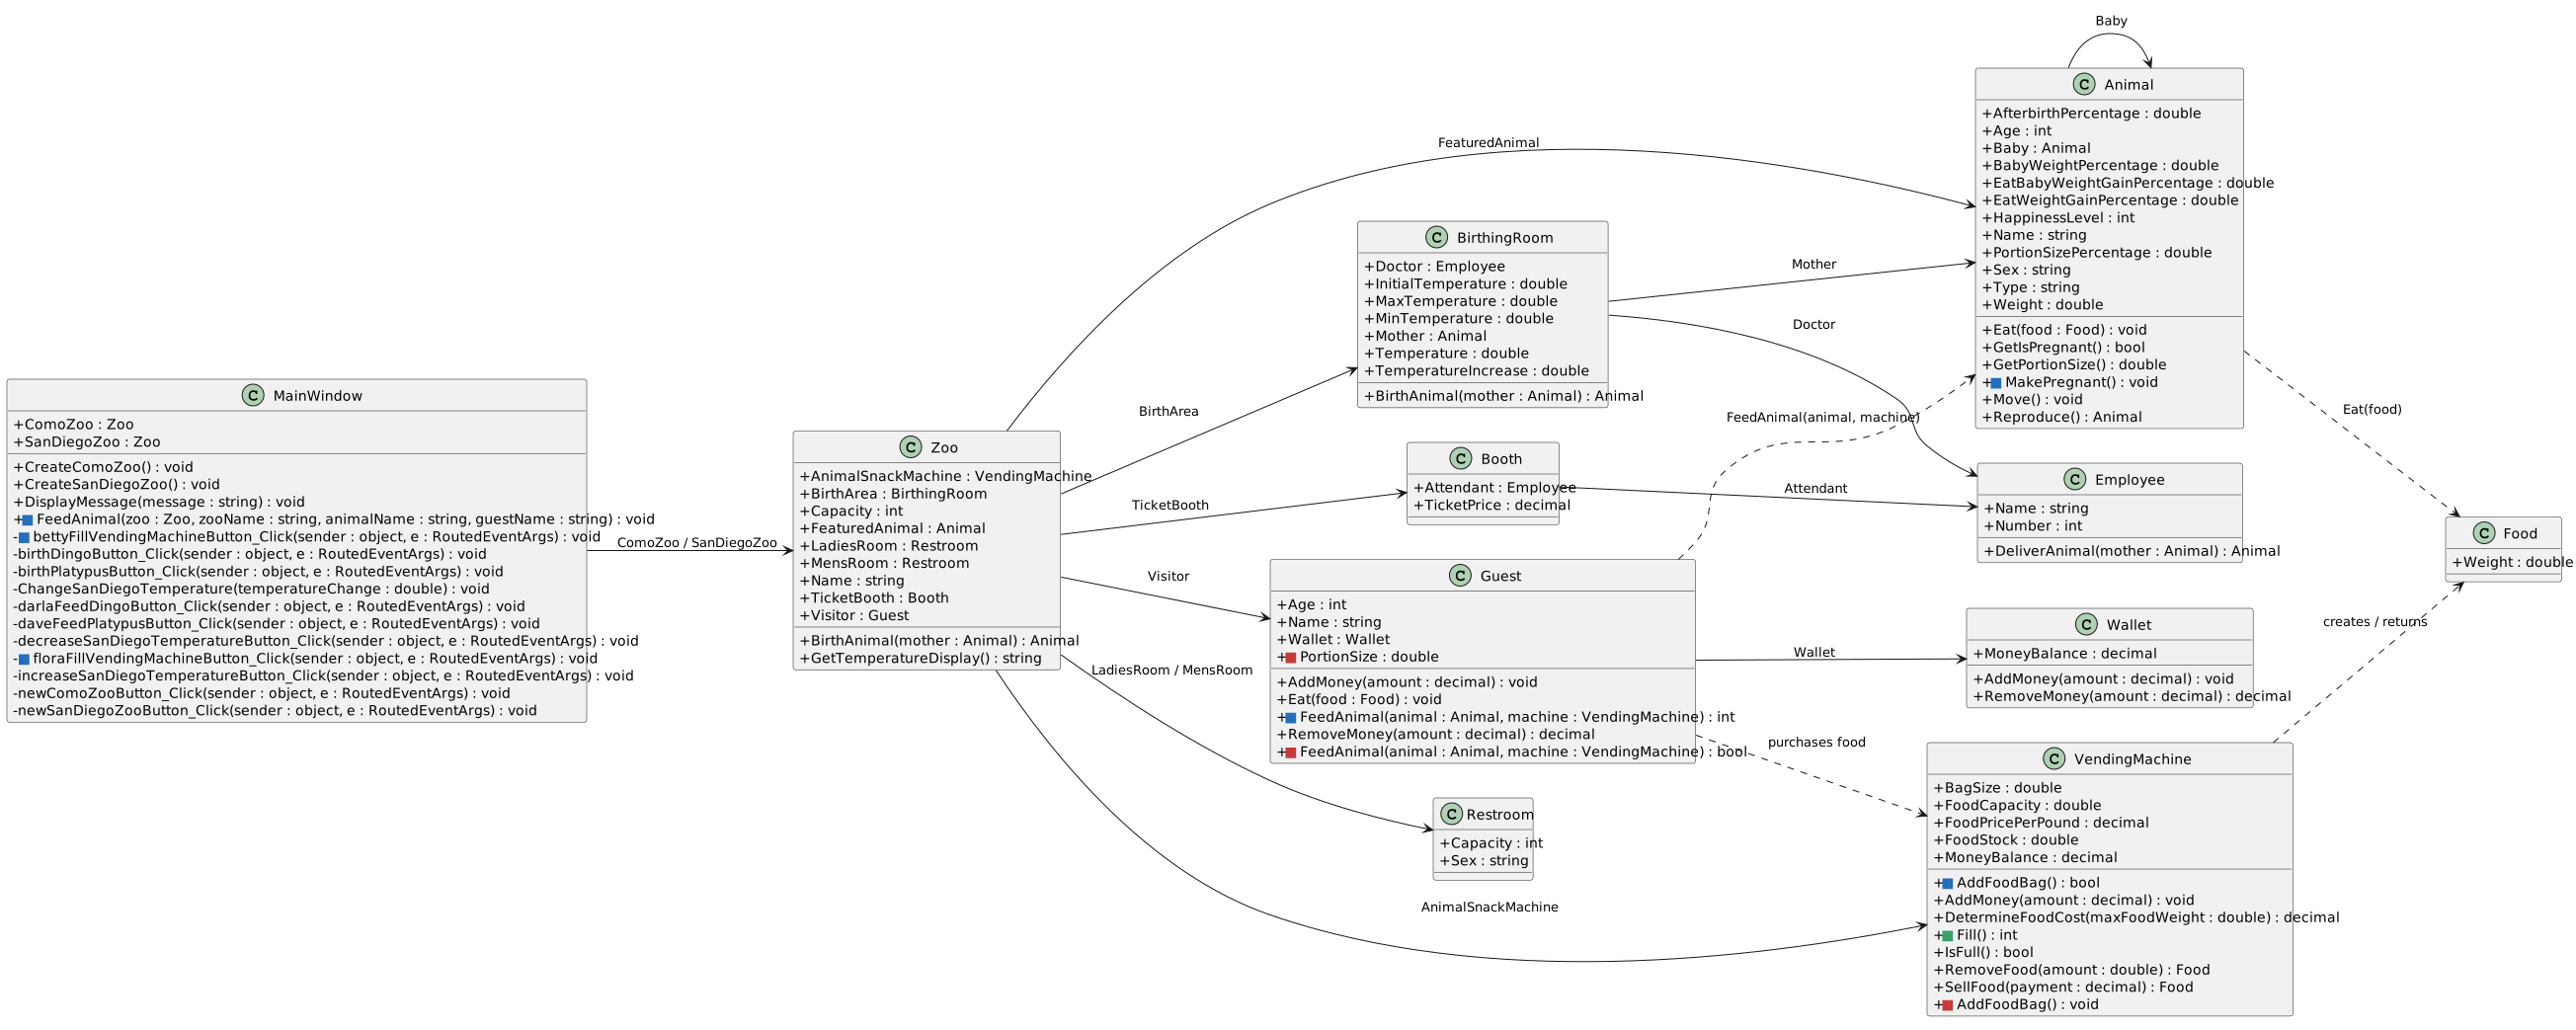
Zoo 2.1 starting structure from the latest supplied project.
Starting structure — supplied Zoo 2.1 LastName
  • New
  • Changed
  • Removed
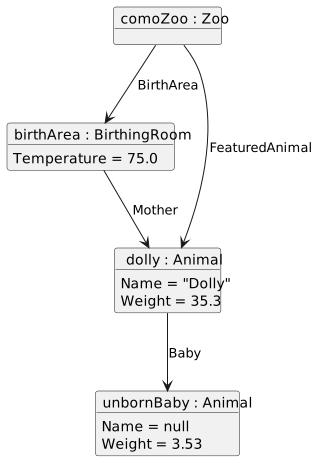
Before birth, Como Zoo and its birthing room reference the same Dolly; Dolly references her unborn Baby. No separate newborn field exists in Zoo.
Starting references — Dolly and her unborn baby
  • New
  • Changed
  • Removed
Explain Why an Animal Could Not Be Fed
Acceptance Criteria
  • I can feed either zoo’s animal when money and stock are available.
  • I receive a specific message for missing objects, invalid prices, insufficient funds, or insufficient stock.
  • An unsuccessful feeding leaves the animal unfed and does not keep my payment.
2.Review the Existing Food Purchase Checks
A Inspect VendingMachine.cs

The starting project already checks payment, price, and available stock in SellFood and RemoveFood. Keep these methods unchanged. the FeedAnimal(...) method in Guest.cs will use their returned Food reference while reporting more specific results.

1 Trace the existing methods in this order:
  • SellFood checks that payment and FoodPricePerPound are positive before dividing.
  • It checks the purchased weight against FoodStock before calling RemoveFood.
  • RemoveFood returns null for an invalid amount; for a valid amount, it subtracts stock and returns a Food object.
  • SellFood adds payment after removing the food and returns that Food reference.
B Check Your Work
1 Open VendingMachine.SellFood in the source. Follow its statements from top to bottom using the sample values below; this is a paper/source trace, so do not run or edit the application for this check.
2 For the Como machine, start this.FoodStock at 12.0, this.MoneyBalance at 0.00m and this.FoodPricePerPound at 0.75m.
3 Trace payment 0.75m. Confirm returned food.Weight is approximately 1.0, stock becomes 11.0 and money becomes 0.75m.
4 Reset the trace values. Use payment 0.00m. Confirm the returned reference is null and neither stock nor money changes.
5 Reset again. Use price 0.00m with positive payment. Confirm null is returned without division.
6 Reset again. Request more food than stock permits. Confirm null is returned and no stock or money is changed.
3.Return a Result From the Guest
Problem

A bool only distinguishes success from failure. The window needs to know which condition prevented feeding.

Solution

Change the FeedAnimal(...) method in Guest.cs to return int. Each early return ends the method before an unsafe action. Reserve 0 for success.

A Update Guest.cs
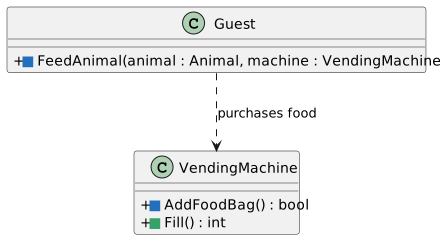
Focused signature changes. Guest.FeedAnimal returns int; VendingMachine.AddFoodBag returns bool; new VendingMachine.Fill returns int.
Method return types for feeding and refilling
  • New
  • Changed
  • Removed
1 In Guest.cs, change FeedAnimal(Animal animal, VendingMachine machine) from bool to int. Replace its existing method body using the following steps.
  • Remove the wasFed local and its final return.
  • Replace the combined outer and inner conditions with the ordered checks below.
  • Keep the existing parameters. Use 0 only when feeding completes.
Feeding result contract
Result Meaning
0 Success
1 Missing animal
2 Missing machine
3 Missing wallet
4 Invalid food price
5 Invalid food cost
6 Insufficient funds or incomplete payment
7 Invalid dispensed weight
8 Insufficient food stock
9 No Food returned; payment refunded

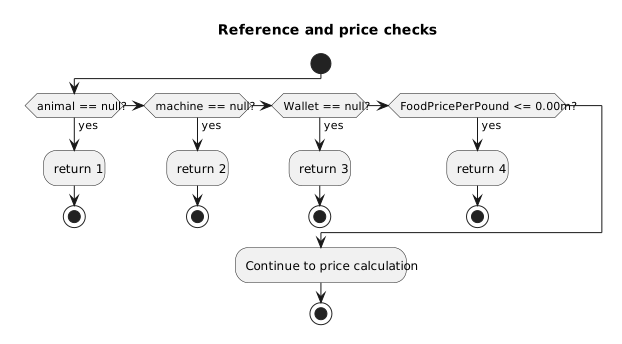
The following four activity diagrams show consecutive sections of the same FeedAnimal(...) method in Guest.cs. Continue to the next section only when its preceding checks pass. A return ends the method immediately; a continuation label only marks where the next diagram begins.

Beginning of FeedAnimal. Missing references return 1 through 3; invalid unit price returns 4. Passing all checks continues in the next diagram.
Reference and price checks
  • New
  • Changed
  • Removed
2 At the beginning of the FeedAnimal(...) method in Guest.cs, use if / else if checks in this order:
  • animal == null returns 1.
  • machine == null returns 2.
  • this.Wallet == null returns 3.
  • machine.FoodPricePerPound <= 0.00m returns 4.

This order prevents reading a member through a null reference.

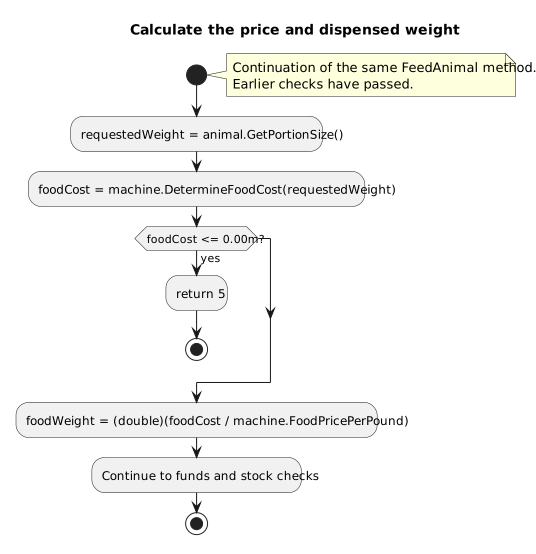
Continues after reference and unit-price checks. Invalid food cost returns 5. Passing this check calculates foodWeight for the next section.
Calculate the price and dispensed weight
  • New
  • Changed
  • Removed
3 After those checks, calculate the cost and weight in this order:
  • Define double requestedWeight and assign animal.GetPortionSize().
  • Define decimal foodCost and assign machine.DetermineFoodCost(requestedWeight).
  • Return 5 if foodCost <= 0.00m.
  • Define double foodWeight using the rounded price as shown below.
double foodWeight = (double)(foodCost / machine.FoodPricePerPound);

Check the actual dispensed weight because rounding the cost can make it differ from the animal’s requested portion.

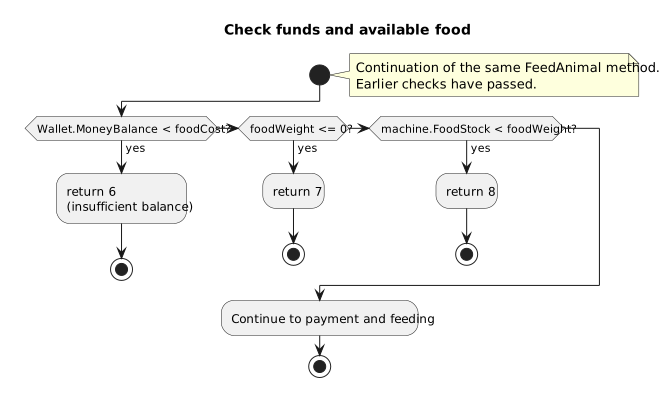
Continues after foodWeight is calculated. Insufficient funds returns 6, invalid weight returns 7, insufficient stock returns 8. Otherwise continue to payment.
Check funds and available food
  • New
  • Changed
  • Removed
4 Next use if / else if checks in this order:
  • this.Wallet.MoneyBalance < foodCost returns 6.
  • foodWeight <= 0 returns 7.
  • machine.FoodStock < foodWeight returns 8.

These checks happen before removing money.

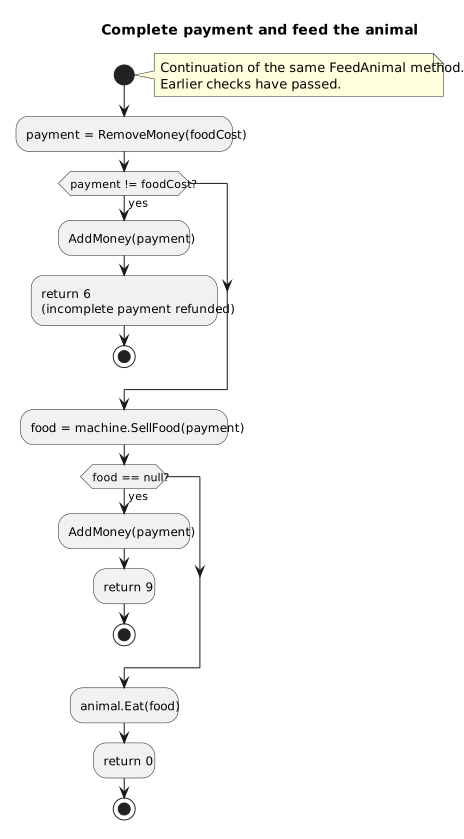
Continues after funds and stock checks. Incomplete payment is refunded and returns 6; missing food is refunded and returns 9; successful feeding returns 0.
Complete payment and feed the animal
  • New
  • Changed
  • Removed

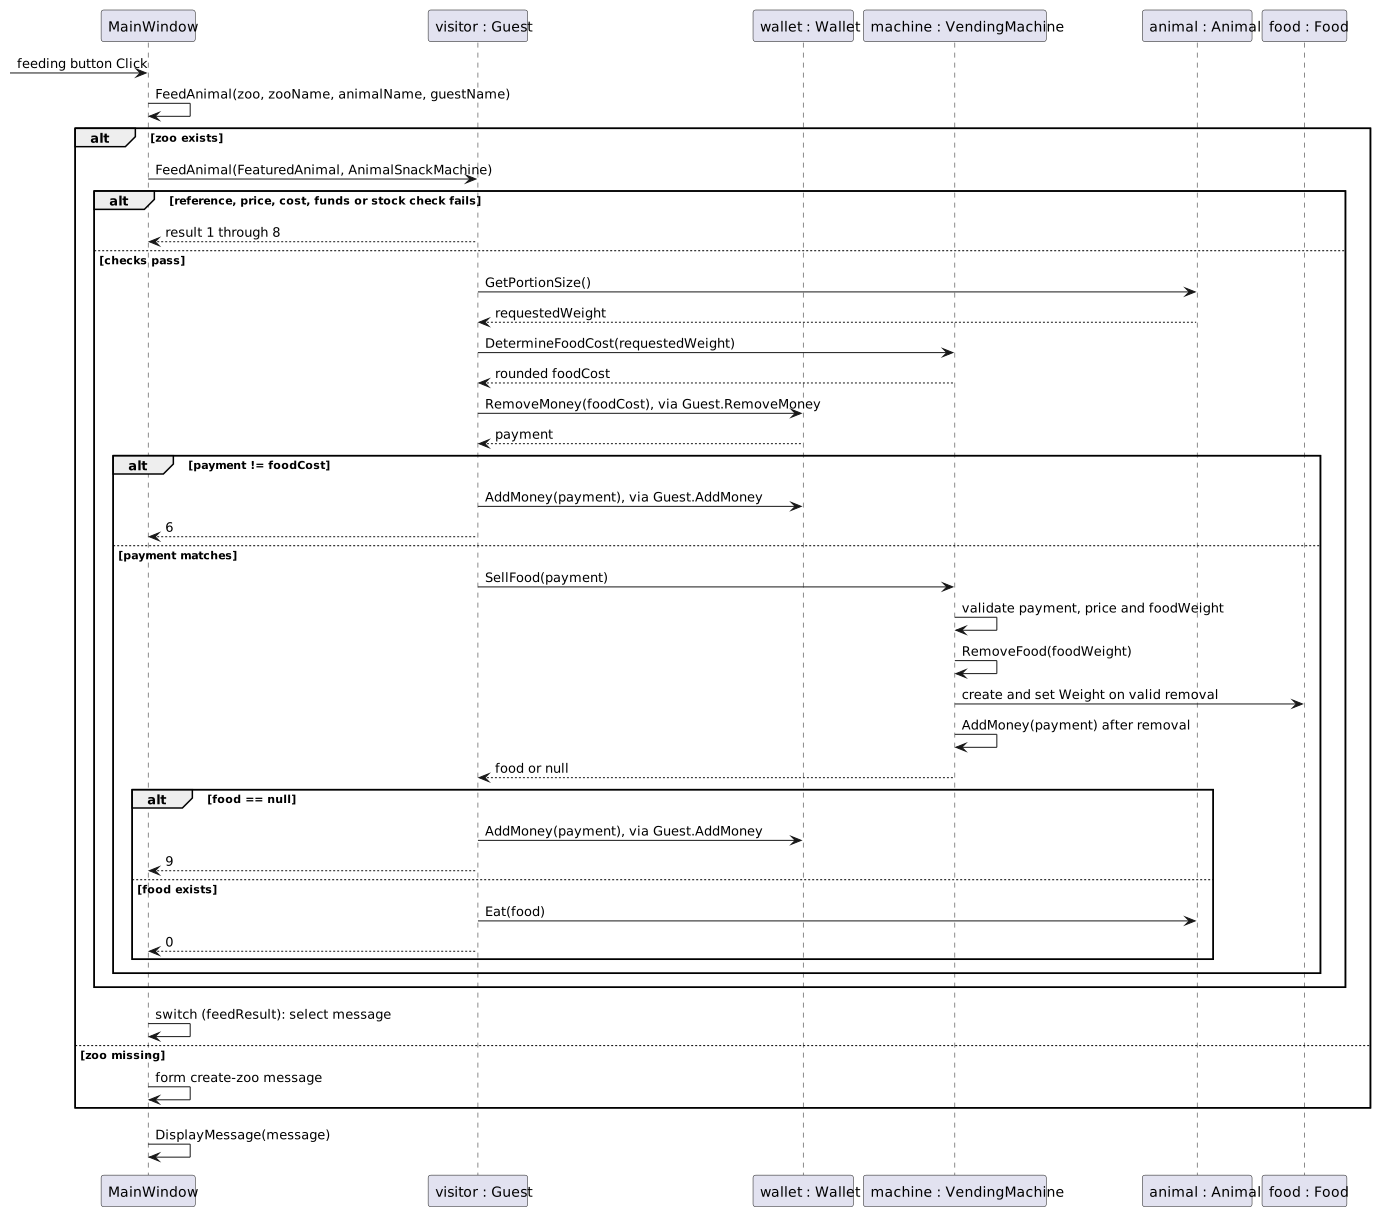
Result 6 has two paths: the earlier balance check detects insufficient funds before payment; the payment check detects an incomplete payment and refunds the amount removed. Both report the same unsuccessful-payment result.

5 After the checks, complete the purchase in this order:
  • Assign this.RemoveMoney(foodCost) to decimal payment.
  • If payment != foodCost, refund payment with this.AddMoney(payment) and return 6.
  • Assign machine.SellFood(payment) to Food food.
  • If food == null, refund payment and return 9.
  • Call animal.Eat(food), then return 0.

Use the payment-and-feeding activity diagram to place these checks after the stock check. A refund must happen before its return. The final call to Eat runs only after food is confirmed to exist.

4.First Display Success or an Error Code
Problem

the FeedAnimal(...) method in Guest.cs now returns an integer instead of a bool. Before selecting a separate message for each error, use that integer to distinguish a successful feeding from an unsuccessful feeding.

Solution

Store the returned result in feedResult. Display the success message when it is 0. Otherwise, display a general failure message followed by the error code.

A Update the FeedAnimal(...) method in MainWindow.xaml.cs
1 In MainWindow.xaml.cs, update the existing public void FeedAnimal(Zoo zoo, string zooName, string animalName, string guestName) method using the intermediate diagrams and steps below. Keep the two feeding button handlers calling this method with their existing arguments.

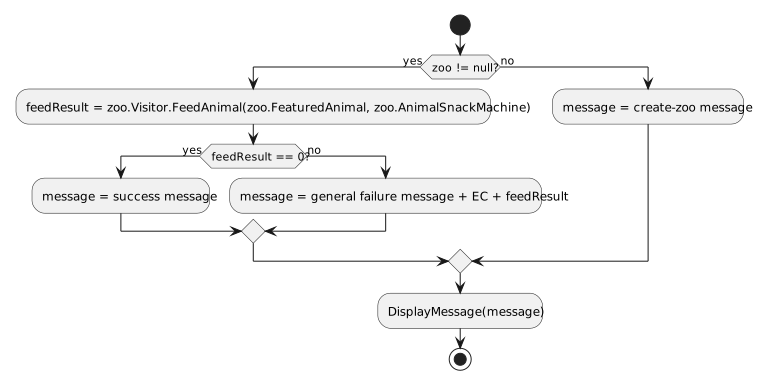
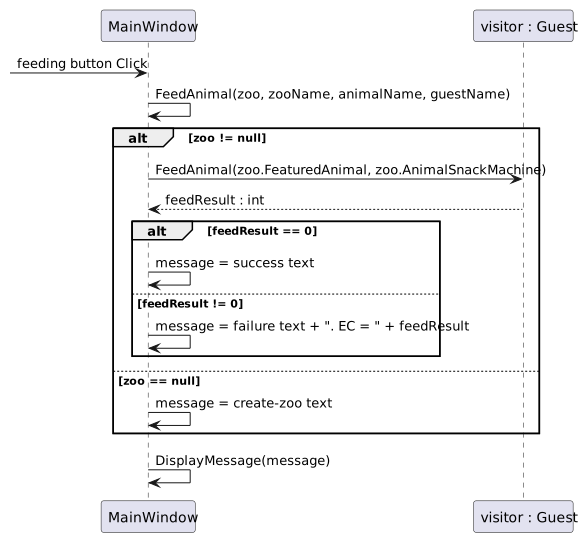
Use the intermediate activity and sequence diagrams to update the existing method. Keep the signature and the outer zoo check. Inside its valid-zoo branch:

  • Assign the visitor’s returned result to an int local named feedResult.
  • If feedResult == 0, assign the existing success message to message.
  • Otherwise, assign the general failure message shown below, ending with the result code.
message = guestName + " was unable to feed " + animalName
    + " at " + zoo.Name + ". EC = " + feedResult;

Keep the existing create-zoo message in the outer else, and call DisplayMessage once after the outer if / else.

The outer check handles a zoo that has not been created. The inner check interprets the result returned by the visitor. EC labels the error code; use the result table above to identify its meaning. DisplayMessage remains after the checks so every path displays its selected message.

Intermediate MainWindow feeding checks: a missing zoo selects the create-zoo message; otherwise result zero selects success and any other result displays EC.
Intermediate if / else message selection
  • New
  • Changed
  • Removed
Intermediate feeding display. MainWindow receives an integer result from Guest, displays success for zero and a general message with the error code otherwise.
Intermediate window behavior — success or an error code
  • New
  • Changed
  • Removed
B Check Your Work
1 Click New Como Zoo to reset that zoo. Do not feed, refill, move or give birth before this test.
2 Click Darla, feed dingo. Confirm Darla fed Dolly at Como Zoo. and, at the handler’s switch, feedResult equal to 0.
3 Click New Como Zoo to reset that zoo. Do not feed, refill, move or give birth before this test.
4 Pause before feeding, set this.ComoZoo.Visitor.Wallet.MoneyBalance to 0.00m in Watch and continue. Feed Dolly. Confirm Darla was unable to feed Dolly at Como Zoo. EC = 6.
5 Inspect the machine and animal before and after: this.ComoZoo.AnimalSnackMachine.FoodStock, this.ComoZoo.AnimalSnackMachine.MoneyBalance and this.ComoZoo.FeaturedAnimal.Weight must stay unchanged.
6 Click New San Diego Zoo to reset that zoo. Do not feed, refill, move or give birth before this test.
7 Pause before feeding and set this.SanDiegoZoo.AnimalSnackMachine.FoodStock to 0.0. Feed Patti and confirm Dave was unable to feed Patti at San Diego Zoo. EC = 8.
8 Confirm this.SanDiegoZoo.Visitor.Wallet.MoneyBalance remains 3.75m.
9 Restart the application and click a feeding button before creating its zoo. Confirm the create-first message appears. Recreate both zoos to clear the test values.
5.Select the Window Message With switch
A Update MainWindow.xaml.cs
1 In the FeedAnimal(...) method in MainWindow.xaml.cs, keep the outer zoo != null check, the int feedResult assignment, and the create-zoo else message from the intermediate version. Replace only the inner if (feedResult == 0) / else message selection with a switch guided by the diagram and message table below. This replaces the general EC message with a specific explanation for each result and completes this section’s final behavior.

Follow the switch activity diagram and the result table. Each case assigns message and ends with break. Use this case as the pattern, then write the remaining cases yourself:

case 0:
    message = guestName + " fed " + animalName + " at " + zoo.Name + ".";
    break;

Use these exact message expressions so each result gives the intended feedback:

Message expressions by result
Result Assign to message
0 guestName + " fed " + animalName + " at " + zoo.Name + "."
1 "No animal is available to feed."
2 "The animal food vending machine is unavailable."
3 guestName + " does not have a wallet."
4 "The vending machine's food price is invalid."
5 "The animal's food portion has no valid price."
6 guestName + " does not have enough money to feed " + animalName + "."
7 "The requested food weight is invalid."
8 "The vending machine does not have enough food in stock."
9 "Food could not be dispensed
default "An unexpected error occurred while feeding the animal."
2 Keep DisplayMessage(message) after the outer if/else. Keep darlaFeedDingoButton_Click and daveFeedPlatypusButton_Click calling this window helper with their existing arguments. Do not duplicate the purchase sequence in those handlers.
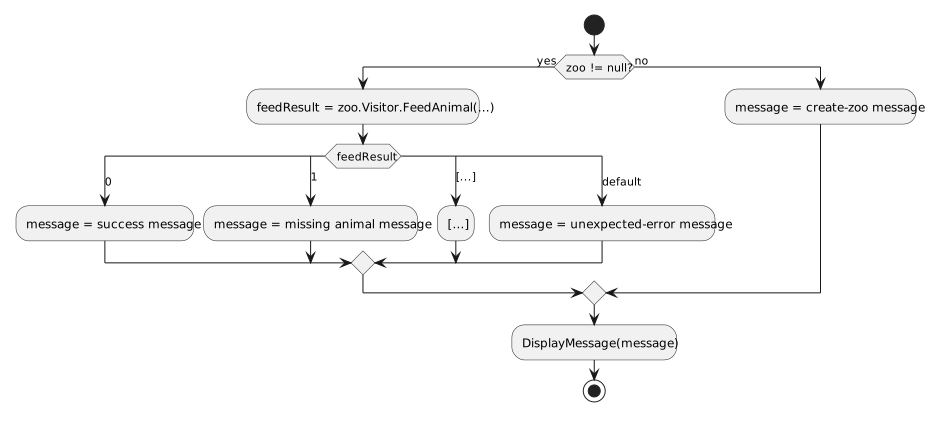
Compact window feeding switch showing cases 0 and 1, an ellipsis for cases 2 through 9, and default. All branches select a message and then call DisplayMessage.
Final switch cases and message selection
  • New
  • Changed
  • Removed

The diagram shows the first two cases and default. The single [...] branch abbreviates cases 2 through 9; keep all of those cases in your code.

MainWindow delegates feeding to Guest. Guest returns an integer result and refunds an unsuccessful payment; the window selects the message with switch.
Feeding calls, returned results, and refund paths
  • New
  • Changed
  • Removed
B Check Your Work
1 Click New Como Zoo to reset that zoo. Do not feed, refill, move or give birth before this test.
2 Feed Dolly once. Confirm Darla fed Dolly at Como Zoo., payment 0.53m and this.ComoZoo.Visitor.Wallet.MoneyBalance equal to 4.72m.
3 Confirm this.ComoZoo.AnimalSnackMachine.FoodStock decreases from 12.0 by approximately 0.53 / 0.75 pounds.
4 Click New San Diego Zoo to reset that zoo. Do not feed, refill, move or give birth before this test.
5 Feed Patti once. Confirm Dave fed Patti at San Diego Zoo., payment 0.08m and this.SanDiegoZoo.Visitor.Wallet.MoneyBalance equal to 3.67m.
6 For each failure below, recreate Como Zoo, pause before Guest.FeedAnimal runs, change only the named Watch value, then continue and inspect the result.
7 Set this.ComoZoo.FeaturedAnimal to null: expect result 1.
8 Set this.ComoZoo.AnimalSnackMachine to null: expect result 2.
9 Set this.ComoZoo.Visitor.Wallet to null: expect result 3.
10 Set this.ComoZoo.AnimalSnackMachine.FoodPricePerPound to 0.00m: expect result 4 without division or payment.
11 Set this.ComoZoo.FeaturedAnimal.Weight to 0.0: expect result 5.
12 Set this.ComoZoo.Visitor.Wallet.MoneyBalance to 0.00m: expect result 6 with no stock or animal-weight change.
13 Set this.ComoZoo.AnimalSnackMachine.FoodStock to 0.0: expect result 8 and no payment removed.
14 Read the branches for results 7 and 9 in Guest.FeedAnimal. Identify the refund call and confirm it restores money already removed when food is not returned.
15 To simulate a failed food return, pause just after SellFood returns and set local food to null. Step through the refund call and confirm the wallet receives the removed payment.
16 Remove test breakpoints and recreate both zoos before continuing.
Refill With Whole Food Bags
Acceptance Criteria
  • One fill click adds every whole bag that fits.
  • Refilling stops when full or when the next whole bag would exceed capacity.
  • I see how many whole bags were added: seven for a fresh Como machine and ten for a fresh San Diego machine.
6.Count Whole Bags Added With a while Loop
A Update VendingMachine.cs

The starting project already sets the machine sizes. Keep these assignments in both zoo creation methods:

Starting machine settings
Zoo FoodStock BagSize FoodCapacity
Como Zoo 12.0 5.0 50.0
San Diego Zoo 17.0 4.0 60.0
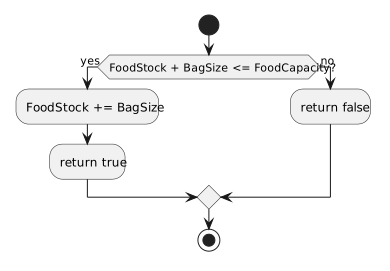
1 Change AddFoodBag() from void to bool and implement the behavior shown in the activity diagram:
  • If FoodStock + BagSize <= FoodCapacity, add BagSize to FoodStock and return true.
  • Otherwise, return false without changing FoodStock.

Use the AddFoodBag activity diagram to implement the two branches. The class diagram below shows the changed return type.

AddFoodBag returns true and changes stock only when the whole bag fits; otherwise it returns false.
Adding a whole bag with if / else
  • New
  • Changed
  • Removed
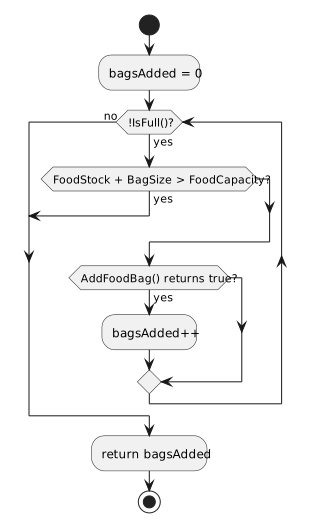
2 Add public int Fill() to VendingMachine.cs. Build its body in this order:
  • Declare int bagsAdded = 0 before the loop. This local counts successful additions during this call.
  • Repeat while !this.IsFull().
  • Before adding a bag, break if FoodStock + BagSize > FoodCapacity.
  • Use if (this.AddFoodBag()) and increment bagsAdded inside that check.
  • After the loop, return bagsAdded.

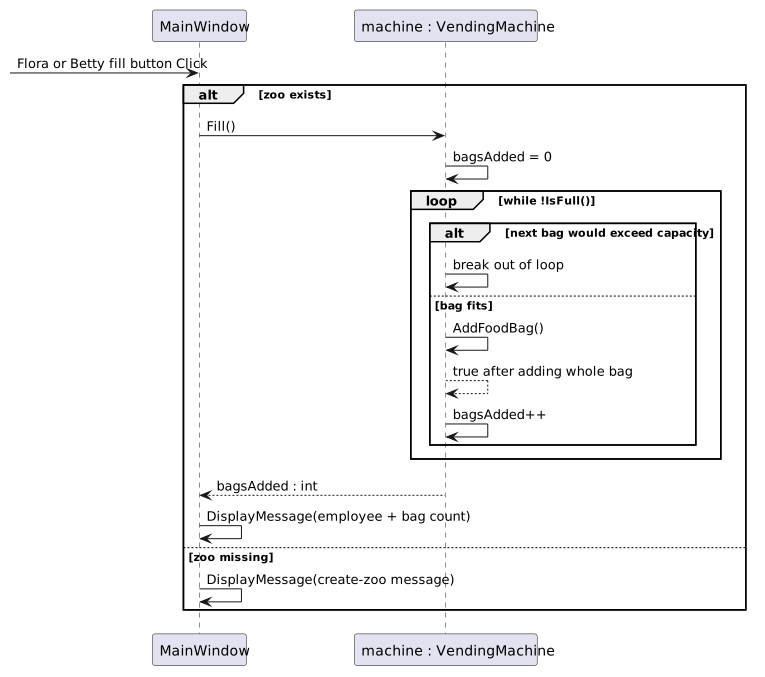
Use the Fill activity diagram for statement order and loop exits. Use the sequence diagram to trace the returned count back to the window. Write the method from the diagram and the steps above.

The returned bool from AddFoodBag is the condition of the if statement. bagsAdded++ increases the count by one only after a bag was added. break leaves the loop and execution continues at return bagsAdded. IsFull stays unchanged. Keep the supplied positive BagSize values so successful iterations make progress.

3 In MainWindow.xaml.cs, update the two fill handlers while keeping their create-zoo checks:
  • In floraFillVendingMachineButton_Click, replace the final AddFoodBag call with int bagsAdded = this.ComoZoo.AnimalSnackMachine.Fill();.
  • Immediately afterward, display Flora’s message using bagsAdded.
  • In bettyFillVendingMachineButton_Click, do the same for this.SanDiegoZoo and Betty’s message.

In the Como handler, after the create-zoo check:

In the Como handler, store the returned int in bagsAdded, then call DisplayMessage with this exact expression:

"Flora filled the vending machine by adding " + bagsAdded + " bag(s) of food."

In the San Diego handler, after the create-zoo check:

Repeat the same pattern in the San Diego handler, using this exact message expression:

"Betty filled the vending machine by adding " + bagsAdded + " bag(s) of food."

MainWindow calls Fill, receives the bag count and displays Flora or Betty’s message.
Fill calls and returned bag count
  • New
  • Changed
  • Removed
Fill counts successfully added bags and returns the count after the loop.
Whole-bag loop, count, and early exit
  • New
  • Changed
  • Removed
B Check Your Work
1 Click New Como Zoo to reset that zoo. Do not feed, refill, move or give birth before this test.
2 Click the Como fill button once. Confirm this.ComoZoo.AnimalSnackMachine.FoodStock changes from 12.0 to 47.0 and the message is Flora filled the vending machine by adding 7 bag(s) of food..
3 Click New San Diego Zoo to reset that zoo. Do not feed, refill, move or give birth before this test.
4 Click the San Diego fill button once. Confirm this.SanDiegoZoo.AnimalSnackMachine.FoodStock changes from 17.0 to 57.0 and the message is Betty filled the vending machine by adding 10 bag(s) of food..
5 Click each fill button again. Confirm stock stays at 47.0 and 57.0 respectively and each message reports 0 bags.
6 In a separate paused Como test, set this.ComoZoo.AnimalSnackMachine.FoodStock to 40.0. Step through Fill(): confirm two bags reach 50.0 exactly.
7 Start a separate trace at stock 50.0. Confirm IsFull() is true, the loop body is skipped and Fill() returns 0.
8 Trace AddFoodBag() with Como stock 47.0. A five-pound bag would produce 52.0, so confirm false is returned and stock stays 47.0.
9 Recreate both zoos after the experiments.
Create a Baby for a Supported Animal Type
7.Use switch in MakePregnant
A Update Animal.cs
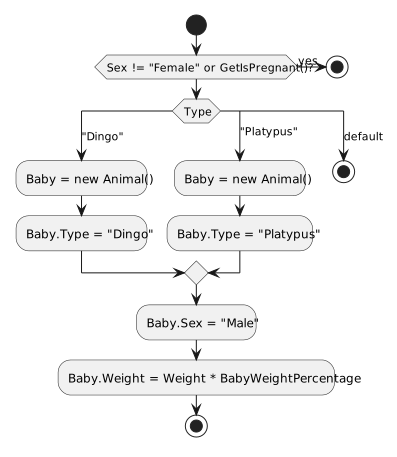
1 In the MakePregnant() method in Animal.cs, keep the existing early return and replace the single baby creation with a switch on Type:
  • Keep the return when Sex != "Female" or GetIsPregnant() is true.
  • For "Dingo", create a new Animal and assign Baby.Type = "Dingo"; end the case with break.
  • For "Platypus", create a new Animal and assign Baby.Type = "Platypus"; end the case with break.
  • In default, return without creating a baby.
  • After the switch, keep the shared Baby.Sex and Baby.Weight assignments.

Use the MakePregnant activity diagram to implement the cases. Both supported cases create an Animal, set its Type, and end with break. The default branch returns before the shared Sex and Weight assignments.

Keep Reproduce unchanged. The baby is still an Animal; the selected case assigns its Type, and the existing birth handler assigns its Name after birth.

MakePregnant returns early for a male or pregnant animal and creates a baby only for Dingo or Platypus.
Pregnancy guard and type selection
  • New
  • Changed
  • Removed
8.Verify the Existing Birth Workflow
A Review the unchanged birth methods
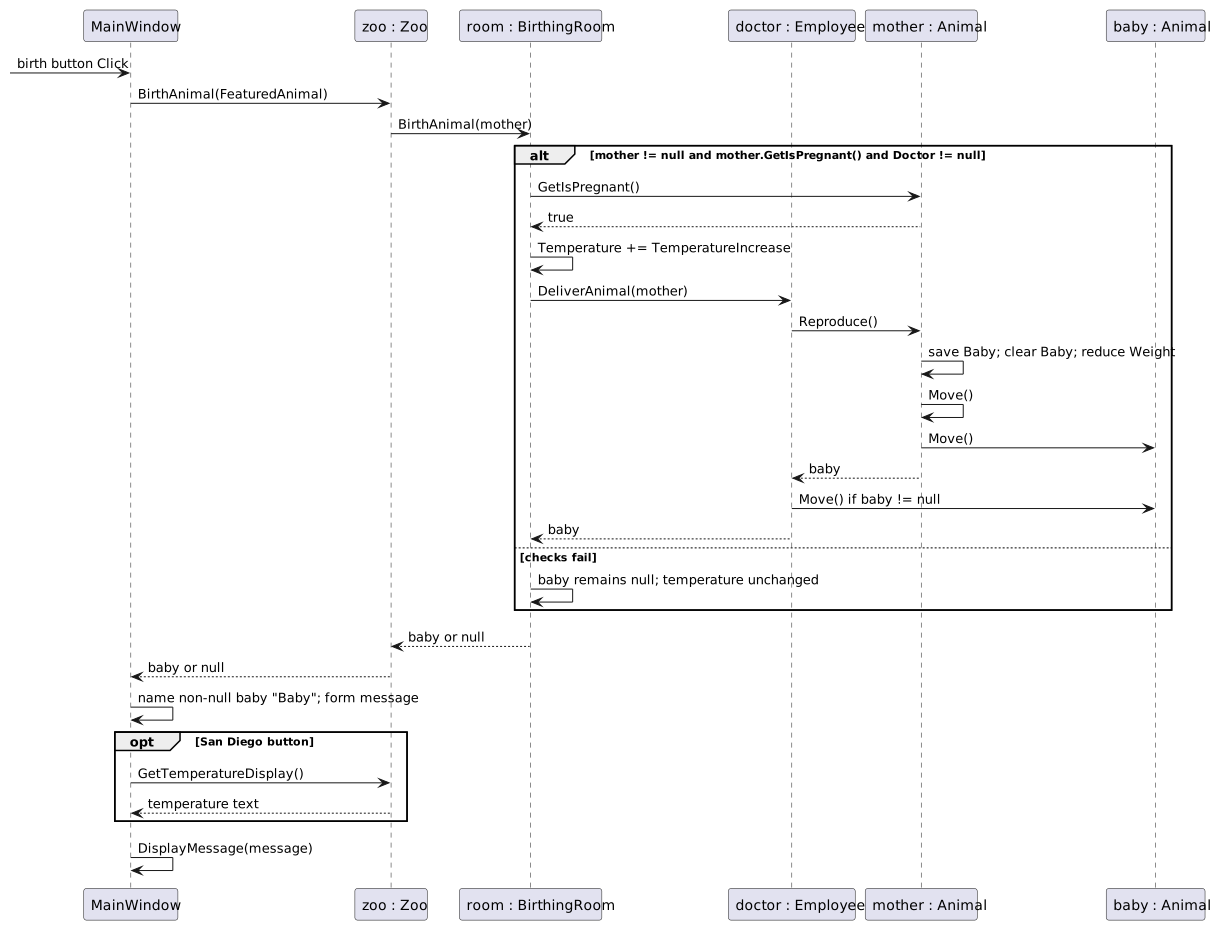
1 Keep the existing the BirthAnimal(...) method in BirthingRoom.cs checks, returned baby, and window birth handlers. These are already present in LastName:
  • BirthAnimal checks the passed mother, her pregnancy, and Doctor before changing temperature or delivering.
  • Reproduce clears the mother’s Baby field and returns the newborn.
  • The handler assigns exactly "Baby" and chooses the success or no-baby message.
  • The San Diego handler refreshes the temperature display.
Birth starts at MainWindow, checks the passed mother and doctor, and returns the baby or null. Baby movement is shown on the baby participant.
Birth checks and the returned baby
  • New
  • Changed
  • Removed
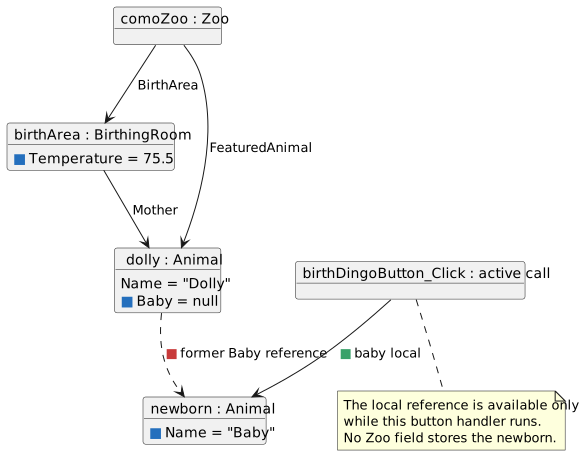
After the 2.1 birth call, the mother is shared by Zoo and BirthingRoom and her Baby field is null. The returned newborn is referenced by the button handler's baby local while that handler is running. Green squares mark new local references, blue squares mark changed field values, and red squares mark removed old connections.
The baby reference while the handler runs
  • New
  • Changed
  • Removed
B Check Your Work
1 Click New Como Zoo to reset that zoo. Do not feed, refill, move or give birth before this test.
2 Click Give birth to dingo once. Confirm the message begins A dingo was born.. At the handler, inspect baby.Name as Baby and this.ComoZoo.FeaturedAnimal.Baby as null.
3 Click the same birth button again. Confirm No dingo was born..
4 Click New San Diego Zoo to reset that zoo. Do not feed, refill, move or give birth before this test.
5 Click Give birth to platypus once. Confirm A platypus was born. begins the message and the temperature display changes from 77.0 to 77.5.
6 Click again. Confirm No platypus was born. and no further temperature increase.
7 Trace Animal.MakePregnant() with an existing baby. Confirm the guard preserves that baby. Trace a nonpregnant male and an unsupported Type: confirm neither receives a baby.
8 Trace BirthingRoom.BirthAnimal separately with this.Doctor equal to null and with its mother argument equal to null. Confirm each case returns null without changing this.Temperature.
Complete Zoo 2.1
9.Review the Completed Design
A Remove the Unused Guest PortionSize Field
1 The animal supplies its food portion through GetPortionSize(). Remove the unused guest data in these locations:
  • In Guest.cs, remove public double PortionSize and its associated comment.
  • In the CreateComoZoo() method in MainWindow.xaml.cs, remove this.ComoZoo.Visitor.PortionSize = 1.0;.
  • In the CreateSanDiegoZoo() method in MainWindow.xaml.cs, remove this.SanDiegoZoo.Visitor.PortionSize = 1.0;.
  • Keep Animal.PortionSizePercentage and Animal.GetPortionSize unchanged; these still determine the animal’s portion.
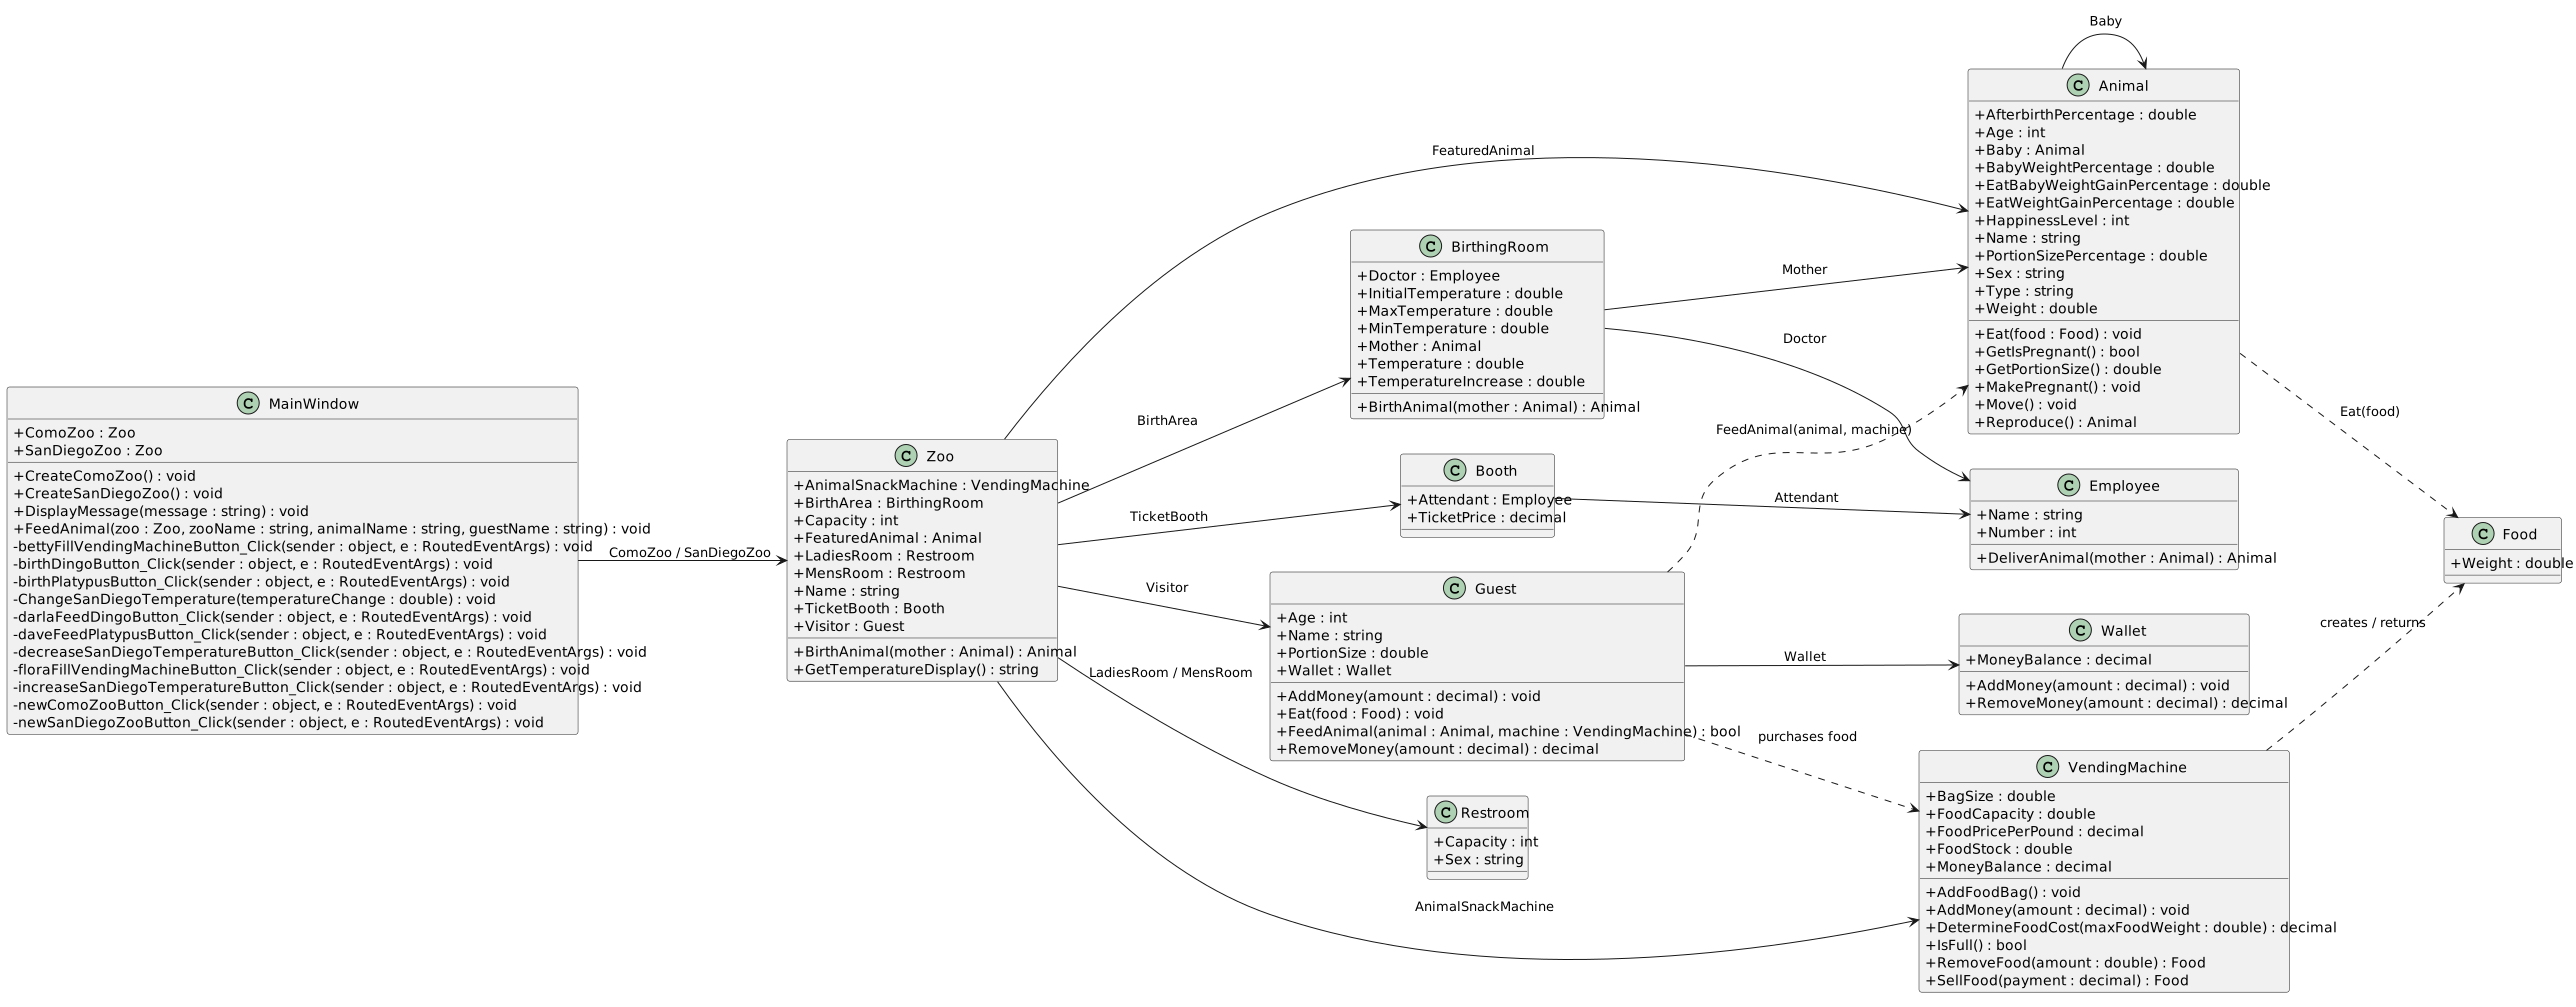
Zoo 2.1 ending structure from the latest supplied project.
Completed Zoo 2.1 — new, changed, and removed signature
  • New
  • Changed
  • Removed
B Check Your Work
1 Select Build > Build Solution. Open View > Error List and resolve any errors introduced by this task.
2 Open Guest.cs. Confirm FeedAnimal(...) returns int. In MainWindow confirm the existing switch handles its returned code.
3 Repeat the successful feeding checks for both zoos, then the separate zero-wallet and zero-stock failure checks.
4 Recreate both zoos and repeat each fill test and each first-birth/second-birth test above.
5 Recreate both zoos once more. Confirm Como starts with FoodStock of 12.0 and wallet 5.25m; San Diego starts with stock 17.0 and wallet 3.75m.
6 Remove test breakpoints and save all files.
10.Submit Zoo 2.1
A Close Visual Studio and ZIP your complete Zoo 2.1 solution folder, including its solution and project files.
B Submit the ZIP through the Feedback System.
C Submit the Feedback System URL in Canvas.