In 0.2 Parcheesi, you showed particular Player and Pawn objects. In 0.3, you used an activity diagram to describe game logic. In 0.4, you created a class diagram to describe the information Game, Player, and Pawn objects can contain. This week, you will create a sequence diagram to show who communicates with whom and in what order.
Keep working in the same Violet sequence diagram throughout this assignment. Add the participants first, show the user's click, send the browser's request, and return the new board state. Each checkpoint image builds on the previous one. Your only deliverable is the completed, editable sequence diagram; the checks do not require separate written answers.
This simplified interaction begins when the user clicks the dice icon. The browser asks the server to run RollDice(), and the server returns the new board state. You will show this exchange without diagramming the server's internal game logic.
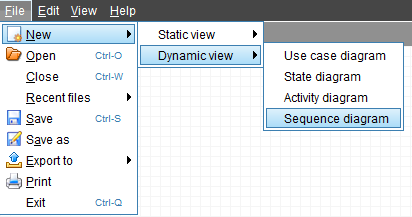
Open Violet UML Diagramming Tool. Choose File > New and select Sequence diagram, or choose Sequence diagram from Violet's opening screen.
A sequence diagram is read from top to bottom. A message lower in the diagram happens later. Each participant gets its own vertical column so you can see who sends and receives each message.
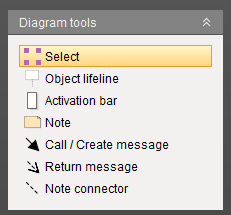
Locate the tools shown above. Hover over an icon to see its name if the label is not visible.
| Tool | Purpose in this assignment |
|---|---|
| Object lifeline | Place a participant's name box and vertical dashed line |
| Activation bar | Show a period of activity on a participant's lifeline |
| Call / Create message | Draw a solid message arrow toward a receiving participant |
| Return message | Draw a dashed response arrow back to the caller |
To place an item, select its tool and click in the workspace. To draw a connection, select its tool and drag from the starting item to the receiving item. To change text, double-click the item to open its properties. If your version uses a context menu, right-click and choose its properties command. Use the selection tool when you need to move or resize an item.
A participant is a person or part of the system involved in the interaction. The name box identifies the participant. Its vertical dashed line is its lifeline, which lets you follow that participant through the sequence.
Select Object lifeline and click near the upper-left part of the workspace. Open the name box's properties, enter User, and confirm the change.
User represents the person playing the game. Use a lifeline box for this participant, as shown in the checkpoint image.
Place a second Object lifeline to the right of User. Enter the following name on two lines:
Browser
(Client)
The browser is the client software. It receives the user's click, sends a request to the server, and receives the result. The person and the browser are separate participants because clicking a control and processing that click are different parts of the interaction.
Add a third Object lifeline to the right of Browser (Client). Name it Server. Align the three name boxes near the top and leave enough space between them for readable message labels.
The server runs the requested game operation and supplies the resulting board information.
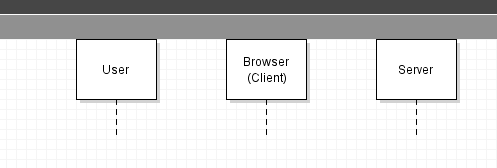
Your diagram should contain exactly these three participants in this order. Keep all three for the rest of the assignment. You have not added any messages yet.
Begin the interaction with the user's action. The first message goes from User to Browser (Client).
Select Activation bar and click on the User lifeline below its name box. The narrow rectangle belongs on the dashed line.
An activation bar shows a period of activity. In this simplified diagram, User's bar marks the user's participation in the interaction. Leave room below the first message for the browser and server exchange.
Add an activation bar on the Browser (Client) lifeline. Position its top slightly below the top of the User activation. The browser's activity will begin when it receives the click.
Select Call / Create message. Drag from the User activation to the top of the Browser (Client) activation. The solid arrow must point right toward Browser (Client). Connect to the activation bar, not the name box; the browser already exists.
Open the message's properties and enter Click "Dice Icon" in its middle label. Leave the start and end labels blank. If Violet has created an additional receiving activation automatically, keep one receiving bar for this interaction rather than two overlapping bars.
This label describes a user action. It is not a method name or program code.
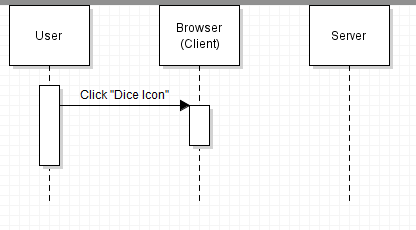
Follow the arrow from User to Browser (Client). It should read as: “The user clicks the dice icon in the browser.” Keep Server in place even though it has not received a message yet.
The browser now asks the server to perform the game operation. Add this request below the user's click so that the order is clear.
Add an activation bar on the Server lifeline. Its top should be slightly below the incoming click message on the browser. The server's activity begins when the browser's request arrives.
Use Call / Create message to drag from the browser activation to the top of the server activation. Keep the arrow below Click "Dice Icon", with its arrowhead pointing right toward Server. If Violet creates a receiving activation automatically, use that bar rather than keeping a duplicate.
Set the message's middle label to RollDice(). Match the capitalization and include the parentheses. Leave the start and end labels blank.
RollDice() names the operation the browser asks the server to perform. The parentheses identify it as a method call; this label shows no arguments between them. You are labeling a diagram, so you do not need to write or implement the method.
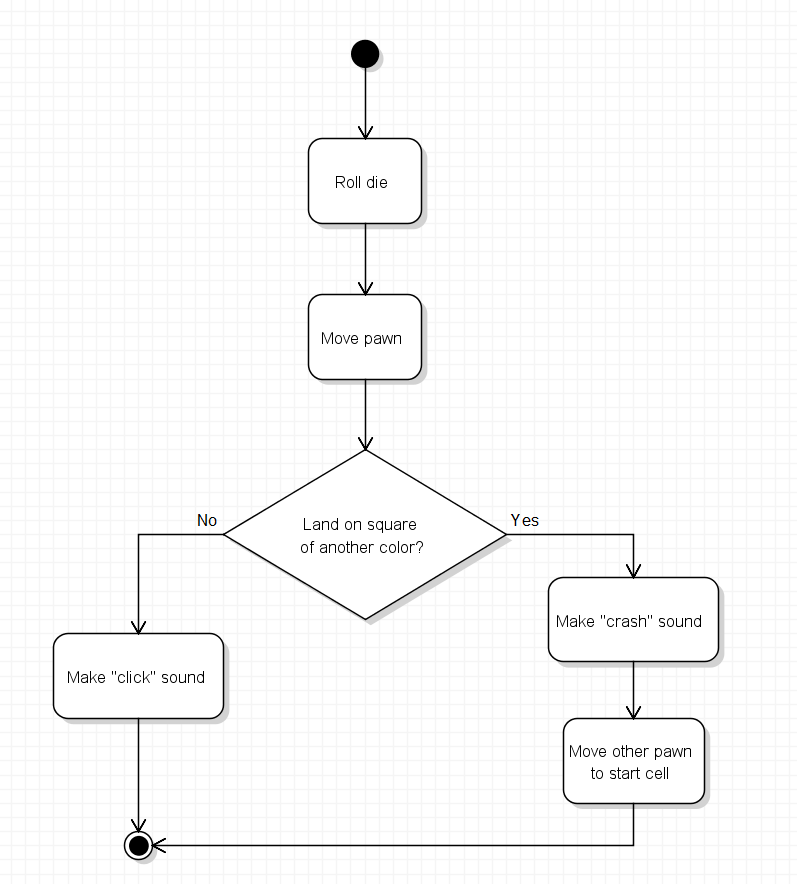
The server activation represents the period when this operation is in progress. The game logic explored in 0.3 belongs inside the server's work. This sequence diagram shows the communication around that work, so you do not need to reproduce the activity diagram here.
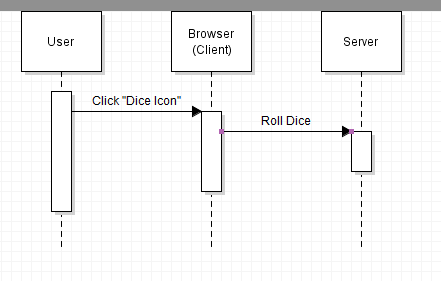
Read from top to bottom: User sends Click "Dice Icon" to Browser (Client), then Browser (Client) sends RollDice() to Server. Both arrows are solid, and each points to the participant receiving the message.
The server returns the result to the browser that made the request. Use the same browser activation you already created.
Select Return message. Below RollDice(), drag from the lower part of the server activation back to the browser activation. The return should be dashed, with its arrowhead pointing left toward Browser (Client).
Set its middle label to New Board State. Leave the start and end labels blank.
The board state is the information describing the board at that moment, such as pawn positions. The server returns that information so the browser can display the updated board. The response returns to the browser, which communicates with the server on the user's behalf.
Use Violet's selection and resize controls as needed. The server activation should extend from receiving RollDice() through returning New Board State. The browser activation should begin at the click and continue below the returning response. Keep the User activation extending below the browser activation, as shown in the completed example.
An activation can remain in progress while it waits for another participant's response. The browser's bar therefore continues while the server does its work. The vertical spacing shows order; it does not specify an exact number of seconds.
Keep all message labels readable. The completed interaction contains only the three lifelines, their activation bars, and the three labeled message arrows shown below.
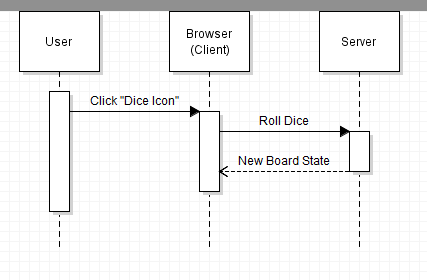
Compare your diagram with the completed example. Each earlier part should still be present, with the return message completing the exchange.
- The three participants are User, Browser (Client), and Server, from left to right.
- Each participant has a lifeline and one activation bar for this interaction.
- A solid message labeled Click "Dice Icon" points from User to Browser (Client).
- A second solid message labeled RollDice() points from Browser (Client) to Server below the click.
- A dashed return labeled New Board State points from Server to Browser (Client) below RollDice().
- All messages connect to the intended activation bars, and every label is readable.
- There are no extra participants, messages, notes, or note connectors.
Read your diagram from top to bottom and follow each arrowhead: the user clicks the dice icon, the browser requests RollDice(), and the server returns New Board State to the browser. This is a review of your diagram, not a separate written submission.
Last week's class-diagram associations described relationships between kinds of objects. This week's message arrows describe communication during an interaction. Their vertical order helps show when that communication happens.
Save your completed sequence diagram and use the Feedback System to check it, following the same submission process as last week. The sequence diagram is the only work you need to include.
Choose File > Save. Use the base filename Parcheesi 0.5 LastName, replacing LastName with your last name. Keep Violet's sequence-diagram file extension. In the desktop version used for these assignments, the filename ends with .seq.violet.html.
Submit the editable Violet diagram file, not a screenshot. Keep a saved copy so you can reopen it and make corrections.
ZIP the .seq.violet.html file itself without first placing it inside another folder. Use the ZIP filename Parcheesi 0.5 LastName.seq.violet.html.zip and submit it to the Feedback System for this assignment. Include only the completed sequence diagram in the ZIP.
Read the returned feedback. Correct any reported issues in Violet, save the corrected diagram, ZIP it again, and resubmit it. Repeat until the required feedback is resolved.
Submit the resulting Feedback System URL to Canvas as directed by your course. No separate written explanation or additional diagram is required.