0.3 Parcheesi Assignment

Parcheesi Assessment

In 0.2 Parcheesi, you built an object diagram to represent a player and four pawns. In this assessment, you will build a UML activity diagram to show what happens during one simplified Parcheesi move. You will roll a die, move a pawn, add a decision about where it lands, and use the Feedback System to check and revise your work.
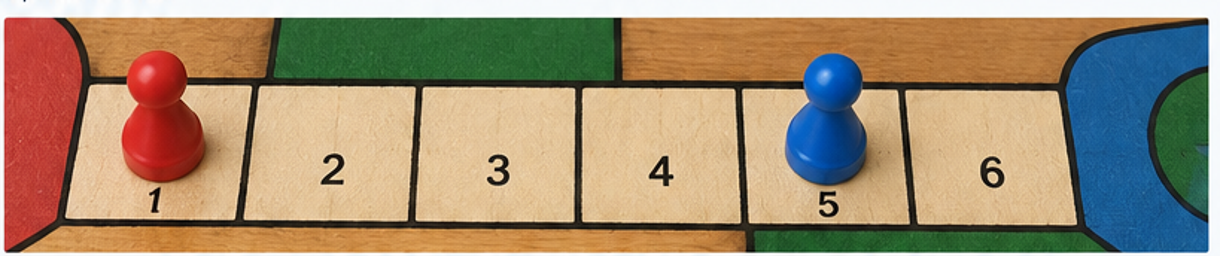
1.Explore a Parcheesi move
A Identify the starting positions
Six numbered cells with a red pawn on Cell 1 and a blue pawn on Cell 5.
A small section of the Parcheesi board

For this assignment, use only these six numbered cells and two pawns. Moving forward means increasing the cell number by the die roll. Red is the pawn that moves in both examples.

1 Locate the red pawn on Cell 1
2 Locate the blue pawn on Cell 5
B Predict what happens when Red rolls a 3
1 Count forward three cells from Cell 1: 2, 3, 4
2 Confirm that Red reaches Cell 4 and Blue stays on Cell 5

Cell 4 has no other pawn. The game makes a click sound, and the move ends.

C Predict what happens when Red rolls a 4
1 Start again with Red on Cell 1 and Blue on Cell 5
2 Count forward four cells from Cell 1: 2, 3, 4, 5
3 Identify Blue as the pawn already on the destination cell

For this simplified rule, the game makes a crash sound and moves the other pawn back to its Start cell. Blue returns to Start; Red stays on Cell 5.

2.Create the starting sequence

Begin with a new activity diagram. You will place a starting point and two activity boxes, then connect them. Each small step below introduces just one part of the diagram. Keep using this same diagram for the rest of the assignment.

A Open a new activity diagram

Open Violet UML Diagramming Tool. Use the menu shown in the screenshot to choose a new Activity diagram.
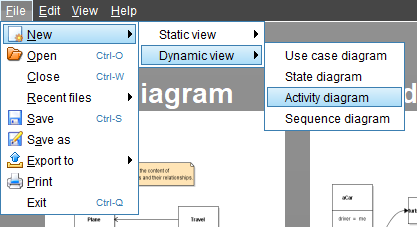
Violet's File menu expanded to show the menu choices leading to a new Activity diagram, with the Activity diagram choice highlighted.
Open an Activity diagram in Violet

You should now see a blank diagram workspace and the activity-diagram tools. You do not need to draw a game board.

B Add the starting point

The starting point is the solid circle. It tells the reader where to begin following the diagram.
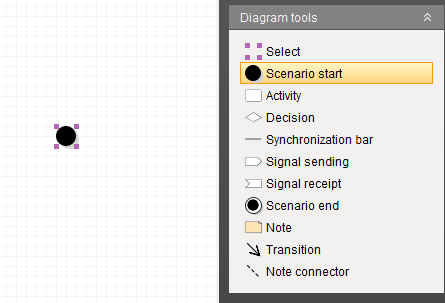
Violet's activity-diagram toolbar with the starting-point tool highlighted and a single starting point placed near the top of the workspace.
Find the starting-point tool
1 Click the starting-point tool shown above
2 Click once near the top of the blank workspace

A solid circle should appear. You do not need to name it or connect it yet.

C Add the Roll die activity

An activity is one action. Its rounded box contains a short description of what happens.
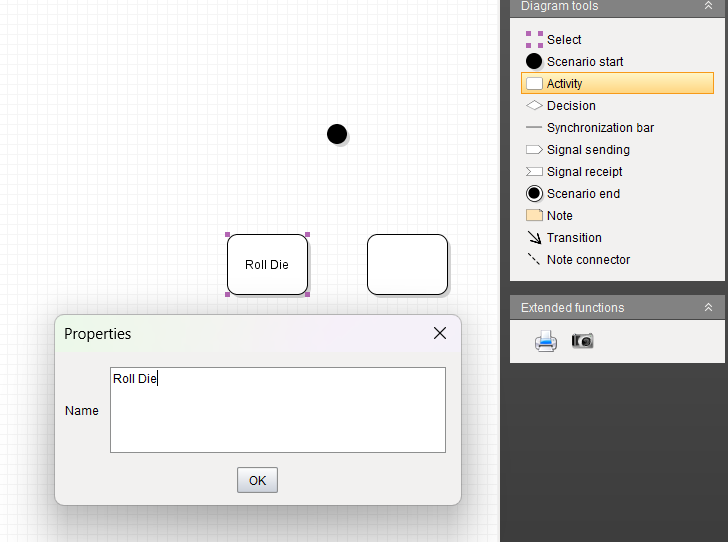
Violet with the activity tool highlighted and an activity's properties window open, showing where to enter Roll die and confirm the change.
Add and name an activity in Violet
1 Select the activity tool, then click below the starting point
2 Double-click the new box and enter Roll die in its text field

Confirm the change in the properties window. Your box should now display Roll die. This describes an action; the diagram does not actually roll a die.

D Add the Move pawn activity

Use the same activity tool to place a second box below Roll die. Double-click the new box, enter Move pawn, and confirm the change.

Move pawn means moving the pawn forward by the number rolled. You now have a starting point and two activities.

E Connect the three shapes

Choose the directed-connection tool. Draw an arrow from the starting point to Roll die, then another from Roll die to Move pawn. Each arrow points toward the next action.
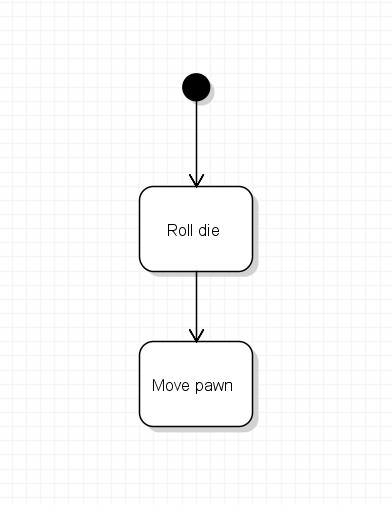
Activity diagram showing a starting point connected to Roll die and then Move pawn
Checkpoint 1 - Starting sequence

Follow your arrows from the solid circle: first roll the die, then move the pawn. If your diagram shows that order, this step is complete. Leave the bottom of Move pawn unconnected for now.

3.Add the landing decision
A Create the decision node
1 Add a decision node below Move pawn

A decision node is a diamond. It asks the question that determines which path to follow.

2 Set the decision text to Land on square of another color?

Use this wording in your diagram. You may split the question across two lines.

3 Connect Move pawn to the decision with an arrow pointing into the diamond
B Confirm that the decision happens after the pawn moves

For a roll of 3, Red reaches Cell 4 and the answer is No. For a roll of 4, Red reaches Cell 5 and the answer is Yes. Next, you will add the actions for each answer.
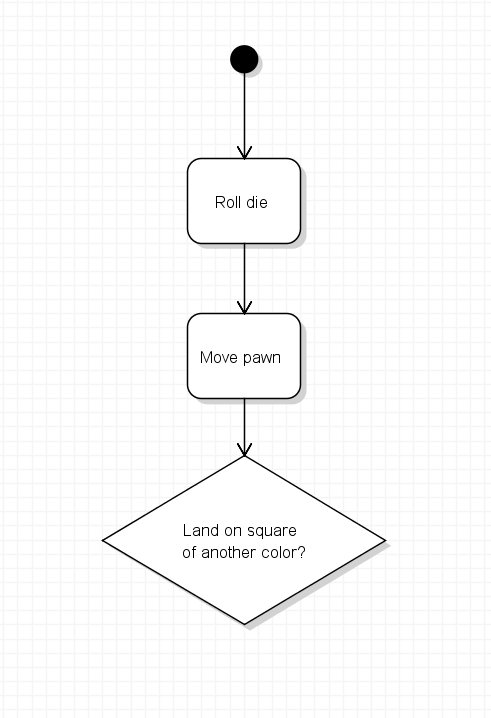
Starting sequence followed by the decision Land on square of another color?
Checkpoint 2 - Landing decision
4.Build the No path
A Add the click activity
1 Add an activity node below and to the left of the decision
2 Set its text to Make "click" sound
B Connect and label the No path
1 Draw a directed connection from the left side of the decision to Make "click" sound
2 Open the connection properties and set its start label to No
3 Confirm that No appears on the connection leaving the decision

Follow this path for the roll of 3. Red is on Cell 4, the game makes a click sound, and Blue stays on Cell 5. Leave the click activity's outgoing connection for the finishing task.
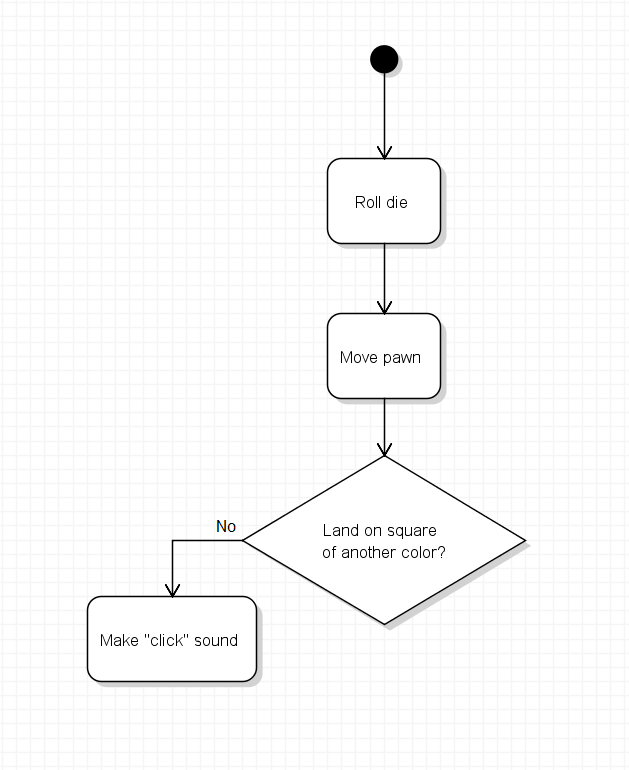
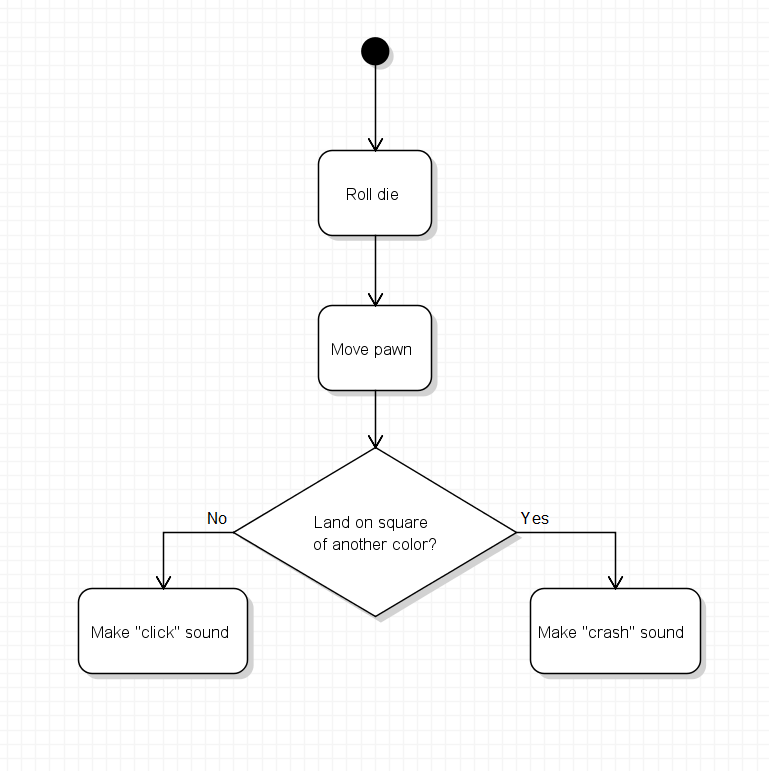
Starting sequence and landing decision with a No branch leading left to Make "click" sound
Checkpoint 3 - No path and click sound
5.Build the Yes path
A Add the crash activity
1 Add an activity node below and to the right of the decision
2 Set its text to Make "crash" sound
3 Draw a directed connection from the right side of the decision to Make "crash" sound
4 Set this connection's start label to Yes
B Return the other pawn to Start
1 Add an activity node below Make "crash" sound
2 Set its text to Move other pawn to start cell
3 Connect Make "crash" sound to Move other pawn to start cell
4 Confirm that the crash sound happens before the other pawn returns to Start
All previous nodes plus a Yes branch leading right to Make "crash" sound and then Move other pawn to start cell
Checkpoint 4 - Yes path and return action
6.Finish and check the diagram
A Connect both paths to an ending point
1 Place one ending point below Make "click" sound

The ending point is a circle with a filled center and an outer ring.

2 Connect Make "click" sound to the ending point
3 Connect Move other pawn to start cell to the same ending point

Arrange the final connection from the Yes path so it travels down and then left into the ending point. Keep all arrowheads and branch labels easy to read.
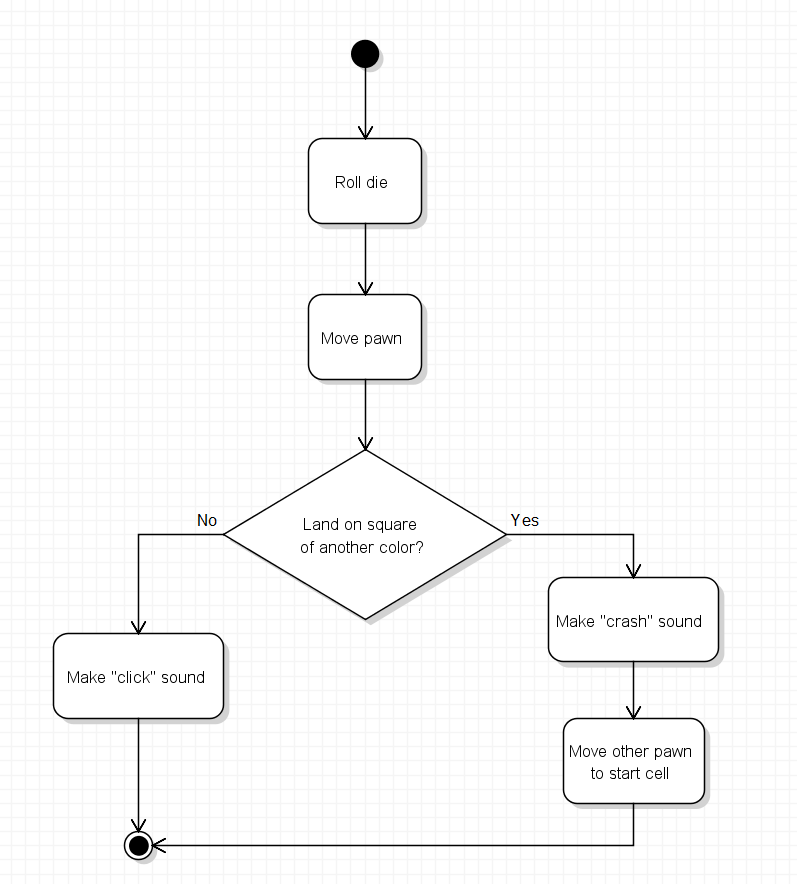
Starting point to Roll die to Move pawn to the landing decision. No leads to Make "click" sound and the ending point. Yes leads to Make "crash" sound then Move other pawn to start cell and the same ending point
Checkpoint 5 - Complete Parcheesi activity diagram
B Trace the complete diagram with a roll of 3

Begin with Red on Cell 1 and Blue on Cell 5. Follow the arrows from the starting point.

  1. Roll die produces 3.
  2. Move pawn moves Red to Cell 4.
  3. The decision answers No.
  4. Make "click" sound runs, then the flow reaches the ending point.
  5. Red remains on Cell 4 and Blue remains on Cell 5.
C Trace the complete diagram with a roll of 4

Reset the example: Red starts on Cell 1 and Blue starts on Cell 5. Follow the arrows again.

  1. Roll die produces 4.
  2. Move pawn moves Red to Cell 5.
  3. The decision answers Yes because Blue was already on Cell 5.
  4. Make "crash" sound runs.
  5. Move other pawn to start cell returns Blue to Start, then the flow reaches the ending point.
  6. Red remains on Cell 5 and Blue is at Start.
D Check the completed diagram
1 Confirm there is one starting point, five activities, one decision, and one ending point
2 Confirm there are eight directed connections and every node is connected
3 Confirm the decision has two outgoing connections labeled No and Yes
4 Confirm each path completes its required actions before reaching the ending point

The No path must include the click sound. The Yes path must include the crash sound followed by returning the other pawn to Start. Do not connect the decision directly to the ending point.

7.Save, submit, and revise the diagram

Save the Violet file, submit it to the Feedback System, and use the returned feedback to correct the diagram before submitting your result to Canvas.

A Save the Violet diagram
1 Choose File > Save in Violet
2 Use the base filename Parcheesi 0.3 LastName

Replace LastName with your last name.

3 Confirm the saved file ends with .activity.violet.html
B Submit the diagram to the Feedback System
1 ZIP the .activity.violet.html file itself

Do not place the file inside another folder before zipping it.

2 Use the ZIP filename Parcheesi 0.3 LastName.activity.violet.html.zip
3 Submit the ZIP file to the Feedback System for this assignment
C Resolve any Feedback System errors
1 Read the feedback and correct any reported diagram issues in Violet
2 Save the corrected file, ZIP it again, and resubmit it
3 Repeat the correction cycle until the required feedback is resolved
D Submit your result to Canvas

Submit the resulting Feedback System URL to Canvas as directed by your course.