4.4A Zoo Assignment

4.4A Zoo Assignment
Add enumerations for gender and wallet color
Acceptance Criteria
Acceptance criteria
  • Gender and wallet color use the specified enumeration values.
1.Add enumerations for gender and wallet color
4.4.1 How to Use Enumerations
Problem
Solution
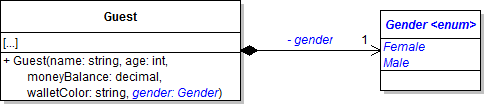
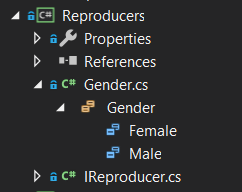
A Add an enumeration called Gender to the Reproducers project and make changes to the Guest class as specified in the diagram below.
Snip - Gender Enum. Reference figure for add enumerations for gender and wallet color.
Snip - Gender Enum
Class Diagram: Gender Enum. Reference figure for add enumerations for gender and wallet color.
Class Diagram: Gender Enum
B Pass an appropriate gender enum value in to the guest constructor wherever it is called.

Enum values are accessed using class notation, as in the code below:

Gender.Female
C Reuse the gender enumeration for animals and restrooms
1 Add a Gender field to the Animal class and a gender parameter in the Animal class and all of the Animal class's descendant classes.

Pass an appropriate gender enum value in to the animal constructor wherever it is called.
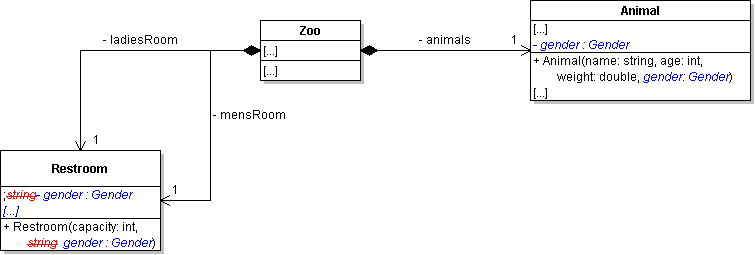
Class Diagram: Gender Enum. Reference figure for add enumerations for gender and wallet color.
Class Diagram: Gender Enum
2 Change the Restroom's gender to be of type Gender instead of type string.

Pass an appropriate gender enum value in to the restroom constructor wherever it is called.
D Create wallet color enumeration
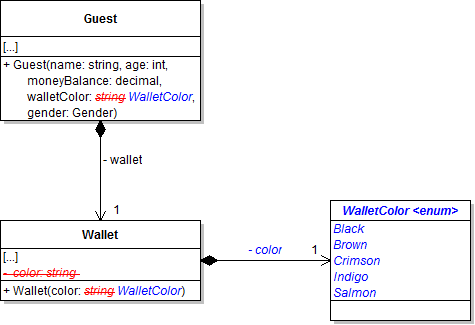
1 Add an enumeration called WalletColor to the People project and make changes to the Wallet and Guest classes as specified in the diagram below.
Class Diagram: Wallet Enum. Reference figure for add enumerations for gender and wallet color.
Class Diagram: Wallet Enum
2 Pass an appropriate wallet color enum value into the guest and wallet constructors wherever they are called.
E Check Your Work: Build the solution and ensure that the code compiles without errors or warnings.
Create the IMoneyCollector Interface
Acceptance Criteria
Acceptance criteria
  • Money collectors expose the common contract required by IMoneyCollector.
2.Create the IMoneyCollector Interface
Problem
Solution
Interface Review
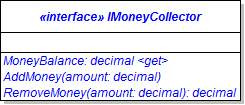
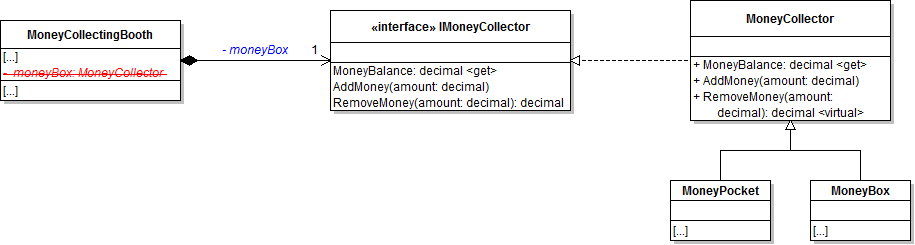
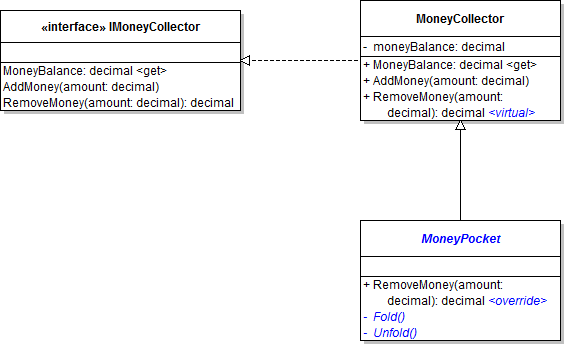
A Define an IMoneyCollector interface in the MoneyCollectors project as seen in the class diagram below.
Class Diagram: IMoneyCollector. Reference figure for create the imoneycollector interface.
Class Diagram: IMoneyCollector
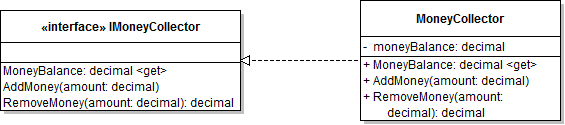
B Have the MoneyCollector class implement the IMoneyCollector interface.
Class Diagram: MoneyCollector. Reference figure for create the imoneycollector interface.
Class Diagram: MoneyCollector
C Create a new folder in the MoneyCollectors project named Interfaces and put the IMoneyCollector interface in it.
D Check Your Work
1 Run the WPF application.

Functionality for the Wallet, VendingMachine, and MoneyCollectingBooth classes should remain the same.
Create a money pocket in the wallet.
Acceptance Criteria
Acceptance criteria
  • The wallet uses an IMoneyCollector field backed by a MoneyPocket instance.
3.Create a money pocket in the wallet.
Problem
Solution
4.4.2 How to Apply the Program to Interfaces, Not Implementations Principle
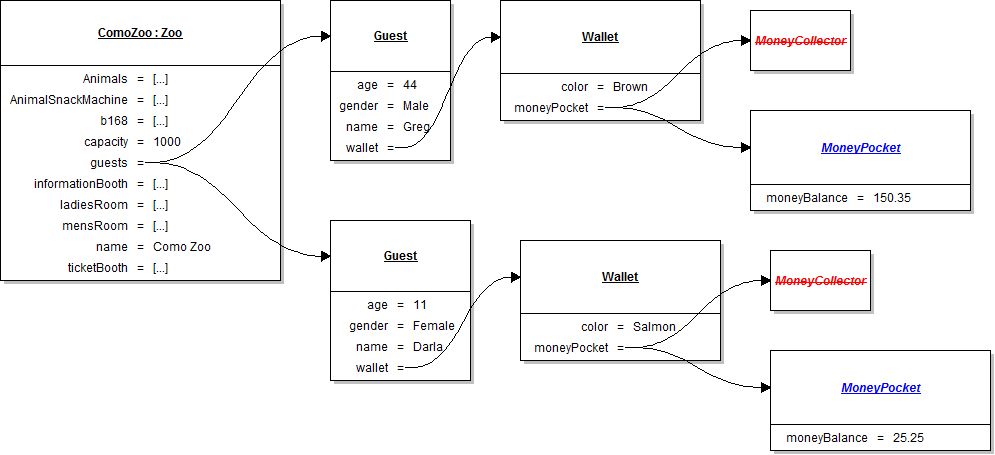
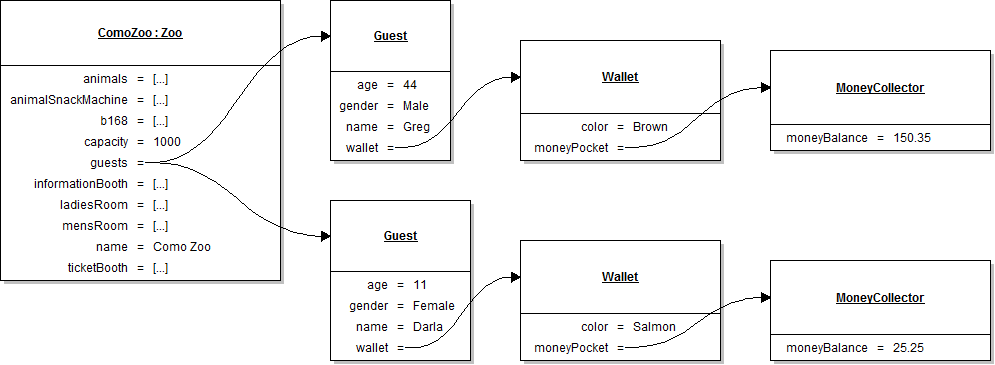
A Review the object diagram of the current state of the guests and their wallets.
Object Diagram: Wallet. Reference figure for create a money pocket in the wallet.
Object Diagram: Wallet
B Create the MoneyPocket class in the MoneyCollectors project as specified in the diagram below.
Class Diagram: Zoo Class Money Pocket. Reference figure for create a money pocket in the wallet.
Class Diagram: Zoo Class Money Pocket
C Have the MoneyPocket class inherit from MoneyCollector class.
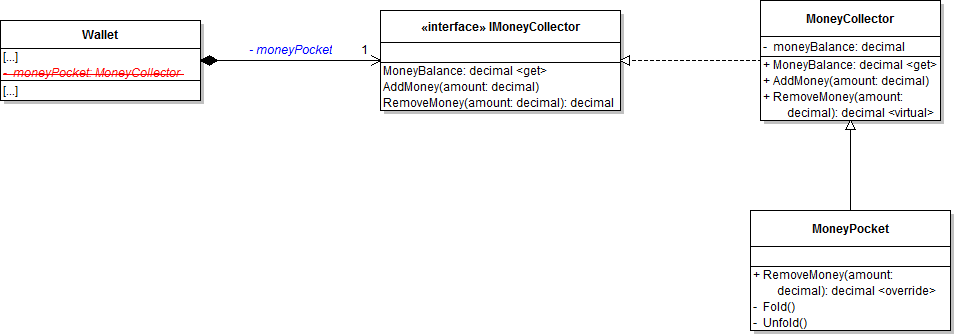
D Change the Wallet's moneyPocket field from type MoneyCollector to IMoneyCollector.
Class Diagram: Wallet Class. Reference figure for create a money pocket in the wallet.
Class Diagram: Wallet Class
E Instantiate the money pocket in the constructor as a MoneyPocket as per the object diagram below.
Object Diagram: Instantiate MoneyPocket. Reference figure for create a money pocket in the wallet.
Object Diagram: Instantiate MoneyPocket
F In the MoneyPocket class in the RemoveMoney method, have the money pocket unfold before calling base to remove money, then fold the pocket after removal.
G Check Your Work
1 In the Wallet constructor, after the line that instantiates the moneyPocket, type moneyPocket. to bring up IntelliSense.

Ensure that you cannot call Fold or Unfold.

2 Set a breakpoint in the guest's VisitTicketBooth method on a call to the wallet's RemoveMoney method.

Run the WPF application.

3 Press F11.

In the Autos window, note that the moneyPocket field has a Type of

MoneyCollectors.IMoneyCollector {MoneyCollectors.MoneyPocket}

. This means the object is of type IMoneyCollector, but has been instantiated as a MoneyPocket type.

4 Press F11.

Ensure that the debugger steps into the MoneyPocket class. Note that the Type is now MoneyCollectors.MoneyPocket. The object has "morphed" into a different thing so it can gain the extra functionality.

5 Step into the base call to RemoveMoney.

Ensure the debugger steps into the MoneyCollector class. Note that the Type is now

**MoneyCollectors.MoneyCollector {MoneyCollectors.MoneyPocket}

. The object has again "morphed" into a different thing to gain functionality, but is still a MoneyPocket.
Give the vending machine and money collecting booth a money box.
Acceptance Criteria
Acceptance criteria
  • Vending machines and money-collecting booths use MoneyBox instances.
4.Give the vending machine and money collecting booth a money box.
Problem
Solution
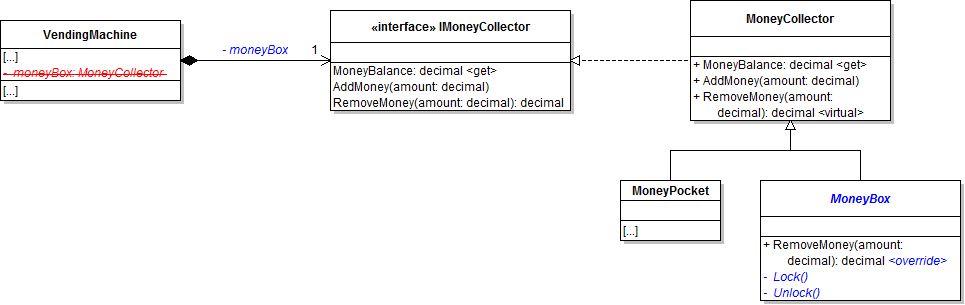
A Create a new class called MoneyBox in the MoneyCollectors project as specified in the diagram below.
Class Diagram: MoneyBox. Reference figure for give the vending machine and money collecting booth a money box.
Class Diagram: MoneyBox
B Have the MoneyBox inherit from the MoneyCollector class.
C Have the money box unlock before calling base to remove money, then lock the money box after removal.
D Change the VendingMachine class's MoneyCollector.
1 Change the VendingMachine's moneyBox field from type MoneyCollector to IMoneyCollector.
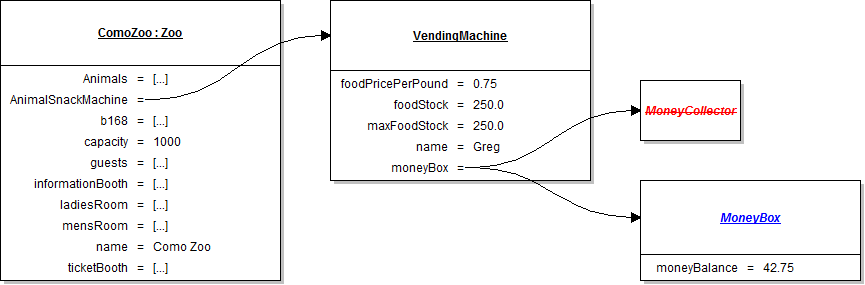
2 Instantiate the moneybox in the VendingMachine's constructor as a MoneyBox.
Object Diagram: VendingMachine MoneyBox. Reference figure for give the vending machine and money collecting booth a money box.
Object Diagram: VendingMachine MoneyBox
E Change the MoneyCollectingBooth class's MoneyCollector.
1 Change the MoneyCollectingBooth's moneyBox field from type MoneyCollector to IMoneyCollector.
Class Diagram: MoneyCollectingBooth MoneyBox. Reference figure for give the vending machine and money collecting booth a money box.
Class Diagram: MoneyCollectingBooth MoneyBox
2 Instantiate the moneyBox in the MoneyCollectingBooth as a MoneyBox.
F Check Your Work
1 Set breakpoint on the VendingMachine's AddMoney method within the BuyFood method.
2 Run the WPF application. Click the Feed animal button.
3 Ensure that the AddMoney method takes you to the VendingMachine class then the MoneyCollector class.
G Define the MoneyCollector class as abstract.
Refactor console commands to a static class
Acceptance Criteria
Acceptance criteria
  • Console operations are organized into the specified static helper classes.
5.Refactor console commands to a static class
Problem
Solution
A Add the internal static ConsoleHelper and ConsoleUtil classes to the ZooConsole project, as specified in the diagram below.
4.4.3 How to Use Internal Static Classes
Class Diagram: ConsoleHelper. Reference figure for refactor console commands to a static class.
Class Diagram: ConsoleHelper
B Move the InitialUpper method from Program.cs to the ConsoleUtil class.
C Move the code inside the "temp" command to the SetTemperature method.

Call the SetTemperature method from the "temp" case in Program.cs.

ConsoleHelper.SetTemperature(zoo, commandWords[1]);
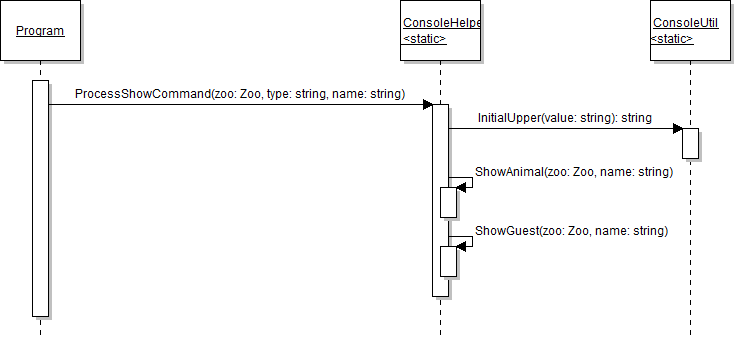
D Refactor the "show" command. The ending method sequence is shown below.
Sequence Diagram: Show Command. Reference figure for refactor console commands to a static class.
Sequence Diagram: Show Command
1 Move the code inside the "show animal" command to the ShowAnimal method.
2 Move the code inside the "show guest" command to the ShowGuest method.
3 Move the switch statement inside the "show" command to the ProcessShowCommand method and switch on the type parameter.

Call the InitialUpper method on the passed in name before the switch statement. Call the ShowAnimal and ShowGuest methods from the appropriate case.

4 Add default cases to switch statements to handle unknown types.
5 Call the ProcessShowCommand method from the "show" command in Program.cs.
E Check Your Work
1 Run the console application.
2 Type just show.

The application should not crash and you should get a message written to the console about the error.
3 Test the show animal and show guest commands. They should work the same as before.
4 Type show employee Flora.
5 A message stating that only animals and guests can be shown should be written to the console.
F In the Program.cs, surround the while loop in a try/catch and catch an Exception with a parameter and inside the catch, write the exception Message to the Console.
Add a new window to hold information about new animals.
Acceptance Criteria
Acceptance criteria
  • The add-animal button opens a separate animal window.
6.Add a new window to hold information about new animals.
Problem
4.4.4 How to Add and Use New Windows
Solution
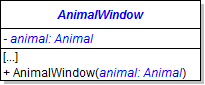
A Create a new window called AnimalWindow.
Class Diagram: Animal Window. Reference figure for add a new window to hold information about new animals.
Class Diagram: Animal Window
1 Add a new AnimalWindow.xaml file to the ZooScenario project.
2 In the xaml file, change the Height of with window to 280 and the Width to 300.
3 You will need to add the following line above the AnimalWindow.xaml.cs class definition.
[System.Diagnostics.CodeAnalysis.SuppressMessage("Microsoft.StyleCop.CSharp.NamingRules", "SA1300:ElementMustBeginWithUpperCaseLetter", Justification = "Event handlers may begin with lower-case letters.")]
4 Add a field and constructor parameter as specified in the diagram above.
5 Set the field to the parameter in the constructor, before the call to InitializeComponent.
B Add a button for adding animals.
1 Add a button to the MainWindow beneath the animal list box. Name it addAnimalButton and add a click event.
2 In the click event, instantiate an animal of your choosing.
3 Instantiate an AnimalWindow. Pass in the animal created in the previous step.
4 Call the ShowDialog method on the newly instantiated AnimalWindow.
5 Then, check if the window's DialogResult is equal to true.

If so, add the animal to the zoo and repopulate the animal list box. If not, do nothing.

C Check Your Work
1 Set a breakpoint in the AnimalWindow constructor on the line that sets the animal field. Run the WPF application.
2 Click the Add animal button.
3 Ensure that the animal parameter has the same field values as the animal created in the add animal button click.
4 Use F10 to step through the code.
5 The AnimalWindow should appear after the call to ShowDialog runs.

You should not be able to click back to the MainWindow while the AnimalWindow is open.

6 Close the AnimalWindow.
7 The window's DialogResult should be false.
Add labels and controls to the animal window to enhance functionality.
Acceptance Criteria
Acceptance criteria
  • The animal window contains the required labels and input controls.
7.Add labels and controls to the animal window to enhance functionality.

**Problem: We have a new window that shows up but the user has nothing to edit.

**Solution: You will add a user interface to the window that allows the user to input/change information for an animal.
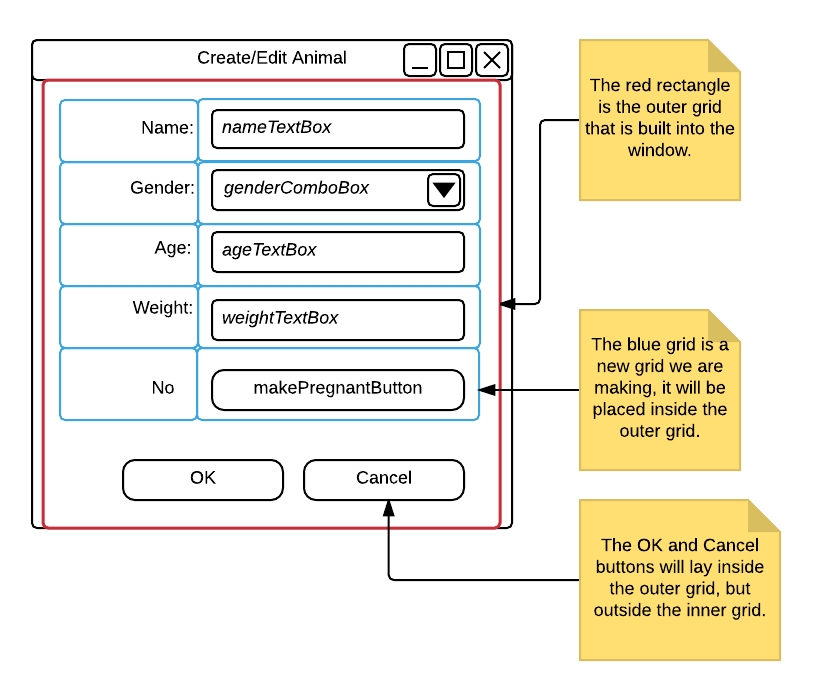
A Use a grid to create a window layout. Look at the wireframe diagram to see what we will be making.
4.4.5 How to Add and Use Grids
Wireframe: AnimalWindow. Reference figure for add labels and controls to the animal window to enhance functionality.
Wireframe: AnimalWindow
1 Inside the existing <Grid></Grid> tags in the AnimalWindow.xaml, add an additional set of Grid tags.

This Grid-ception allows us to put different elements in different containers.

2 Inside the inner Grid tags, add column definitions as shown in the code below
<Grid.ColumnDefinitions>
    <ColumnDefinition />
</Grid.ColumnDefinitions>
3 Add 2 more ColumnDefinition tags.

The Width property of the first is 100. The Width property of the second is 4. The Width property of the third is * (asterisk).

4 After the Grid.ColumnDefinitions, add row definitions as shown in the code below
<Grid.RowDefinitions>
    <RowDefinition />
</Grid.RowDefinitions>
5 Add 9 more RowDefinition tags.

The Height of the first is 4, and the Height of the second is 30. The heights then alternate between 4 and 30 for the rest of the rows.

B Add controls to the AnimalWindow.
4.4.6 How to Add and Use Text Boxes
1 Underneath the column and row definitions, add the Name label in the first column and second row.

Align it to the right, as shown in the code below:

<Label Grid.Row="1" Grid.Column="0" Content="Name" HorizontalAlignment="Right" />
2 Add a TextBox to the XAML with the following values
  • Grid.Row: 1
  • Grid.Column: 2
  • x:Name: nameTextBox
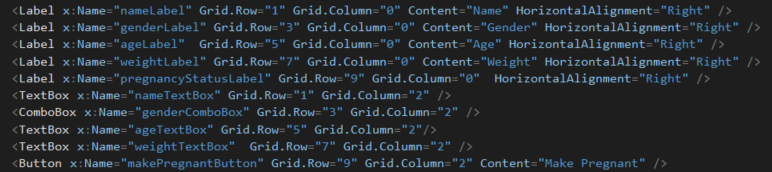
3 Add the rest of the labels, text boxes and buttons as shown in the wireframe/snip below.

All the controls should go in the rows with a height of 30.
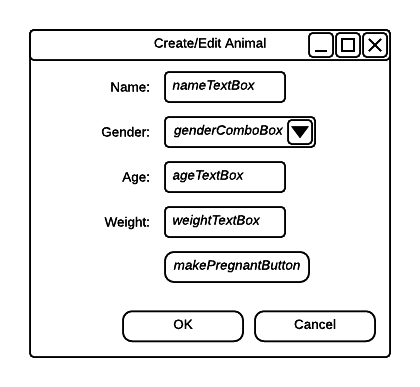
Wireframe: AnimalWindow Controls. Reference figure for add labels and controls to the animal window to enhance functionality.
Wireframe: AnimalWindow Controls
Snip - Xaml Elements. Reference figure for add labels and controls to the animal window to enhance functionality.
Snip - Xaml Elements
4 Under the inner grid tag, add a button with the values below
  • Name: okButton
  • Content: OK
  • Width: 90
  • Margin: 0,0,100,4
  • VerticalAlignment: Bottom
  • HorizontalAlignment: Right
5 Under the OK button, add a button with the values below
  • Name: cancelButton
  • Content: Cancel
  • Width: 90
  • Margin: 0,0,5,4
  • VerticalAlignment: Bottom
  • HorizontalAlignment: Right
C Initialize controls to the animal's values.
1 Add a window_Loaded event to the animal window.
2 Add an Age property to the Animal class with a getter and setter.
3 In the window_Loaded event, set the Text property of the Name, Age and Weight to the associated property of the animal (e.g. the text of the name text box is set to the value of the animal's Name property).
this.ageTextBox.Text = this.animal.Age.ToString();
4 Copy and paste the code below to put values inside the ComboBox and have the Gender of the animal be what shows up.
this.genderComboBox.ItemsSource = Enum.GetValues(typeof(Gender));
this.genderComboBox.SelectedItem = this.animal.Gender;
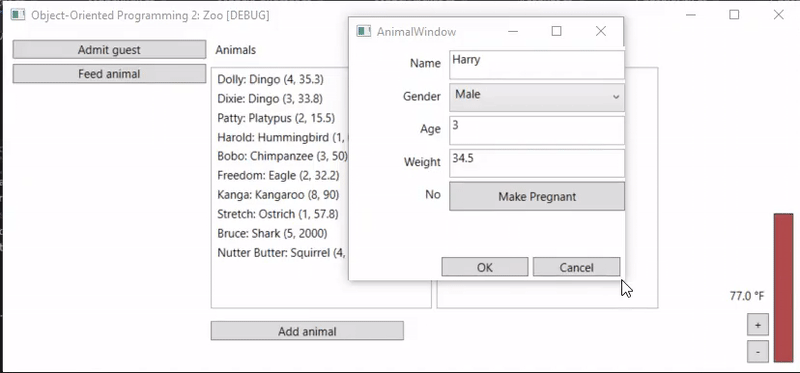
5 Set the pregnancyStatusLabel's Content property to "Yes" if the animal is pregnant and "No" if it is not.
D Check Your Work
1 Run the WPF Application.
2 Click the 'Add animal' button.
3 Ensure that the animal window appears with the correct labels and animal information and that it resizes correctly.
GIF: Animal Window. Reference figure for add labels and controls to the animal window to enhance functionality.
GIF: Animal Window
4 Click the OK button. Nothing should happen.
5 Click the Cancel button. Nothing should happen.
6 Close the window. Your animal should not be added to the list of animals.
Add functionality to the OK and Cancel buttons
Acceptance Criteria
Acceptance criteria
  • The OK and Cancel buttons produce the specified dialog results and control whether an animal is added.
8.Add functionality to the OK and Cancel buttons
4.4.7 How to Edit WPF Object Properties and Events
Problem
Solution
A In AnimalWindow.xaml, select the OK button. In the Properties window, check the IsDefault check box.
B In AnimalWindow.xaml, select the Cancel button. In the Properties window, check the IsCancel check box.
C Add a click event to the OK button. In it, set the window's DialogResult to true.
D Check Your Work
1 Run the WPF application. Launch the animal window.
2 Press the Escape key. The animal window should close without the animal being added to the list.
3 Launch the animal window again. Press the Enter key.
4 The window should close and the animal should be added to the zoo and the list box.
Demonstrate your work
9.Record a video of your applications showing
A The MoneyCollector class implements the IMoneyCollector Interface
B The MoneyPocket class inherits from the MoneyCollector class
C The MoneyBox class inherits from the MoneyCollector class
D 5E - Check Your Work steps
E 7D - Check Your Work steps
F 8D - Check Your Work steps
Prepare and submit your work
10.Submission Steps
A Ensure that your application has no compiler errors or warnings
B Ensure that your code is StyleCop compliant
C Remove all bin and obj folders from your solution
D Zip your solution
E Submit your zipped solution to the Feedback System
F Submit your Feedback System results link to Canvas
G Submit your video recording to your f-channel
Source credit

© 2026 Northcentral Technical College