8.5 MVVM Lab

Overview

8.5 MVVM Lab

Work through the stories in order. Use the acceptance criteria to check each feature, and complete the nested tasks using the specified names, values, and scenarios.

Getting Started
1.Getting Started
A Create a new WPF Project in Visual Studio with the project name DataBinding and the solution name 8.5 DataBinding *YourLastName*
Edit the XAML.
Acceptance Criteria
Acceptance criteria
  • The completed implementation satisfies this requirement: Change the Title to "Data Binding" and the Height to 160 and the Width to 350.
  • The completed implementation satisfies this requirement: Set the first RowDefinition's Height property to 60 and the second to *.
Instructions
2.Edit the XAML.
A Change the Title to "Data Binding" and the Height to 160 and the Width to 350.
B In the Grid tag, add a <Grid.RowDefinitions> tag.
C Inside the <Grid.RowDefinitions> tag, add two <RowDefinition> tags.
D Set the first RowDefinition's Height property to 60 and the second to *.

The * fills the remaining space.

E After the <Grid.RowDefinitions> tag, add a <TextBox> tag with the following properties:
1 Grid.Row=0
2 Height=40
3 Width=40
4 FontSize=24
5 TextAlignment=Center
F After the <TextBox> tag, add a <Slider> tag with the following properties:
1 Grid.Row=1
2 VerticalAlignment=Center
3 Width=300
4 Maximum=100
5 Minimum=0
G Start the application and use the slider. Nothing happens. What we WANT to happen is for the text box to show the number the…

Start the application and use the slider. Nothing happens. What we WANT to happen is for the text box to show the number the slider is on automatically.

Creating the ViewModel
Acceptance Criteria
Acceptance criteria
  • The completed implementation satisfies this requirement: Add a new class named MainWindowViewModel.
  • The completed implementation satisfies this requirement: Have the class implement INotifyPropertyChanged (in the System.ComponentModel) namespace. This will add a PropertyChanged event to the class.
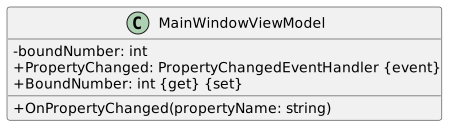
  • MainWindowViewModel exposes the required contract: boundNumber: int; PropertyChanged: PropertyChangedEventHandler event; BoundNumber: int get set; OnPropertyChanged(propertyName: string).
Instructions
3.Creating the ViewModel

For this example we will be focusing only on a PART of MVVM, the data binding. Generally a Model class would be involved.

A Add a new class named MainWindowViewModel.
B Have the class implement INotifyPropertyChanged (in the System.ComponentModel) namespace. This will add a PropertyChanged…

Have the class implement INotifyPropertyChanged (in the System.ComponentModel) namespace. This will add a PropertyChanged event to the class.

C Make changes to the class based on the diagram below.
Class Diagram: MainWindowViewModel; Members and relationships are shown in the editable reference; unrelated members may be omitted.
Class Diagram: MainWindowViewModel
  • New
  • Changed
  • Removed
Additions to MainWindowViewModel Class
add field
- boundNumberMainWindowViewModel Class
add field
- boundNumber: : int
add property
+ BoundNumberproperty
+ BoundNumber: : int <get> <set>
add method
+ OnPropertyChanged(propertyName: string)
D In the BoundNumber property, get the boundNumber field as normal, but in the setter, first check if the value is not the…

In the BoundNumber property, get the boundNumber field as normal, but in the setter, first check if the value is not the number in boundNumber. If it isn't, set the boundNumber field and call OnPropertyChanged, passing in the property name "BoundNumber".

E In the OnPropertyChanged method, if the PropertyChanged event is not null, call it and pass in this and a new…

In the OnPropertyChanged method, if the PropertyChanged event is not null, call it and pass in this and a new PropertyChangedEventArgs, passing in the propertyName parameter.

Binding the ViewModel to the View.
Acceptance Criteria
Acceptance criteria
  • Use the slider, the number should update as you drag the slider.
  • Type a number in the text box and tab out. The slider should update to the value on the slider.
  • The completed implementation satisfies this requirement: Change the Two-Way to One-Way and repeat steps 2-3 in different variations to see how the Mode works.
Instructions
4.Binding the ViewModel to the View.
A In the MainWindow.xaml, before the Grid tag, add a new <Window.DataContext> tag.
B In the tag, add a new tag: <local::MainWindowViewModel>

This tells the xaml view where the data it is looking for should be.

If you get an error in xaml, try rebuilding.

C In the TextBox tag, add a new property named Text and in the " ", put the following:
{Binding Path=BoundNumber, Mode=TwoWay}

Two-way binding allows information to be updated BACK to the View.

D Do the same for the Slider tag, but instead of Text, use Value.

Try typing it out instead of copying and pasting to see how it uses IntelliSense.

E Check Your Work:

One of the key facets of MVVM that we have done is removed all the "business logic" from the MainWindow.xaml.cs that we are used to having and moved it to a ViewModel class. There is no longer anything in the "back end" of the View that handles anything.

1 Run the application.
2 Use the slider, the number should update as you drag the slider.
3 Type a number in the text box and tab out. The slider should update to the value on the slider.
4 Change the Two-Way to One-Way and repeat steps 2-3 in different variations to see how the Mode works.
Zip your assignment and submit it to Canvas.
5.Zip your assignment and submit it to Canvas.
A Zip your assignment and submit it to Canvas.
Completion review
6.Review the feature acceptance criteria
A Confirm the required results

Return to each story and verify its acceptance criteria. Preserve the submission format and destination stated in the activity; a reading, setup guide, lab, video demonstration, and oral final may require different evidence.

Edit the XAML. Creating the ViewModel Binding the ViewModel to the View.