6.1 Scratchpad Learning Activity

Overview

6.1 Scratchpad Learning Activity

"Using" methods/File writing and reading/Binary Formatter/XML Serializer

Work through the stories in order. Use the acceptance criteria to check each feature, and complete the nested tasks using the specified names, values, and scenarios.

Microsoft: BinaryFormatter risks and migration
If you like, you can follow along with the instructor-led lab videos
1.If you like, you can follow along with the instructor-led lab videos

Use the 4.5 Scratchpad Lab to complete this lab activity.

Chapter 9 of Head First C# discusses reading and writing files.

6.1 Scratchpad Lab Walkthrough, Part 1 [14:52]

6.1 Scratchpad Lab Walkthrough, Part 1 [14:52]

6.1 Scratchpad Lab Walkthrough, Part 2 [19:01]

6.1 Scratchpad Lab Walkthrough, Part 2 [19:01]
A If you like, you can follow along with the instructor-led lab videos
Add a Save button and a Load button.
Acceptance Criteria
Acceptance criteria
  • The completed implementation satisfies this requirement: Create Click event handlers for both the Save and Load buttons.
  • Required result: Place two button controls onto the MainWindow.
  • Required result: The first button (Save) should have the following attributes:
Instructions
2.Add a Save button and a Load button.
A Place two button controls onto the MainWindow.
B The first button (Save) should have the following attributes:
x:Name="saveButton" Content="Save" HoriztontalAlignment="Right" Margin="0,0,95,10" VerticalAlignment="Bottom" Width="75"

C The second button (Load) should have the following attributes:
x:Name="loadButton" Content="Load" HoriztontalAlignment="Right" Margin="0,0,10,10" VerticalAlignment="Bottom" Width="75"

D Create Click event handlers for both the Save and Load buttons.
Write a line to a file.
Acceptance Criteria
Acceptance criteria
  • Run the application and click Save. Nothing will happen in the application, but a File.txt file should be generated in the Test folder.
  • Open up the File.txt file. The string should be there.
  • The completed implementation satisfies this requirement: Add a using method by pasting the code below:
Instructions
3.Write a line to a file.
A At the root of your C drive, create a new folder named 'Test'.

If you do not have access to your C drive you can put this folder on the Desktop.

B In the SaveButton_Click event handler:
1 Add a using method by pasting the code below:
using ()
{
}

A using method is different from a using statement. A using method creates an object and then at the end of the method all connections and/or references to that object are released.

2 In the using parenthesis, instantiate a StreamWriter named writer.

You will need to add a using to System.IO. This namespace stands for Input/Output and contains the classes necessary to read and write files.

3 For the argument of the StreamWriter, put the string "C:\Test\File.txt".
4 Put an @ symbol before the string.

The \ symbol in C# represents an escape character meaning that the text that follows is special in some way (such as \n for a new line). To avoid this issue we put an @ symbol before the string that forces the application to not look for escape characters.

5 In the using method, use the writer object's WriteLine method to write out a line of text.

The text can be anything, but we suggest "Sample text 1".

C Check Your Work:
1 If you can, open up the Test folder you created and the application.
2 Run the application and click Save. Nothing will happen in the application, but a File.txt file should be generated in the…

Run the application and click Save. Nothing will happen in the application, but a File.txt file should be generated in the Test folder.

3 Open up the File.txt file. The string should be there.
Read a line from a file.
Acceptance Criteria
Acceptance criteria
  • Press F10. The text variable should now be the string written previously to the file.
  • The completed implementation satisfies this requirement: Add a using method and instantiate a StreamReader named reader just like the StreamWriter.
  • The completed implementation satisfies this requirement: Set a breakpoint on the line that called ReadLine.
Instructions
4.Read a line from a file.
A In the LoadButton_Click event handler:
1 Add a using method and instantiate a StreamReader named reader just like the StreamWriter.
2 In the argument for the new StreamReader, pass in the same string as you did for the StreamWriter.
3 In the using method body, define a string named text and set it to the result of the reader obejct's ReadLine method.
B Check Your Work:
1 Set a breakpoint on the line that called ReadLine.
2 Start the application and click the Load button.
3 Press F10. The text variable should now be the string written previously to the file.
Write and Read multiple lines to/from a file.
Acceptance Criteria
Acceptance criteria
  • Close the File.txt and reopen it. The file should now have all four lines in it.
  • Start the application and press F10. The text variable should now contain the entire contents of the txt file.
  • The completed implementation satisfies this requirement: Set a breakpoint on the first WriteLine call.
Instructions
5.Write and Read multiple lines to/from a file.
A In the SaveButton_Click event handler, write three more lines to the file. Ex: "Sample text 2".
B Check Your Work:
1 Set a breakpoint on the first WriteLine call.
2 Open the File.txt.
3 Start the application and click Save.
4 Note that the File.txt is now empty. The StreamWriter is a new instance so the old instance goes away.
5 F10 over the first WriteLine. The line isn't written to the file. This is because the using body locks the file until the…

F10 over the first WriteLine. The line isn't written to the file. This is because the using body locks the file until the ending curly brace.

6 F10 until you are outside the using method.
7 Close the File.txt and reopen it. The file should now have all four lines in it.
C In the LoadButton_Click, change the ReadLine method call to ReadToEnd
D Check Your Work:
1 Set a breakpoint on the line that calls ReadToEnd.
2 Start the application and press F10. The text variable should now contain the entire contents of the txt file.

The \r\n escape characters represent a return and then a new line.

Use a BinaryFormatter to save the Airport.
Acceptance Criteria
Acceptance criteria
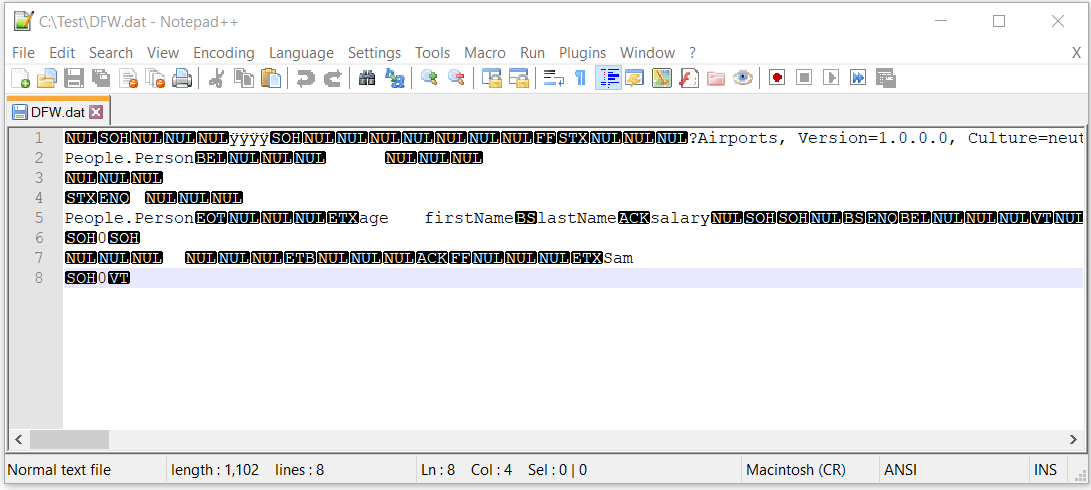
  • Open your Test folder. A DFW.dat file should have been created.
  • Open the file with a text editor. The file should resemble the image below.-.
  • The completed implementation satisfies this requirement: Call Serialize on the BinaryFormatter object.
Instructions
6.Use a BinaryFormatter to save the Airport.
A In the SaveButton_Click event:
1 Define a new using method.
2 In the using parenthesis, define a local variable of type Stream named stream and assign it to the static File class's Create method.
Stream stream = File.Create()
3 Pass the path/file name as an argument to the Create method.
@"C:\Test\DFW.dat"
The .dat extension is arbitrary and here is being used to represent data.is arbitrary and here is being used to represent data.
4 In the using body:

Instantiate a new BinaryFormatter.

Since we are only acting upon it once there is no need to define a local variable for it.

The namespace for the BinaryFormatter is System.Runtime.Serialization.Formatters.Binary;

Call Serialize on the BinaryFormatter object.

Pass in stream and the dfw object as arguments.

new BinaryFormatter().Serialize(stream, this.dfw);
B Add Serializable attributes.
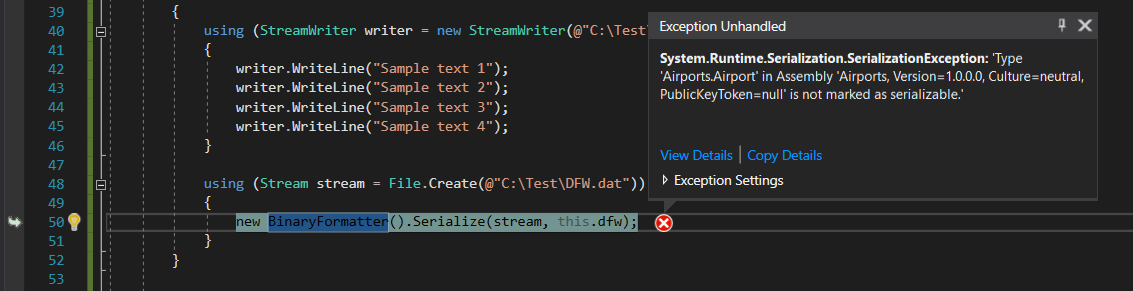
1 Run the application and click Save. Note that you will get an error about the Airport not being serializable.
Snip: Serializable Error for 6.1 Scratchpad Learning Activity (NEW). Use the adjacent task instructions to identify the required controls, output, or debugger values.
Snip: Serializable Error
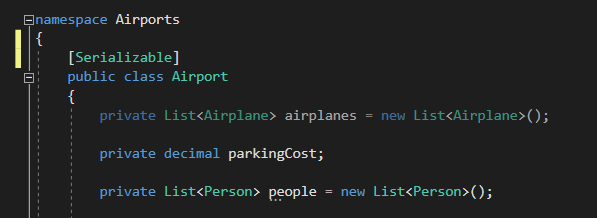
2 Above the Airport class definition, add the attribute [Serializable].
Snip: Serializable Attribute for 6.1 Scratchpad Learning Activity (NEW). Use the adjacent task instructions to identify the required controls, output, or debugger values.
Snip: Serializable Attribute

You may need to add a using for the System namespace.

The Serializable attribute dictates that this class is now capable of being stored in a binary format.

3 Add the Serializable attribute to the Airplane class.
4 Add the Serializable attribute to the Person class.
C Check Your Work:
1 Run the application and click Save.
2 Open your Test folder. A DFW.dat file should have been created.
3 Open the file with a text editor. The file should resemble the image below.-.
6.1 Scratchpad 6C datFile for 6.1 Scratchpad Learning Activity (NEW). Use the adjacent task instructions to identify the required controls, output, or debugger values.
6.1 Scratchpad 6C datFile
Use a BinaryFormatter to load a binary file.
Acceptance Criteria
Acceptance criteria
  • Instead of clicking Save, click Load. That person should disappear from the list because they were never saved to the Airport.
  • Restart the application. Only Suzi and Sam should be in the list box.
  • Click load. The person you created should appear in the list box.
Instructions
7.Use a BinaryFormatter to load a binary file.
A In the LoadButton_Click event handler:
1 Define a using method.
2 In the using parenthesis, define a Stream object like previously, but this time use the OpenRead method of the File class…

In the using parenthesis, define a Stream object like previously, but this time use the OpenRead method of the File class instead of Create.

using (Stream stream = File.OpenRead(@"C:\Test\DFW.dat"))
3 In the using body, assign the dfw object to the call to Deserialized on a new BinaryFormatter object.
4 Cast the BinaryFormatter object as an Airport.
this.dfw = new BinaryFormatter().Deserialize(stream) as Airport;
B After loading the file in the event handler, assign the ItemsSource of the peopleListBox to null and then assign the…

After loading the file in the event handler, assign the ItemsSource of the peopleListBox to null and then assign the ItemsSource of the peopleListBox to the dfw's People IEnumerable.

C Check Your Work:
1 Run the application.
2 Click the Save button.
3 Add a new person to the Airport.
4 Instead of clicking Save, click Load. That person should disappear from the list because they were never saved to the Airport.
5 Add a new person and click Save.
6 Restart the application. Only Suzi and Sam should be in the list box.
7 Click load. The person you created should appear in the list box.
Use an XML Serializer
Acceptance Criteria
Acceptance criteria
  • Double click the saved xml file that was generated (it should open in a browser). It should look similar to the image below.
  • Restart the application and click Load. The person you added earlier should appear in the list box.
  • The completed implementation satisfies this requirement: Change the extensions of the files from .dat to .xml
Instructions
8.Use an XML Serializer
A Copy and paste the using and BinaryFormatter code in the Save and Load button clicks.
B Comment out one of the BinaryFormatter code blocks from each of the Save and Load button clicks.
C Replace BinaryFormatter with XMLSerializer in both event handlers.
D Change the extensions of the files from .dat to .xml
E Pass in the argument typeof(Airport) to both XmlSerializer constructors.
F In the Airport class, change the People property from an IEnumerable type to a List type and add a setter.

Xml is different from Binary in that it only saves public properties. Additionally, the property must have a getter and setter. This violates encapsulation, but is necessary.

G Check Your Work:
1 Start the application.
2 Add a new person to the Airport.
3 Click the Save button.
4 Double click the saved xml file that was generated (it should open in a browser). It should look similar to the image below.
<?xml version="1.0" encoding="ISO-8859-1"?>
<Airport xmlns:xsd="http://www.w3.org/2001/XMLSchema" xmlns:xsl="http://www.w3.org/2001/XMLSchema-instance">
<Airplanes></Airplanes>
<ParkingCost>0</ParkingCost>
<People>
<Person>
<Age>11</Age>
<FirstName>Suzi</FirstName>
<Salary>0</Salary>
</Person>
<Person>
<Age>23</Age>
<FirstName>Sam</FirstName>
<Salary>0</Salary>
</Person>
<Person>
<Age>45</Age>
<FirstName>Fred</FirstName>
<Salary>0</Salary>
</Person>
</People>
</Airport>
5 Restart the application and click Load. The person you added earlier should appear in the list box.
Submit a zipped Visual Studio solution after completing the following:
9.Submit a zipped Visual Studio solution after completing the following:
A Ensure that the application has no compiler errors or warnings.
B Make the code StyleCop compliant.
C Remove all bin and obj folders from the entire solution.
Completion review
10.Review the feature acceptance criteria
A Confirm the required results

Return to each story and verify its acceptance criteria. Preserve the submission format and destination stated in the activity; a reading, setup guide, lab, video demonstration, and oral final may require different evidence.

Add a Save button and a Load button. Write a line to a file. Read a line from a file. Write and Read multiple lines to/from a file. Use a BinaryFormatter to save the Airport. Use a BinaryFormatter to load a binary file. Use an XML Serializer