5.1A Zoo Assignment

5.1A Zoo Assignment
Use inner exceptions when handling exceptions
Acceptance Criteria
Acceptance criteria
  • Exception handling preserves the original failure as an inner exception and reports the outer error to the user.
1.Use inner exceptions when handling exceptions
Problem
Solution
5.1.1 How to Use Inner Exceptions
A In the employee's FindItem method, after looping through the list, check to see if the result is null.

If so, throw a new exception with the following message:

$"An item of type {type.Name} does not exist."
B In the MoneyCollectingBooth's SellTicket method, surround the code that finds the item and adds the money in a try...catch that catches Exceptions.

In the catch block, throw a NullReferenceException, passing in a message and an inner exception, as shown in the code below:

catchcatch (Exception ex)
{
    throw )
{
    throw new NullReferenceException("Ticket not found.", ex);
}}
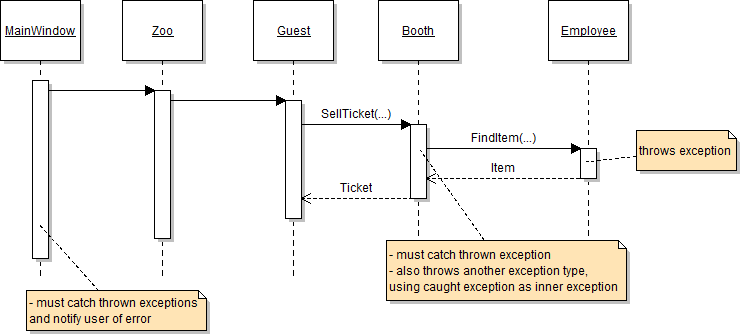
C Surround each call to the FindItem method (in the sell water bottle/give coupon or map methods) with a try...catch block that catches Exceptions and throws a NullReferenceException that uses the caught exception as the inner exception.
Sequence Diagram: Inner Exception Flow. Reference figure for use inner exceptions when handling exceptions.
Sequence Diagram: Inner Exception Flow
D In the click event of the Add Guest button, ensure that the calls to SellTicket, AddGuest, and PopulateGuestListBox are surrounded by a try/catch that catches NullReferenceExceptions.

This is where the exceptions thrown in the FindItem methods will be caught.

E Check Your Work
1 Set a breakpoint inside the catch block in the Admit guest button click. Run the WPF application.
2 Click the Admit guest button until the breakpoint is hit.
3 Open up your autos window. Notice that the ex(Exception object) is that of the NullReferenceException type.
4 Examine the exception's values.

Notice that it has an InnerException, which contains the values of the Exception type thrown in the FindItem method.
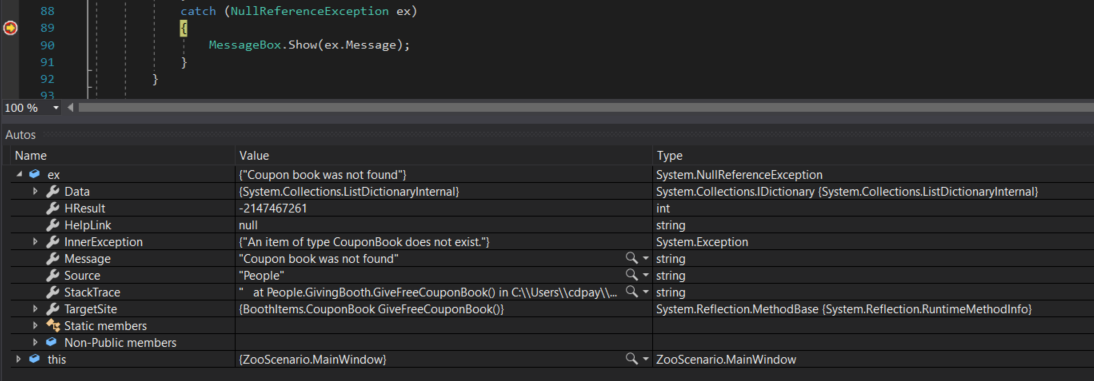
Snip: Exception Message. Reference figure for use inner exceptions when handling exceptions.
Snip: Exception Message
5 Click Continue. Ensure that a MessageBox appears displaying the exception message.
Create and throw custom exceptions
Acceptance Criteria
Acceptance criteria
  • Missing booth items produce the custom MissingItemException with the specified information.
2.Create and throw custom exceptions
Problem
Solution
5.1.2 How to Create and Use Custom Exceptions
A In the BoothItems project, create a new class called MissingItemException as specified in the diagram below.

Pass the message parameter into the call to base. Leave the constructor empty.
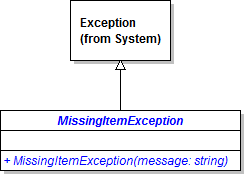
Class Diagram: MissingItemException. Reference figure for create and throw custom exceptions.
Class Diagram: MissingItemException
B In the employee's FindItem method, throw a MissingItemException instead of an Exception. Keep the message the same.
C In each of the try...catch blocks that surround the calls to FindItem, catch a MissingItemException instead of an Exception.
D In the Admit guest event handler, replace the code in the catch statement with the code below
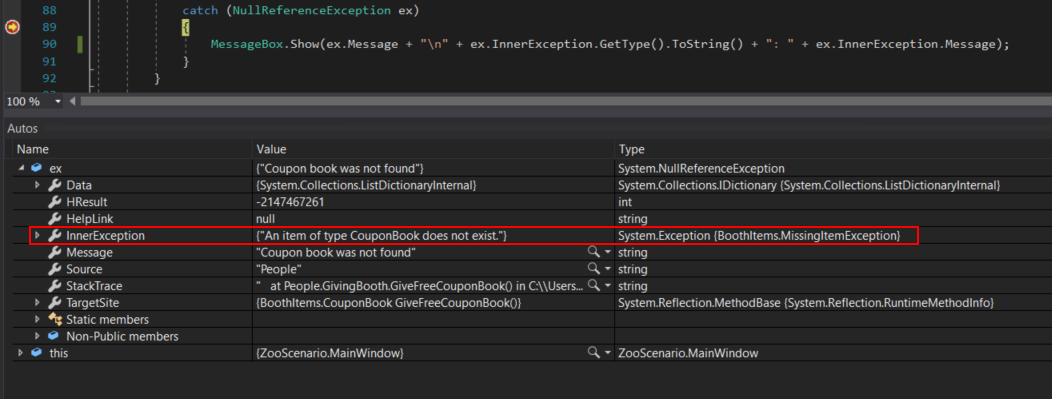
MessageBox.Show(ex.Message + "\n" + ex.InnerException.GetType().ToString() + ": " + ex.InnerException.Message);
E Check Your Work
1 Set a breakpoint inside the catch block in the Admit guest button click. Run the WPF application.
2 Admit guests until the breakpoint is hit.
3 Expand the exception item. Note that its inner exception is of type MissingItemException instead of type Exception.
Snip: MissingItemException Message. Reference figure for create and throw custom exceptions.
Snip: MissingItemException Message
4 Click Continue.

Ensure that a MessageBox pops up with the custom exception type and a more robust message about what is going wrong.

Add functionality for editing animals and guests.
Acceptance Criteria
Acceptance criteria
  • Users can edit existing animals and guests through the required windows.
3.Add functionality for editing animals and guests.
Problem
Solution
A Add a double click event handler to the animal list box in the MainWindow.
B In the event handler, get the selected item in the list box and cast it as an animal and store it in a variable named animal.
C If the animal object is not null, instantiate a new AnimalWindow, passing in the animal. Then show the window.
D If the window's DialogResult is true, repopulate the animal list box.
E Repeat this process for the guest list box.
F For the next few steps we will be using a Dingo to test the application.

Add a Dingo animal to the zoo in the window_Loaded event handler in the MainWindow, so you don't have to create a new object every time the application loads

G Check Your Work
1 Run the WPF application.
2 Double click on an existing animal.

The animal window should appear, and its controls should be initialized to the animal's values.

3 Change the name of the animal and click OK. The animal's name should be updated in the list box.
4 If an animal is selected, de-select it by control-clicking on it.

Then double click in the background of the list box. Nothing should happen.

5 Create a new guest.
6 Double click the guest and change their name or money balance.
7 Click OK and ensure the guest's values are updated.
Add pacing functionality
Acceptance Criteria
Acceptance criteria
  • The animal's pacing algorithm updates its position and reverses direction as specified.
4.Add pacing functionality
Problem
Solution
A Add infrastructure to animals to allow for moving.
5.1.3 How and When to Use Auto Properties
1 Make changes as specified in the diagram below.

Make all of the new animal properties auto-properties (without fields behind them). Put the two enumerations in the Animals project.
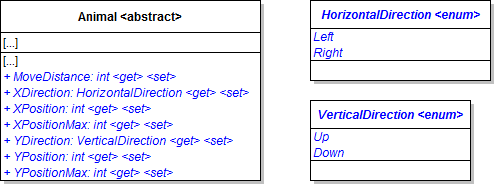
Class Diagram: Animal Movement. Reference figure for add pacing functionality.
Class Diagram: Animal Movement
Example: public int MoveDistance { get; set; }
2 In the animal constructor, assign the following values
  • XPosition: 0
  • YPosition: 0
  • XPositionMax: 800
  • YPositionMax: 400
  • XDirection: HorizontalDirection.Left
  • YDirection: VerticalDirection.Up
3 Initialize the MoveDistance to 10.
B Put the following code inside the mammal's Move method.
if (this.XDirection == HorizontalDirection.Right)
{
    if (this.XPosition + this.MoveDistance > this.XPositionMax)
    {
        this.XPosition = this.XPositionMax;
        this.XDirection = HorizontalDirection.Left;
    }
    else
    {
        this.XPosition += this.MoveDistance;
    }
}
else
{
    if (this.XPosition - this.MoveDistance < 0)
    {
        this.XPosition = 0;
        this.XDirection = HorizontalDirection.Right;
    }
    else
    {
        this.XPosition -= this.MoveDistance;
    }
}
C Comment the above code to demonstrate understanding of what the code is doing.
D Add a button for moving animals.
1 Add a button to the MainWindow called moveAnimalButton. Add a click event handler to it.
2 In the click event handler, get the selected item from the animal list box and cast it as an animal.

If the animal is not null and is a mammal, call the animal's Move method.

E Check Your Work
1 Set a breakpoint on the first line of the mammal's Move method.
2 Run the WPF application. Select the Dingo and click the Move animal button.
3 After the breakpoint is hit, examine the values of the animal's properties. They should be as follows
  • XDirection: Left
  • XPosition: 0
  • YDirection: Up
  • YPosition: 0
  • MoveDistance: 10
  • XPositionMax: 800
  • YPositionMax: 400
4 Step through the method. It should set the XPosition to 0 and the XDirection to Right.
5 Click Continue. Ensure the same animal is selected in the list box, and then click the Move animal button again.
6 After the breakpoint is hit, examine the values of the animal's properties. The XDirection should now be Right.
7 Step through the method. It should add the value of MoveDistance to the XPosition. XPosition should now be 10.
Create a window for showing moving animals in a cage
Acceptance Criteria
Acceptance criteria
  • A cage window provides the controls needed to display animal movement.
5.Create a window for showing moving animals in a cage
Problem
Solution
A Open the file below.

Copy and paste the code in the file into the App.xaml file. All of the code should go inside the Application.Resources tags.

Animal XAML code Overview of XAML
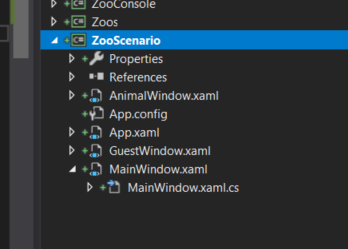
Snip: App.Xaml. Reference figure for create a window for showing moving animals in a cage.
Snip: App.Xaml
B Create a window for showing an animal in a cage.
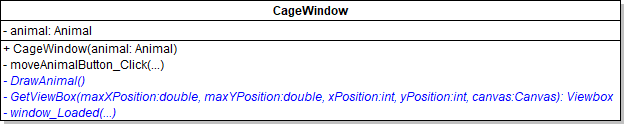
1 Create a new window called CageWindow in the ZooScenario project.

Add an animal field and parameter as specified in the diagram below.
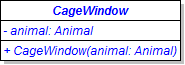
Class Diagram: Cage Window. Reference figure for create a window for showing moving animals in a cage.
Class Diagram: Cage Window
2 In the window's XAML, add a Grid tag within the existing Grid tag.

It has the following properties with corresponding values:

  • x:Name:"animalGrid"
  • Margin:"0,0,0,45"
3 Move the moveAnimalButton and its click event handler from the MainWindow to the CageWindow.

The button should be inside the outer grid and below the inner grid.
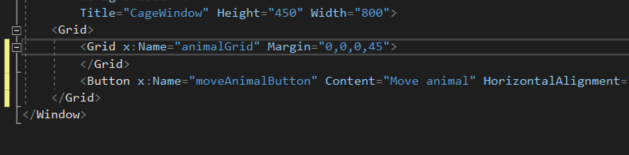
Snip: Move Button. Reference figure for create a window for showing moving animals in a cage.
Snip: Move Button
4 Replace the event handler body with a call to the animal field's Move method.
C Add a button for launching the cage window.
1 Add a button to the MainWindow called showCageButton. Add a click event handler for it.
2 In the event handler, get the selected animal and cast it as an animal.

If the animal is not null, create a CageWindow and show it using .Show(). Otherwise, tell the user that they must select an animal to show.

D Check Your Work
1 Set a breakpoint on the first line of the mammal's Move method.
2 Run the WPF application.
3 Select the Dingo and click the Show cage button. The CageWindow should appear.
4 Click the Move animal button.

The breakpoint in the mammal's Move method should get hit. The method should have the same functionality as before.
Draw animals in the cage window
Acceptance Criteria
Acceptance criteria
  • The cage window draws the animal at its current position.
6.Draw animals in the cage window
Problem
Solution
A Add code to draw animals to the CageWindow.
1 Make changes to the CageWindow as specified in the diagram below.
Class Diagram: CageWindow. Reference figure for draw animals in the cage window.
Class Diagram: CageWindow
2 Call the DrawAnimal method from the window_Loaded event handler.
3 Add the following code to CageWindow.xaml below the existing Grid tags.
<Grid x:Name="outerGrid">
    <Viewbox Stretch="Uniform">
        <Border x:Name="cageBorder" BorderBrush="Black" BorderThickness="1" Height="400" Width="800" Margin="10,10,10,50">
            <Grid x:Name="cageGrid"/>
        </Border>
    </Viewbox>
</Grid>
4 Cut and paste your moveAnimalButton xaml tags below the end Viewbox tag.
5 Delete the original Grid tags.
6 Change the Height of the CageWindow to 500 and the Width to 900.

Your xaml code should look similar to the image below.
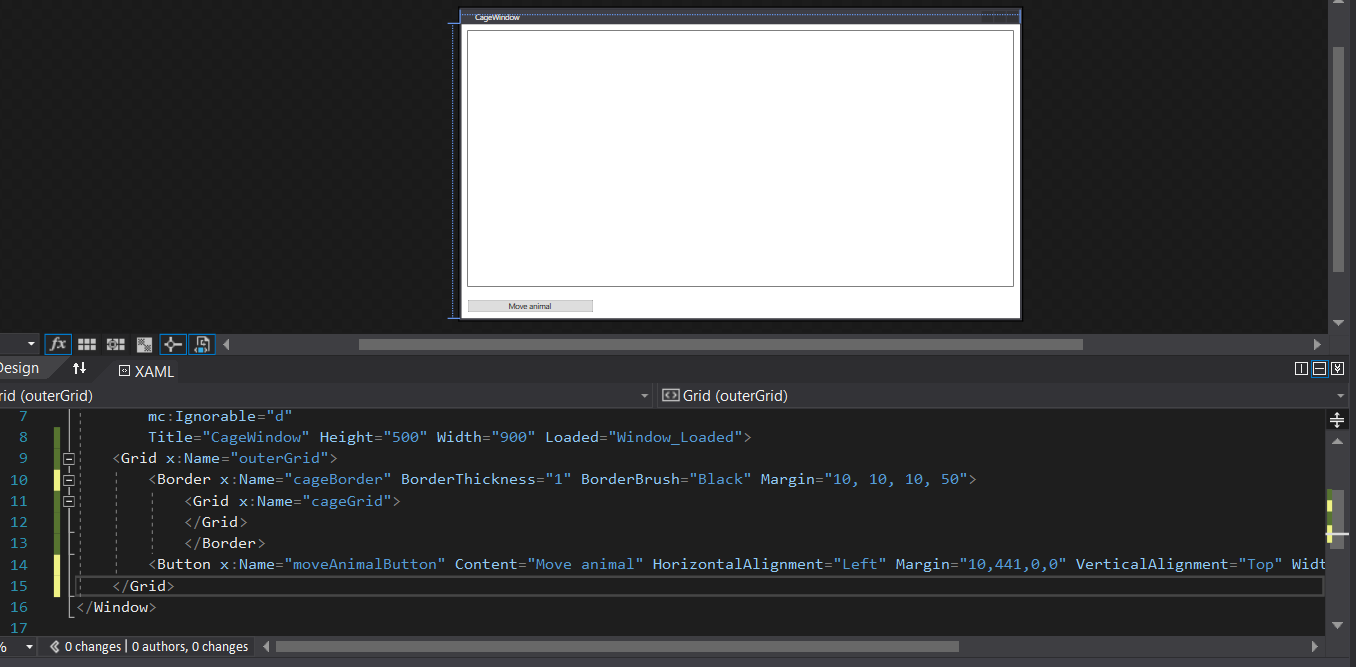
Snip: CageWindow Xaml. Reference figure for draw animals in the cage window.
Snip: CageWindow Xaml
7 Put the following code inside the GetViewBox method
// Instantiate viewBox.
Viewbox finishedViewBox = new Viewbox();

// Sets the animals size.
double itemWidth = canvas.Width;
double itemHeight = canvas.Height;

// Sets the screen scale.
double xScale = 0.7;
double yScale = 0.7;

xScale *= this.cageGrid.ActualWidth / maxXPosition;
yScale *= this.cageGrid.ActualHeight / maxYPosition;

// Changes the size of the animal based on the scale of the screen.
itemWidth *= xScale;
itemHeight *= yScale;

// Sets the width of the viewBox to the size of the canvas.
finishedViewBox.Width = itemWidth;
finishedViewBox.Height = itemHeight;

// Sets the animals location on the screen.
double xPercent, yPercent;

// Scales based on position - on maxX and maxY
xPercent = (this.cageGrid.ActualWidth - itemWidth) / maxXPosition;
yPercent = (this.cageGrid.ActualHeight - itemHeight) / maxYPosition;

int posX, posY;

posX = Convert.ToInt32(xPosition * xPercent);

posY = Convert.ToInt32(yPosition * yPercent);

finishedViewBox.Margin = new Thickness(posX, posY, 0, 0);

// Adds the canvas to the view box.
finishedViewBox.Child = canvas;

// Returns the finished viewBox.
return finishedViewBox;
8 In the DrawAnimal method
Subtasks
  • A. Add the following code. This clears any previous drawing from the cageGrid. Otherwise, the animal would be redrawn over and over and over without ever being removed.
this.cageGrid.Children.Clear();
Subtasks
  • B. Set a string variable called resourceKey to the Name of the animal's Type. Using a ternary operator, if the animal's age is zero add 'Baby' to the end of the resourceKey, else add 'Adult'.
Subtasks
  • C. The resource key is then used to grab the animal image from the Animal XAML and store it as a Canvas object. Create a Canvas variable called canvas. Set the variable to the code below:
5.1.4 How to Use the WPF Canvas 5.1.5 How to Use Resources and Resource Keys
Application.Current.Resources[resourceKey] as Canvas;
Subtasks
  • D. Set a local Viewbox variable to the GetViewBox method. This viewBox will be placed in the cageWindow's grid.
5.1.6 How to Use the WPF ViewBox
Subtasks
  • E. Pass in the following values to the GetViewbox method call:
  • maxXPosition: 800
  • maxYPosition: 400
  • xPosition: animal.XPosition
  • yPosition: animal.YPosition
  • canvas: pass in the previously created canvas variable.
Subtasks
  • F. Align the viewBox to the grid programmatically by setting the viewBox's HorizontalAlignment to the left and set the viewBox's VerticalAlignment to the top. It will look like the code below.
viewBox.HorizontalAlignment = HorizontalAlignment.Left;
viewBox.VerticalAlignment = VerticalAlignment.Top;
Subtasks
  • G. To control the animal's movement, so that it flips when it hits the cage's boundaries, place the code below after the viewBox is aligned.
// If the animal is moving to the left
if (animal.XDirection == HorizontalDirection.Left)
{
      // Set the origin point of the transformation to the middle of the viewBox.
       viewBox.RenderTransformOrigin = new Point(0.5, 0.5);

      // Initialize a ScaleTransform instance.
      ScaleTransform flipTransform = new ScaleTransform();

      // Flip the viewBox horizontally so the animal faces to the left
      flipTransform.ScaleX = -1;

      // Apply the ScaleTransform to the viewBox
      viewBox.RenderTransform = flipTransform;
}
Subtasks
  • H. Currently, the viewBox is not attached to the grid, so it won't be seen when the Show Cage button is clicked. To add the viewBox to the grid, paste the code below at the end of DrawAnimal.
this.cageGrid.Children.Add(viewBox);
B Add a button to the CageWindow called drawAnimalButton.

Add a click event handler for it. In the event handler, call the DrawAnimal method.

C In the Animal constructor, assign the YPosition to 400 instead of 0 to make the animal start at the bottom not the top.
D Check Your Work
1 Check movement
Subtasks
  • A. Run the WPF application.
  • B. Select the dingo and click the Show cage button. The CageWindow should appear and the dingo should be drawn.
  • C. Click the Move animal button, and then click the Draw animal button. The dingo should move a small amount to the right.
2 Check the clearing of the previous drawing and flipping
Subtasks
  • A. Stop the application. Comment out the line of code in the DrawAnimal method that Clear's the cageGrid's Children and in the Animal class's constructor change the MoveDistance from 10 to 40.
  • B. Start the application, select the Dingo and click Show Cage.
  • C. Click the Move animal button several times and then the Draw animal button. The Dingo should move farther than before and now there should be two Dingos instead of one.
  • D. Click the Move animal button and Drawn animal button until the Dingo reaches the end. Ensure that the Dingo flips around when it reaches the right side.
3 Check the boundaries of the drawing
Subtasks
  • A. Stop the application. Un-comment the line of code in the DrawAnimal method that Clear's the cageGrid's Children and in the Animal class's constructor change the XPositionMax to 850.
  • B. Start the application, select the Dingo and click Show Cage.
  • C. Click the Move animal button 22 times (sorry) and then the Draw animal button. Notice that the Dingo is outside of the bounds of the cageWindow.
  • D. Stop the application. Change the XPositionMax back to 800.
4 Check the scaling
Subtasks
  • A. In the CageWindow.xaml, comment out the Viewbox tags and remove the Height and Width property from the cageGrid.
  • B. Start the application. Click the Dingo and click the Show cage button.
  • C. Drag the corner of the window to make it larger and smaller.
  • D. Move the animal and draw it at different window sizes. The Dingo should scale depending on the size of the window. However, the buttons and the Dingo may be cut off at certain points.
  • E. Stop the application. Un-comment the Viewbox tags and replace the Height (400) and Width (800) properties.
  • F. Start the application and show the Dingo cage.
  • G. Drag the corner of the window to make it larger and smaller. Now both the Dingo and the cageGrid should scale correctly. The buttons, however, are still an issue but we will get rid of those in the next step.
Make the animals move on a timer
Acceptance Criteria
Acceptance criteria
  • A timer calls the animal's movement behavior.
7.Make the animals move on a timer
Problem
Solution
5.1.7 How to Use Timers
A Make changes to the Animal class as specified in the diagram below.

Use the System.Timers namespace when adding the timer.
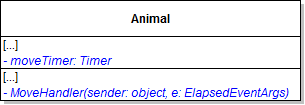
Class Diagram: Move Timer. Reference figure for make the animals move on a timer.
Class Diagram: Move Timer
B Set up the move timer.
5.1.8 How to Add an Event Handler to an Event
1 In the Animal constructor, initialize the move timer to a new timer.

Pass in 1000 milliseconds for the interval, as shown in the code below:

this.moveTimer = new Timer(1000);
2 Then, attach the MoveHandler method to the timer's Elapsed event, as shown in the code below.
this.moveTimer.Elapsed += this.MoveHandler;
3 Then start the timer by calling its Start method.
C In the MoveHandler method, call the Move method.
D Remove the moveAnimalButton and its click event from the CageWindow.
E Change the MoveDistance from 40 back to 10.
F Check Your Work
1 Run the WPF application. Select the Dingo and show it's cage.
2 Click the Draw animal button.

The animal should move across the window. Wait a few seconds and click the button again. The animal should move farther across the window.

Debugging movement code
Acceptance Criteria
Acceptance criteria
  • The debugger exposes the movement state at the required checkpoints.
8.Debugging movement code
Problem
Solution
A Check Your Work
1 Set a breakpoint in the Animal class MoveHandler method.
2 Start the application.
3 Press F11 to step into movement code.

The debugger will continually kick you back to the breakpoint, making it virtually impossible to debug.

4 Once it exits the movement code, it will re-enter after the set amount of time.

A blue circle will appear next to the yellow arrow as seen in the image below.

Exclamation point on blue diamond on top of yellow arrow (next execution statement) when looping around the code again.. Reference figure for debugging movement code.
Exclamation point on blue diamond on top of yellow arrow (next execution statement) when looping around the code again.
5 Stop the application.
B Within the Animal class MoveHandler method, disable the move timer prior to calling the Move method using .Stop(), then enable the timer after calling Move using .Start()
C Check Your Work
1 Set a breakpoint in the Animal class MoveHandler method.
2 Start the application and press F11 to step into movement code.
D We don't want the time starting and stopping when the actual application is released.

Surround the line stopping the timer with a conditional compiler directive to run only in debug mode. Do the same for the starting of the timer.
E Check Your Work
1 Change Visual Studio to run in release mode.
2 Ensure that the code to disable and enable the timer is grey.
3 Change Visual Studio to run in debug mode.
Redraw the caged animal on a timer
Acceptance Criteria
Acceptance criteria
  • A redraw timer refreshes the displayed animal as its position changes.
9.Redraw the caged animal on a timer
Problem
Solution
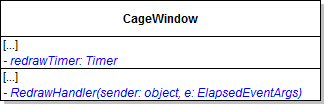
A Make changes to CageWindow.xaml.cs as specified in the diagram below.
Class Diagram: Redraw Timer. Reference figure for redraw the caged animal on a timer.
Class Diagram: Redraw Timer
B Set up the redraw timer.
1 In the constructor, initialize the redraw timer to a new timer. Pass in 100 milliseconds for the interval.
2 Then, attach the RedrawHandler method to the timer's Elapsed event.
3 Then start the timer by calling its Start method.
C Put the following code in the RedrawHandler method.

This prevents threading issues between the timer and the drawing.

5.1.9 How to Avoid Threading Issues
this.Dispatcher.Invoke(new Action(delegate()
{
    this.DrawAnimal();
}));
D Remove the drawAnimalButton and its click event handler from the CageWindow.
E Change the Margin of the cageBorder to 10,10,10,10
F Check Your Work
1 Run the WPF application.
2 Show the Dingo in the cage window. The Dingo should move across the window on its own.
3 Play around with the different values for the timers (Animal and CageWindow) and the MoveDistance of the animal.

The gif below has a MoveDistance of 20, moveTimer of 100 milliseconds and a redrawTimer of 10 milliseconds.
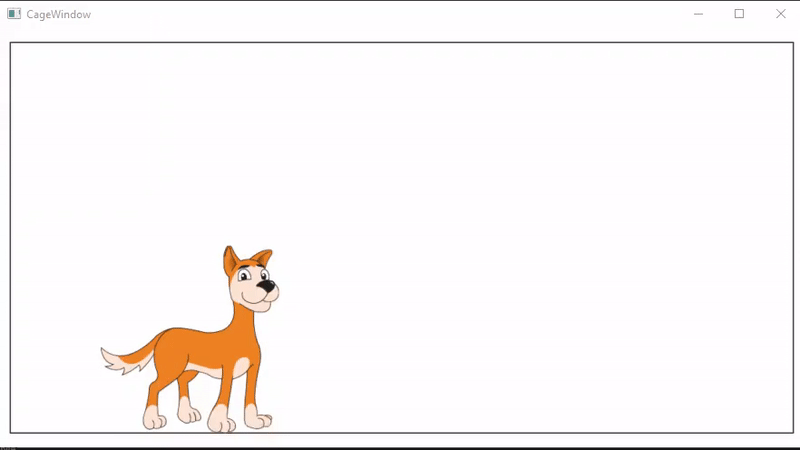
Gif: Moving Dingo. Reference figure for redraw the caged animal on a timer.
Gif: Moving Dingo
Demonstrate your work
10.Record a video showing
A The Mammal class' Move method
1 Explain what the code is doing
B Your WPF Application
1 Test your error notifications
Subtasks
  • A. Admit guests until the zoo would have 6.
  • B. Ensure the 6th admission displays a message box containing:
  • B.1. The exception message
  • B.2. The inner exception type
  • B.3. The inner exception message
2 Test Guest editing
Subtasks
  • A. Double click an existing guest and make sure the controls are initialized to the guest's values.
  • B. Change the guest's values and click OK. The guest's values should also be updated in the list box.
3 Test Animal editing
Subtasks
  • A. Add an animal to the zoo.
  • B. Double click the animal you just added and make sure the controls are initialized to the animal's values.
  • C. Change the animal's values and click OK. The animal's values should also be updated in the list box.
4 Test Display of Animals
Subtasks
  • A. Add a 10 year old Dingo to the zoo
  • B. Show the Dingo. It should be moving between the left and right edge of the cage.
  • C. Change the Animal's age to 0 and show it again.
  • D. The Animal's portrait should be a baby version and it should still be moving like before.
  • E. Repeat Steps A - D for each type of Animal in the zoo.
Prepare and submit your work
11.Submission Steps
A Ensure that your application has no compiler errors or warnings
B Ensure that your code is StyleCop compliant
C Remove all bin and obj folders from your solution
D Zip your solution
E Submit your zipped solution to the Feedback System
F Submit your Feedback System results link to Canvas
G Submit your video recording to your f-channel
Source credit

© 2026 Northcentral Technical College