4.1A Zoo Assignment

4.1A Zoo Assignment
Getting started
1.Getting started
A Download this starting zip file.
B Extract the contents of the zip file to a location of your choice.
C Rename the Zoo 4.1A LastName folder, replacing LastName with your last name.
D Within the folder renamed in the previous step, rename the file Zoo 4.1A LastName.sln file, replacing LastName with your last name.
E Open the contained solution file and examine the code to establish a comfort level with it in preparation for making further changes.
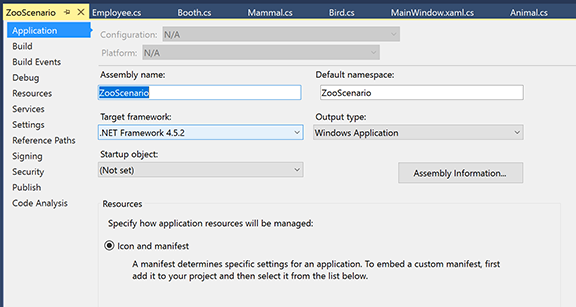
Target Framework. Reference figure for getting started.
Target Framework
Link
Target Framework. Reference figure for getting started.
Target Framework
F Ensure there are no Style Cop warnings.
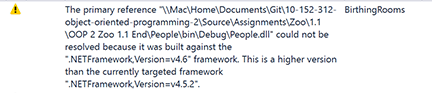
StyleCopMissingAssembly.png. Reference figure for getting started.
StyleCopMissingAssembly.png
Fix Style Cop Guide
Remove unused using directives
Acceptance Criteria
Acceptance criteria
  • Unused imports are removed and the solution builds without compiler errors or warnings.

2.Remove unused using directives
Problem
Solution
4.1.1 How to Optimize Using Directives
A Remove and sort the using directives in every class in the solution, including MainWindow.xaml.cs.
B Check your work: Build the solution and ensure that there are no errors or compiler warnings.
Write a compiler directive based on build mode
Acceptance Criteria
Acceptance criteria
  • The window title includes [DEBUG] only in a Debug build.
3.Write a compiler directive based on build mode
Problem
Solution
4.1.2 How to Use Visual Studio Build Configurations 4.1.3 How to Use Conditional Directives
A In the constructor of the MainWindow, after the call to InitializeComponent, write a compiler directive that adds [DEBUG] to the title of the window, as shown in the code below.
#if DEBUG
    this.Title += " [DEBUG]";
#endif#if DEBUG
    this.Title += " [DEBUG]";
#endif
B Check your work
1 Run the WPF application in Debug mode. The window title should have [DEBUG] added to it.
2 Run the WPF application in Release mode. The window title should not have [DEBUG] after it.
Create new class libraries
Acceptance Criteria
Acceptance criteria
  • Related classes reside in the required class libraries, with namespaces and references that allow each project to build.
4.Create new class libraries
Problem
Solution
4.1.4 How to Add Class Libraries and Use the File System 4.1.5 Why we Use Multiple Projects in a Solution
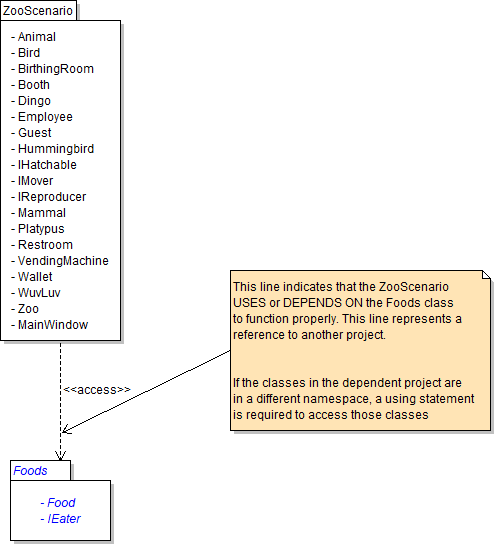
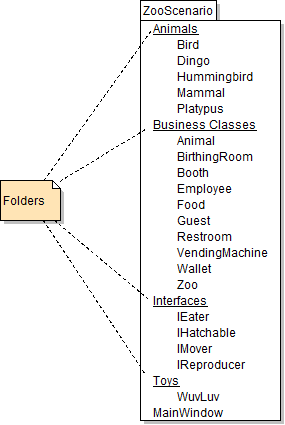
A The package diagram below represents the ZooScenario as it is now.
Start Package. Reference figure for create new class libraries.
Start Package
B Add a Foods project.
1 Add a new project of type C# Class Library (.Net Framework) from the Windows Classic Desktop section named Foods to the ZooScenario solution.

Make sure the Framework version is 4.6.1. Then delete the auto-generated class named Class1.
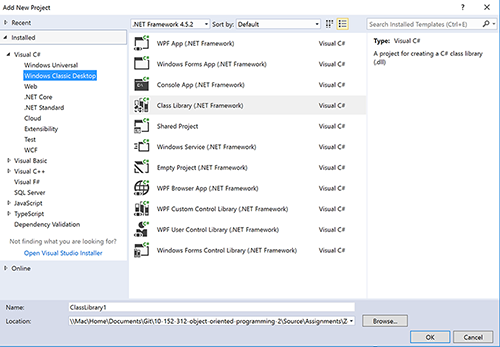
New Class Library. Reference figure for create new class libraries.
New Class Library
2 Check your file tree in the File Explorer and make sure Class1 was deleted; if it wasn't, delete it.
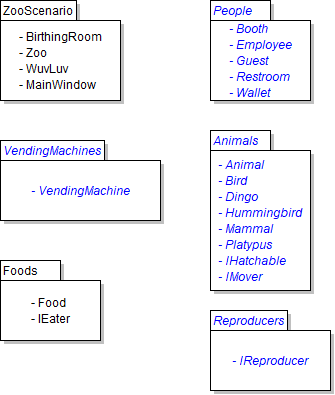
3 Move the Food class and the IEater interface from the ZooScenario project into the newly created Foods project.
Package Diagram: Foods Project. Reference figure for create new class libraries.
Package Diagram: Foods Project
4 The Food class and IEater interface have been moved to a new project, but they still reside in the same namespace (ZooScenario) as before.

Change the namespace of the Food class and the IEater interface from ZooScenario to Foods.

5 Build the solution.

This will generate several errors suggesting that a using directive or an assembly reference is missing.

6 To address these errors, add using directives as necessary to get the application to compile.

Attempt to rebuild the solution after resolving each error until all are resolved.
7 Check your work
Subtasks
  • A. Build the Foods project.
  • B. Build the ZooScenario project. No errors should be generated, and the build should succeed.
C Create more projects
1 Create class libraries for each of the projects as shown in the package diagram below, then move classes into the appropriate project.
Package Diagram: Other Class Libraries. Reference figure for create new class libraries.
Package Diagram: Other Class Libraries
2 Add references to the appropriate projects to remove compiler errors that occur during the process of adding projects and moving files.
3 Change the namespaces for all classes to reflect their new location.

All namespaces should be the same as the project names (e.g. classes in the Animals project will have the namespace Animals).
4 Add using directives to the appropriate namespaces to remove compiler errors that occur during the process of changing namespaces.
5 Organize the Animals project.
Subtasks
  • A. Make a new Abstract Animals folder and put Animal.cs, Bird.cs, and Mammal.cs in it.
  • B. Make a new Animals folder and put Dingo.cs, Hummingbird.cs, and Platypus.cs in it.
  • C. Make a new Interfaces folder and put IHatchable.cs and IMover.cs in it.
6 Check your work: Build each project individually from the bottom of the chain to the top, until each project has been successfully built.
D Create even more projects
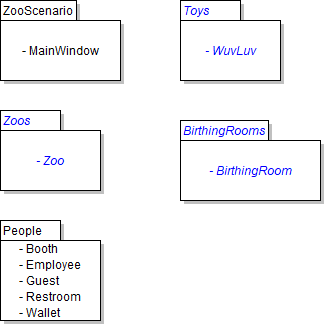
1 Create class libraries for each of the new projects shown in the package diagram below and move the classes into the appropriate projects.
Package Diagrams: Other Class Libraries. Reference figure for create new class libraries.
Package Diagrams: Other Class Libraries
2 Change the namespaces for all classes to reflect their new location.

All namespaces should be the same as the project names (e.g. classes in the Zoos project will have the namespace Zoos).
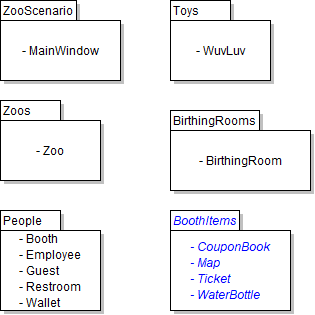
3 Add references to the appropriate projects and using directives to the appropriate namespaces to remove compiler errors that occur during the process of adding projects, moving files and changing namespaces.
4 Build each project individually from the bottom of the chain to the top, until each project has been successfully built.
5 Check your work: Build each project individually from the bottom of the chain to the top, until each project has been successfully built.
Create BoothItem classes
Acceptance Criteria
Acceptance criteria
  • The booth item classes expose the fields, constructors, and behavior shown in the supplied diagrams.
5.Create BoothItem classes
Problem
Solution
A Create a new class library project for the new classes as shown in the package diagram below.
Package Diagram: BoothItems. Reference figure for create boothitem classes.
Package Diagram: BoothItems
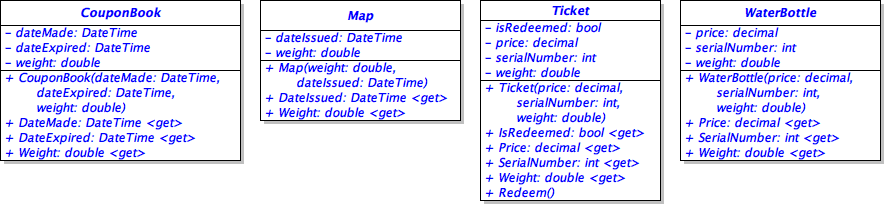
B Create the classes as specified in the class diagram below. Assign all fields in the constructor for each class.
Class Diagram: BoothItems. Reference figure for create boothitem classes.
Class Diagram: BoothItems
1 Fill out Ticket's Redeem method to redeem the ticket.
C Check your work
1 Build the BoothItems project.
2 Build the entire solution. Both builds should succeed.
Create instances of booth items
Acceptance Criteria
Acceptance criteria
  • The booth contains the specified quantities of dated items and uniquely numbered tickets and water bottles.
6.Create instances of booth items
Problem
Solution
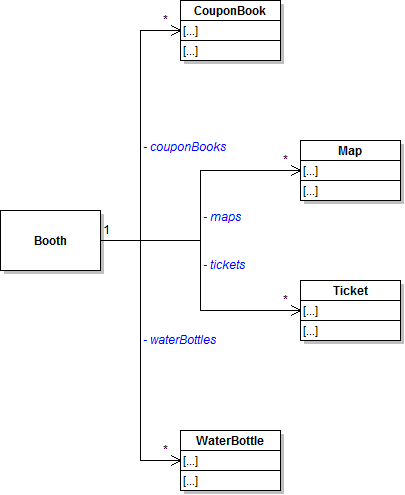
A Add a list for each item type to the Booth class and initialize each list in the booth's constructor.
Class Diagram: BoothItems Lists. Reference figure for create instances of booth items.
Class Diagram: BoothItems Lists
B Create coupon books, maps, tickets, and water bottles in the booth's constructor.
4.1.6 How to Use the DateTime Type in C# 4.1.7 How to Use For Loops in C# How to Sign in to Lynda
1 Use a for loop to create five coupon books.

All coupon books were issued on today's date, expire one year after today's date, and weigh 0.8 lbs.

for (int i = 0; i < 5; i++)
{
    this.couponBooks.Add(new CouponBook(DateTime.Now, (DateTime.Now).AddYears(1), 0.8));
}
2 Use a for loop to create 10 maps. All maps were issued on today's date and weigh .5 lbs.
3 Use a for loop to create five tickets.

The price of each ticket is stored in the Booth's ticketPrice field and each ticket weighs .01 lbs. Give each ticket a unique, sequential serial number.

4 Use a for loop to create five water bottles.

All water bottles are $3 and weigh 1 lb. Give each water bottle a unique serial number.
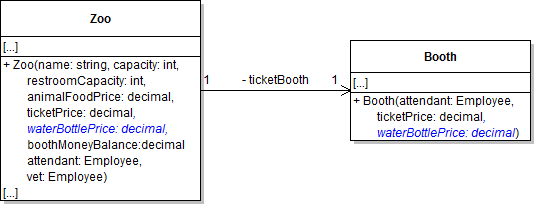
5 Add a water bottle price parameter to the zoo and booth constructor as shown in the class diagram.
Class Diagram: WaterBottle Price. Reference figure for create instances of booth items.
Class Diagram: WaterBottle Price
C Check your work
1 Set a breakpoint in the booth's constructor after the for loops.
2 Run the WPF application.
3 Run the program and after the breakpoint has been hit, examine the lists in the booth to ensure that each has the correct number of items, that the map and coupon book dates are correct, that the water bottle price is correct and that each ticket and water bottle has a unique serial number.
Add StyleCop to the rest of your projects.
Acceptance Criteria
Acceptance criteria
  • StyleCop checks all projects and the remaining StyleCop errors are fixed.
7.Add StyleCop to the rest of your projects.
A Follow the instructions to add StyleCop to each of your new projects.

The ZooScenario project already has StyleCop installed.

StyleCop Installation

B Check your work
1 Remove the summary tags from the Animal class' header.
2 You should get these warnings
4.1A Zoo 7B CYW AnimalClassWarnings.png. Reference figure for add stylecop to the rest of your projects.
4.1A Zoo 7B CYW AnimalClassWarnings.png
C Fix any remaining StyleCop errors.
D Bookmark the StyleCop page. New projects will need to add StyleCop.
Demonstrate your work
8.Record a video of your application showing
A StyleCop works in all Projects
B All projects have a target framework of .Net Framework 4.6.1.
C The MainWindow constructor uses a Conditional Directive
Prepare and submit your work
9.Submission Steps
A Ensure that your application has no compiler errors or warnings
B Ensure that your code is StyleCop compliant
C Remove all bin and obj folders from your solution
D Zip your solution
E Submit your zipped solution to the Feedback System
F Submit your Feedback System results link to Canvas
G Submit your video recording to your f-channel
Source credit

© 2026 Northcentral Technical College