7.1 SOLID Principles Lab

Overview

7.1 SOLID Principles Lab

Work through the stories in order. Use the acceptance criteria to check each feature, and complete the nested tasks using the specified names, values, and scenarios.

Create a new project.
Acceptance Criteria
Acceptance criteria
  • The completed implementation satisfies this requirement: Change the Name to "SOLIDPrinciples".
  • The completed implementation satisfies this requirement: Change the Solution name to: 7.1 SOLID *YourLastName*.
Instructions
1.Create a new project.
A Open Visual Studio.
B Choose File --> New Project
C Select Console App (.NET Core)

Previously, the majority of projects you have worked on have been in .NET Framework. Here we are introducing you to another version of the C# language .NET Core, that has been made only fairly recently. Core is open source compared to Framework that is developed exclusively by Miscrosoft. Read the article below for more information.

.NET Core - Wikipedia

.NET Core - Wikipedia
D Change the Name to "SOLIDPrinciples".
E Change the Solution name to: 7.1 SOLID *YourLastName*.
F The Location defaults to your Documents folder, but you can change this if need be.
G Click OK
H In the Main method after the default Console.WriteLine, call Console.Read().
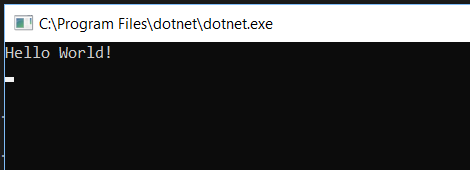
I Run the application. The output looks like a normal Framework app which the exception of the title bar.
Output for 7.1 SOLID Principles Lab. Use the adjacent task instructions to identify the required controls, output, or debugger values.
Output
J Open File Explorer and navigate to the Solution root folder.
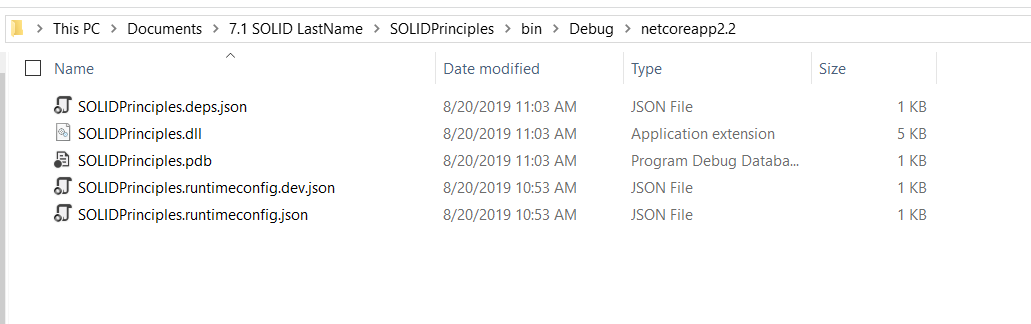
K Open the project folder --> bin --> Debug --> netcoreapp2.2
Debug Folder for 7.1 SOLID Principles Lab. Use the adjacent task instructions to identify the required controls, output, or debugger values.
Debug Folder

This structure looks different from Framework in that this does not have a standalone exe file and has additional json files to help with configuration.

A file explorer window displaying the contents of the netcoreapp2.2 folder. In order top to bottom the following files are listedexplorer window displaying the contents of the netcoreapp2.2 folder. In order top to bottom the following files are listed:
:
SOLIDPrinciples.deps.json
SOLIDPrinciples.dll
SOLIDPrinciples.pdb
SOLIDPrinciples.runetimeconfig.dev.json
SOLIDPrinciples.runtimeconfig.json
Create a Class Library
Acceptance Criteria
Acceptance criteria
  • The completed implementation satisfies this requirement: Change the Name to OpenClosed and click OK
  • The completed implementation satisfies this requirement: Remove the default Class1 class.
Instructions
2.Create a Class Library
A Right-click the Solution and select Add --> New Project...
B Select Class Library (.NET Standard).
C Change the Name to OpenClosed and click OK
D Remove the default Class1 class.
E Build your application.
F Open File Explorer and navigate to the Solution root folder.
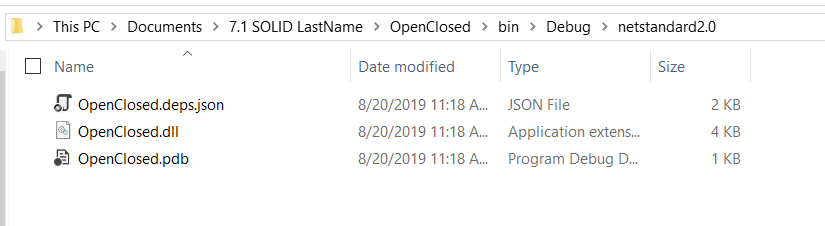
G Open the OpenClosed project folder --> bin --> Debug --> netstandard2.0
Class Library Debug Folder for 7.1 SOLID Principles Lab. Use the adjacent task instructions to identify the required controls, output, or debugger values.
Class Library Debug Folder

This looks similar to the console app's debug folder without the json startup files because class libraries can't start up.

A File Explorer window displaying the contents of the netstandard2.0 folder. In order top to bottomExplorer window displaying the contents of the netstandard2.0 folder. In order top to bottom, the following files are displayedfollowing files are displayed:
:
OpenClosed.deps.json
OpenClosed.dll
OpenClosed.pdb
Import classes and projects.
Acceptance Criteria
Acceptance criteria
  • The supplied classes are placed in the required folders and projects.
  • Project references and using directives allow the imported types to build.
Instructions
3.Import classes and projects.
A Download and extract the zip file below.

SOLID Exercise.zip

SOLID Exercise.zip
B Add a class.
1 Open SOLID Exercise --> OpenClosed and copy the Hero.cs
2 Paste the Hero.cs class into the OpenClosed folder in your solution.
3 Right click the OpenClosed project and select Add --> Existing Item...
4 Open the OpenClosed folder and select the Hero.cs
C Add a project.
1 Open SOLID Exercise and copy all folders except for OpenClosed.
2 Paste the folders inside your solution folder.
3 Right click the Solution and click Add --> Existing Project...
4 Open your solution folder --> SingleResponsibility folder --> SingeResponsibility.csproj
D Repeat step C(3-4) for LiskovSubstitution, InterfaceSegregation and DependencyInversion
E Add references to projects.
1 Right-click Dependencies in the SOLIDPrinciples project and select Add Reference...
2 Navigate to the Projects tab.
3 Select all 5 of the projects available and click OK.
Single Responsibility Principle
Acceptance Criteria
Acceptance criteria
  • The completed implementation satisfies this requirement: Remove the "Hello World" and replace it with "---------------- Single Responsibility Principle ----------------"
  • Assignment exposes the required contract: name: string; points: int; Assignment(name: string, points: int); Name get.
  • Student exposes the required contract: firstName: string; lastName: string; motivation: int; skill: int.
Instructions
4.Single Responsibility Principle

We have a Student class with some functionality that relates to an assignment. But what if the formula for grading changes? Should we have to open up the Student code that really doesn't have anything to do with assignments other than use them to change functionality? No.
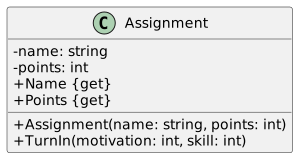
A Define a new Assignment class based on the diagram below.
Class Diagram: Assignment Class; Members and relationships are shown in the editable reference; unrelated members may be omitted.
Class Diagram: Assignment Class
  • New
  • Changed
  • Removed

It is easy to not want to create many classes for fear of cluttering up a solution/project, but it is always better than have many classes that do one thing than one large class that does many.

A UML Class diagram of the Assignment Class diagram of the Assignment class is displayed:
:
Fields:
- name: : string
- points- points: : int
Methods and Propertiesand Properties:
:
+ Assignment(name: string, points: int)
+ Name <get>
+ Points <get>
+TurnIn(motivation: int, skill: int)
B Cut the code from the TurnInAssignment method in the Student class and paste it into the Assignment class's TurnIn method.
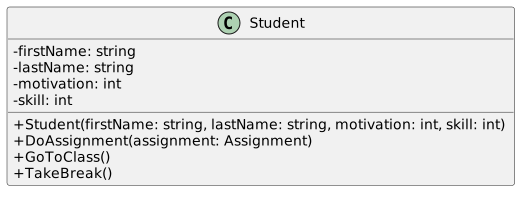
C Make changes to the Student class based on the diagram below.
Class Diagram: Student; Members and relationships are shown in the editable reference; unrelated members may be omitted.
Class Diagram: Student
  • New
  • Changed
  • Removed
A UML Class diagram of the Student Class diagram of the Student class is displayed:
:
Fields:
- assignmentName: : string (red with a line striking it out)
- assignmentPoints: : int (red with a line striking it out)
-firstName: : string
-lastName-lastName: : string
-motivation-motivation: : int
-skill-skill: : int
Methods and Propertiesand Properties:
:
+ Student(firstName: string, lastName: string, motivation: int, skill: int)
+ DoAssignment(assignmentName: string, assignmentPoints: int, assignment: Assignment)  (the existing parameters assignmentName and Assignment Points are red and with a line striking them out. The new parameter as
+ GoToClass()
+ TakeBreak()
+ TurnInAssignment() (red with a line striking it out)
D In the DoAssignment method, fix the errors and call the TurnIn method after the WriteLine.
E In the Main method in the SOLIDPrinciples project...
1 Remove the "Hello World" and replace it with "---------------- Single Responsibility Principle ----------------"
2 Instantiate a Student object with skill and motivation between 0 and 100.
3 Instantiate an Assignment object.
4 Call DoAssignment and pass in the Assignment object.
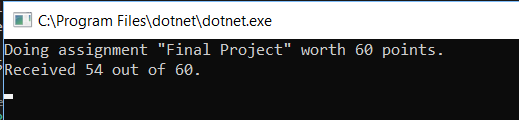
F Check Your Work: Run the application. Your output should be similar to the image shown below.
Output for 7.1 SOLID Principles Lab. Use the adjacent task instructions to identify the required controls, output, or debugger values.
Output

We have now broken the Student class out so that it no longer has anything to do with how an assignment functions. Both the Student and Assignment class only have ONE responsibility now.

A console window displaying the following textwindow displaying the following text:
:
Line 11: : Doing assignment "Final Project" worth 60 points.
Line 2"Final Project" worth 60 points.
Line 2: : Received 54 out of 60.54 out of 60.
Open/Closed Principle
Acceptance Criteria
Acceptance criteria
  • The completed implementation satisfies this requirement: Call the hero's Battle method and pass in "Goblin".
  • The completed implementation satisfies this requirement: Change the minion field from type string to type Minion.
  • Minion exposes the required contract: hp: int; attack: int; defense: int; HP: int get set.
  • Goblin exposes the required contract: Goblin(hp: int, attack: int, defense: int); Battle(hero: Hero) override.
Instructions
5.Open/Closed Principle

Classes should be OPEN to extension and CLOSED to modification. This means that a class should not need to be messed with if you need to add new features or derive a subclass from it.

A Explore the beginning project.
1 In Main, after the call to DoAssignment, print out "\n---------------- Open/Closed Principle ----------------"
2 Instantiate a new Hero, passing in 100, 50, 40 and 20 for arguments.
3 Call the hero's Battle method and pass in "Goblin".
4 Run the application.

What if we wanted to add more minions to the application? We would have to go in and change the Hero class to accommodate/modify that.
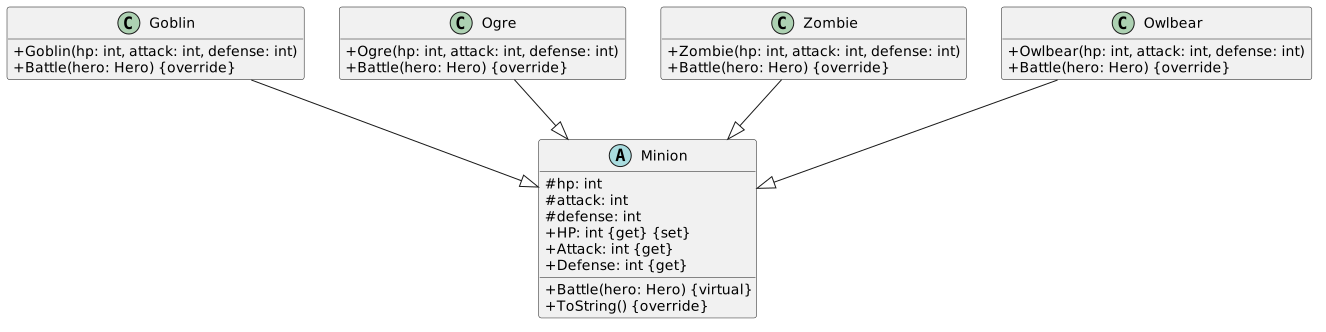
B Close the class to modification.
1 Make new classes based on the diagram below.
Class Diagram: Minions; Members and relationships are shown in the editable reference; unrelated members may be omitted.
Class Diagram: Minions
  • New
  • Changed
  • Removed
A UML Class diagram displaying the Minion <Class diagram displaying the Minion <abstract> class with 4 subclasses inheriting from itfrom it: : Goblin, Ogre, Zombie, and OwlBear.
Minion < Abstract >
Fields
# hp: int
# attack: int
# defense: int
Methods and PropertiesOwlBear.
Minion < Abstract >
Fields
# hp: int: int
# attack: int: int
# defense: int: int
Methods and Properties:
:
+ HP: : int <get> <set>
+ Attack: : int <get>
+ Defense: : int <get>
+ Battle(Hero hero) <virtual>
+ ToString() <override>
Goblin (inheriting Minion)
No Fields
Methods and Properties
+ Goblin(hpMethods and Properties
+ Goblin(hp: : int, attack: : int, defense: : int)
+ Battle(Hero)
+ Battle(Hero: : hero)
Ogre (inheriting Minion)
No Fields
Methods and Properties
+ Ogre(hp)
Ogre (inheriting Minion)
No Fields
Methods and Properties
+ Ogre(hp: : int, attack: : int, defense: : int)
+ Battle(Hero)
+ Battle(Hero: : hero)
Zombie(inheriting Minion)
No Fields
Methods and Properties
+ Zombie(hp)
Zombie(inheriting Minion)
No Fields
Methods and Properties
+ Zombie(hp: : int, attack: : int, defense: : int)
+ Battle(Hero)
+ Battle(Hero: : hero)
OwlBear(inheriting Minion)
No Fields
Methods and Properties
+ OwlBear(hp)
OwlBear(inheriting Minion)
No Fields
Methods and Properties
+ OwlBear(hp: : int, attack: : int, defense: : int)
+ Battle(Hero)
+ Battle(Hero: : hero))
2 Put the Minion class and the minions in a folder named Minions
3 In the Minion class's Battle method, paste the code below:
hero.HP -= (int)Math.Round(this.attack - hero.Defense * .20);
this.hp -= (int)Math.Round(hero.Attack - this.defense * .10);
4 In the Minion class's ToString method, paste the code below:
return $"{this.GetType().Name} HP: {this.hp}";
5 In the Goblin class's Battle method, call the base Battle method and the hero's HackNSlash method.
6 In the Ogre class's Battle method, call the base Battle method and the hero's PutUpShield method.
7 In the Owlbear class's Battle method, call the hero's Run method. Owlbears are too scary to fight.
8 In the Zombie class's Battle method, call the base Battle method and the hero's PerformMagic method.
9 In the Hero class...

Change the minion field from type string to type Minion.

Change the Battle method to take a Minion type not a string type.

Change the references to the minion in the hero methods to minion.GetType().Name

Ensure the your battle method contains the following:

Assign the minion field

Print out a new line

Print out the hero's ToString

Print out the minion's ToString

Call the minion's Battle Method, passing in the hero object

Print out the hero's ToString

Print out the minion's ToString

10 In the Main method, instantiate a Goblin, passing in 80, 40 and 10 as arguments and then call the hero's Battle method,…

In the Main method, instantiate a Goblin, passing in 80, 40 and 10 as arguments and then call the hero's Battle method, passing in the Goblin object.
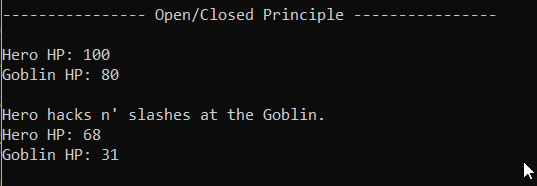
11 Check Your Work: Run the application. Your output should look like the output below:
Output for 7.1 SOLID Principles Lab. Use the adjacent task instructions to identify the required controls, output, or debugger values.
Output
A console displaying the following textdisplaying the following text:
:
Line 11:  :  Open/Closed Principle
Line 22: : Blank
Line 33: : Hero HP: : 100
Line 44: : Goblin HP: : 80
Line 55: : Blank
Line 66: : Hero hacks n' slashes at the Goblin.
Line 7n' slashes at the Goblin.
Line 7: : Hero HP: : 68
Line 88: : Goblin HP: : 31
Line 99: : Blank
12 Change the Goblin object to a Zombie object and run the application. Your output should change to show a Zombie.

Now that we modified the classes to that the Hero's Battle method changes depending on the object we no longer have to modify the Hero class if we need to add another minion. We could add a Dragon class and never have to touch the Hero class at all.

C Open the class to extension.

Along with our Hero we want a Sidekick. The Sidekick can do most of what the Hero can do with a little variation, but right now if we inherited from Hero the Sidekick would have to do everything exactly the same.
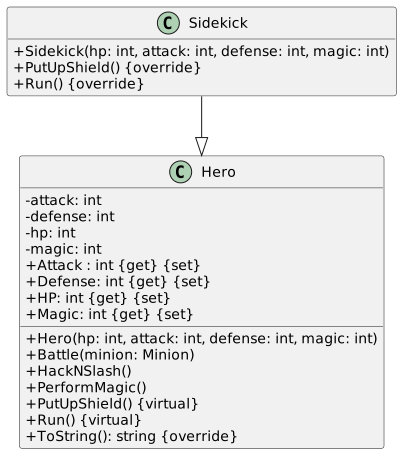
1 In the Hero class, make the PutUpShield and Run methods virtual.
2 Define a new Sidekick class based on the diagram below:
Class Diagram: Sidekick; Members and relationships are shown in the editable reference; unrelated members may be omitted.
Class Diagram: Sidekick
  • New
  • Changed
  • Removed
A class diagram showing the Sidekick Sidekick class inheriting from the Hero class.
.
Hero
All the Fieldsthe Fields, Methods and Properties of the existing Hero and Properties of the existing Hero class are displayed.
Sidekick inheriting from Hero (in blue text)
No Fields
Methods and Properties
+ Sidekick(hpfrom Hero (in blue text)
No Fields
Methods and Properties
+ Sidekick(hp: : int, attack: : int, defense: : int, magic: : int) (in blue text)
+ PutUpShield() <override> (in blue text)
+ Run() <override> (in blue text)) (in blue text)
+ PutUpShield() <override> (in blue text)
+ Run() <override> (in blue text)
3 In the PutUpShield method, print out: "\nSidekick throws body in front of Hero".
4 In the Run method, call the base Run behavior and then print out: "\nSidekick hides in a corner".
5 In the Main method, change the Zombie object to an Ogre object.
6 In the Main method after the hero battles the Ogre...

Instantiate a new Sidekick, passing in 80, 30, 20 and 10.

Call the sidekick's Battle method and pass in the Ogre object.
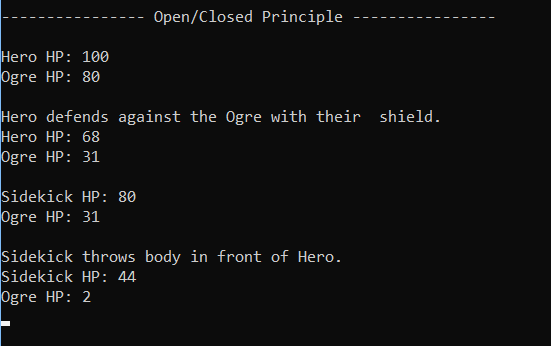
7 Check Your Work: Run the application. Your output should look like the image below.
Output for 7.1 SOLID Principles Lab. Use the adjacent task instructions to identify the required controls, output, or debugger values.
Output
A console window displaying the following textwindow displaying the following text:
:
Line 11: : Open/Closed Principle
Line 22: : Blank
Line 33: : Hero HP: : 100
Line 44: : Ogre HP: : 80
Line 55: : Blank
Line 66: : Hero defends against the Ogre with their shield.
Line 7against the Ogre with their shield.
Line 7: : Hero HP: : 68
Line 88: : Ogre HP: : 31
Line 99: : Blank
Line 1010: : Sidekick HP: : 80
Line 1111: : Ogre HP: : 31
Line 1212: : Blank
Line 1313: : Sidekick throws body in front of Hero.
Line 14body in front of Hero.
Line 14: : Sidekick HP: : 44
Line 1515: : Ogre HP: : 2
Liskov Substitution Principle
Acceptance Criteria
Acceptance criteria
  • The completed implementation satisfies this requirement: Define and instantiate a new list field of type FlyingBird named flyingBirds.
  • Bird exposes the required contract: Eat() abstract.
  • Penguin exposes the required contract: Eat() override.
  • FlyingBird exposes the required contract: Fly() abstract.
Instructions
6.Liskov Substitution Principle

This principle states that subclasses should be able to be swapped without changing or breaking the application.

A In Main, after the battle with the Ogre, paste the code below.
Console.WriteLine("\n---------------- Liskov Substitution Principle ----------------");
Birdkeeper birdkeeper = new Birdkeeper();
birdkeeper.AddBird(new Hawk());
birdkeeper.AddBird(new Duck());
birdkeeper.AddBird(new Pigeon());
birdkeeper.AddBird(new Penguin());
birdkeeper.FeedBirds();
birdkeeper.BirdsFlyAround();
B Start the application. An exception will be thrown because Penguins can't fly! But they're in a list of things that should…

Start the application. An exception will be thrown because Penguins can't fly! But they're in a list of things that should be able to fly.

Since not all Birds can fly, we need to remove that behavior from the Bird class. This violates the Liskov Substitution Principle. You aren't able to treat Penguins and Hawks the same way because they don't function in similar ways in all their behaviors.
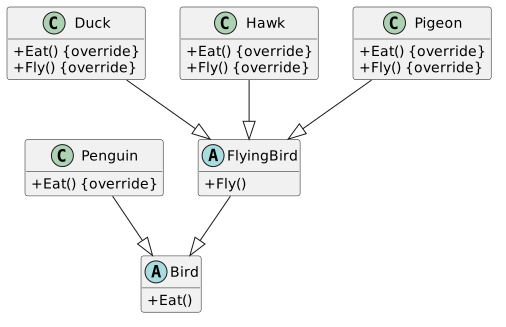
C Define a new class and modify existing classes based on the diagram below. Put the FlyingBird class in the Birds folder.
Class Diagram: FlyingBird; Members and relationships are shown in the editable reference; unrelated members may be omitted.
Class Diagram: FlyingBird
  • New
  • Changed
  • Removed
A UML class diagram is displayed. The new FlyingBird <abstractabstract> class is inheriting from the Bird <abstract> class. . The + Fly() <abstract> methods in in both Bird and Penguin are red and with a line striking them ou
FlyingBird <and Penguin are red and with a line striking them ou
FlyingBird <abstract> inheriting from Bird
No Fields
Methods and Properties
+ Fly() <Properties
+ Fly() <abstract>
D In the Birdkeeper class...
1 Define and instantiate a new list field of type FlyingBird named flyingBirds.
2 In the AddBird method, if the Bird object is a FlyingBird, add it to the flyingBirds list, casting it as a FlyingBird.
3 In the BirdsFlyAround method, change the Bird type to a FlyingBird type and target the flyingBirds list.
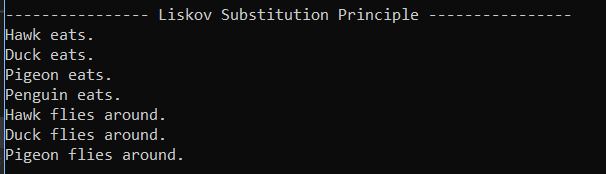
E Check Your Work: Run the application. Your output should look like the image below.
Output for 7.1 SOLID Principles Lab. Use the adjacent task instructions to identify the required controls, output, or debugger values.
Output

Now the Penguin isn't forced to implement a method that they shouldn't and an exception won't be thrown. Additionally, shared behaviors are now properly inherited.

A console window displaying the following textwindow displaying the following text:
:
Line 11: : Liskov Substitution Principle
Line 2Principle
Line 2: : Hawk eats.
.
Line 33: : Duck eats.
.
Line 44: : Pigeon eats.
.
Line 55: : Penguin eats.
.
Line 66: : Hawk flies around.
Line 7around.
Line 7: : Duck flies around.
Line 8around.
Line 8: : Pigeon flies around.around.
Interface Segregation Principle
Acceptance Criteria
Acceptance criteria
  • The completed implementation satisfies this requirement: Make changes to the Restaurant class.
  • The completed implementation satisfies this requirement: Define a new Waiter class and have it implement IWorker.
  • The completed implementation satisfies this requirement: Remove the MakeFood and TakeOrder methods from the IWorker interface.
  • Restaurant exposes the required contract: cook: Cook; waiter: Waiter; Restaurant(cook: Cook, waiter: Waiter); OpenRestaurant().
Instructions
7.Interface Segregation Principle

Clients should not have to be forced to implement members of an interface.

A In the Main method after the birds fly around, paste the code below.
Console.WriteLine("\n---------------- Interface Segregation Principle ----------------");
Restaurant restaurant = new Restaurant(new Cook());
restaurant.OpenRestaurant();
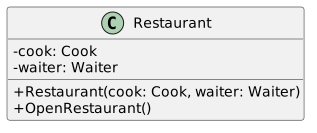
B The restaurant is growing and wants to hire a Waiter because the Cook is taking too many orders.
1 Make changes to the Restaurant class.
Class Diagram: Restaurant; Members and relationships are shown in the editable reference; unrelated members may be omitted.
Class Diagram: Restaurant
  • New
  • Changed
  • Removed
A UML Class Diagram displaying the Restaurant Class Diagram displaying the Restaurant class.
.
Restaurant
Fields
- cookFields
- cook: : Cook
- waiter: : Waiter (in blue text)
+ Restaurant(cook:Cook, waiter: Waiter) (The new parameter waiter: Waiter is in blue text)
+OpenRestaurant()
2 Define a new Waiter class and have it implement IWorker.
3 In the Waiter's PunchIn method, print out: "Waiter is punching in."
4 In the Waiter's PunchOut method, print out: "Waiter is punching out."
5 In the Waiter's TakeOrder method, print out: "Waiter is taking an order."
C Fix the interfaces.

We have a problem now. Waiters don't make food and Cooks don't take orders but they both have to implement methods because of the IWorker interface. The Restaurant still wants to make sure that only waiters take orders and only cooks make things.

1 Remove the MakeFood and TakeOrder methods from the IWorker interface.
2 Define a new interface named ICook with the void method MakeFood()
3 Define a new interface named IWaiter with the void method TakeOrder()
4 In addition to IWorker, have the Waiter implement IWaiter and remove the MakeFood method.
5 In addition to IWorker, have the Cook implement ICook and remove the TakeOrder method.
D In the OpenRestaurant method, replace the current calls with the calls below.
this.cook.PunchIn();
this.waiter.PunchIn();
this.waiter.TakeOrder();
this.cook.MakeFood();
this.cook.PunchOut();
this.waiter.PunchOut();
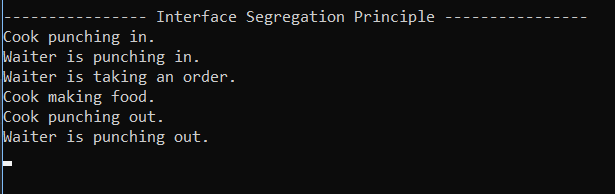
E In the Main method, pass in a new Waiter to the Restaurant constructor.
F Check Your Work: Run the application. Your output should look like the output below.
Output for 7.1 SOLID Principles Lab. Use the adjacent task instructions to identify the required controls, output, or debugger values.
Output

Now both workers have the IWorker methods and aren't forced to implement something unrelated to their functionality.

A Console window displaying the following text
Line 1window displaying the following text
Line 1: : Interface Segregation Principle
Line 2Principle
Line 2: : Cook punching in.
Line 3in.
Line 3: : Waiter is punching in.
in.
Line 44: : Waiter is taking an order.
Line 5: : Cook making food.
Line 6food.
Line 6: : Cook punching out.
Line 7out.
Line 7: : Waiter is punching out.out.
Dependency Inversion Principle
Acceptance Criteria
Acceptance criteria
  • The completed implementation satisfies this requirement: Change the field type in the CharacterBuilder class from Human to ICharacter.
  • The completed implementation satisfies this requirement: Add a parameter of type ICharacter named character to the CharacterBuilder constructor and assign the field in the constructor.
  • ICharacter exposes the required contract: Age: int get set; EyeColor: string get set; HairColor: string get set; Weight: double get set.
  • Human exposes the required contract: Age: int get set; EyeColor: string get set; HairColor: string get set; Weight: double get set.
Instructions
8.Dependency Inversion Principle

High-level classes should not depend on low-level classes. Instead, abstractions should be used.

A After the restaurant opens, paste the code below.
Console.WriteLine("\n---------------- Dependency Inversion Principle ----------------");
CharacterBuilder characterBuilder = new CharacterBuilder();
characterBuilder.ChangeAge(33);
characterBuilder.ChangeEyeColor("Blue");
characterBuilder.ChangeHairColor("Brown");
characterBuilder.ChangeWeight(130);
Console.WriteLine(characterBuilder.ToString());
B Fix the dependency.

In the CharacterBuilder class the only type we have is Human. But what about other types? Aliens? Monsters? Robots? This design only works if the character we are trying to build is a Human type.
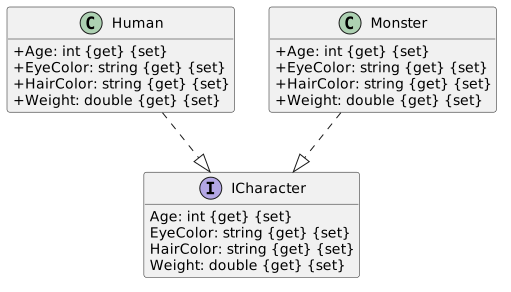
1 Define and implement an interface and new class based on the diagram below.
Class Diagram: Character; Members and relationships are shown in the editable reference; unrelated members may be omitted.
Class Diagram: Character
  • New
  • Changed
  • Removed
A UML class diagram displaying the existing Human existing Human class and the new Monster class both implementing the new <<interface>> ICharacter.
<<interface>> ICharacter  (in blue text)
No Fields
Methods and Properties
AgeMethods and Properties
Age: : int <get> <set> (in in blue text)
EyeColor)
EyeColor: : string <get> <set> (in in blue text)
HairColor)
HairColor: : string <get> <set> (in in blue text)
Weight)
Weight: : double <get> <set> (in in blue text)
Monster (implementing ICharacter)  (in blue text)
No Fields
+ Age)
Monster (implementing ICharacter)  (in blue text)
No Fields
+ Age: : int <get> <set>  (in in blue text)
+ EyeColor)
+ EyeColor: : string <get> <set>  (in in blue text)
+ HairColor)
+ HairColor: : string <get> <set>  (in in blue text)
+ Weight)
+ Weight: : double <get> <set>  (in in blue text)
Human (implementing ICharacter)
No Fields.
+ Age)
Human (implementing ICharacter)
No Fields.
+ Age: : int <get> <set> (in in blue text)
+ EyeColor)
+ EyeColor: : string <get> <set> (in in blue text)
+ HairColor)
+ HairColor: : string <get> <set> (in in blue text)
+ Weight)
+ Weight: : double <get> <set> (in in blue text))
2 Change the field type in the CharacterBuilder class from Human to ICharacter.
3 Rename the human field to character.

There is still an issue, however, because if you want to change the type of thing being instantiated you'd have to open the class. It is still dependent on a low-level class.

4 Add a parameter of type ICharacter named character to the CharacterBuilder constructor and assign the field in the constructor.
5 Add the following to the beginning of the ToString:
\\nType: {this.character.GetType().Name}\\n
6 In the Main method, pass in a new Human into the CharacterBuilder.
7 After the call to ToString, instantiate another CharacterBuilder and pass in a Monster type. Change the properties to…

After the call to ToString, instantiate another CharacterBuilder and pass in a Monster type. Change the properties to whatever you like and call ToString again.

This is the power of Dependency Inversion. We can have two instances of the CharacterBuilder with two different types being passed it. All the class cares about is that the "thing" is an ICharacter. It is no longer dependent on knowing what the object type really is.
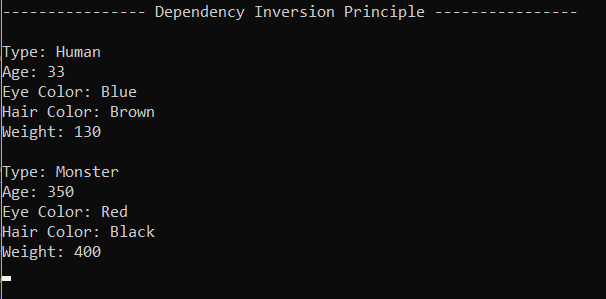
C Check Your Work: Run the application. Your output should look like the output below.
Output for 7.1 SOLID Principles Lab. Use the adjacent task instructions to identify the required controls, output, or debugger values.
Output
A Console window displaying the following textwindow displaying the following text:
:
Line 11: : Dependency Inversion Principle
Line 2Principle
Line 2: : Blank
Line 33: : Type: Human
Line 4: : Age: 33
Line 55: : Eye Color: : Blue
Line 66: : Hair Color: : Brown
Line 77: : Weight: 130
Line 88: : Blank
Line 99: : Type: Monster
Line 10: : Age: 350
Line 1111: : Eye Color: : Red
Line 1212: : Hair color: : Black
Line 1313: : Weight: 400
Zip your assignment and submit it to Canvas.
9.Zip your assignment and submit it to Canvas.
A Zip your assignment and submit it to Canvas.
Completion review
10.Review the feature acceptance criteria
A Confirm the required results

Return to each story and verify its acceptance criteria. Preserve the submission format and destination stated in the activity; a reading, setup guide, lab, video demonstration, and oral final may require different evidence.

Create a new project. Create a Class Library Import classes and projects. Single Responsibility Principle Open/Closed Principle Liskov Substitution Principle Interface Segregation Principle Dependency Inversion Principle