4.2 Scratchpad Learning Activity

Overview

4.2 Scratchpad Learning Activity

This scratchpad covers adding a console application that uses a control loop to monitor commands and determine the flow of the application. Adding a console application as a project to the solution will allow us to deliver a different user interface to the customer while using the same back-end code as the WPF project. You will also be using ReadLine, Write, and WriteLine to get input from the user and deliver messages back to the user.

Work through the stories in order. Use the acceptance criteria to check each feature, and complete the nested tasks using the specified names, values, and scenarios.

If you like, you can follow along with the instructor-led lab video.
1.If you like, you can follow along with the instructor-led lab video.

4.2 Scratchpad lab video (15:03)

4.2 Scratchpad lab video (15:03)
A If you like, you can follow along with the instructor-led lab video.
Add a console project.
Acceptance Criteria
Acceptance criteria
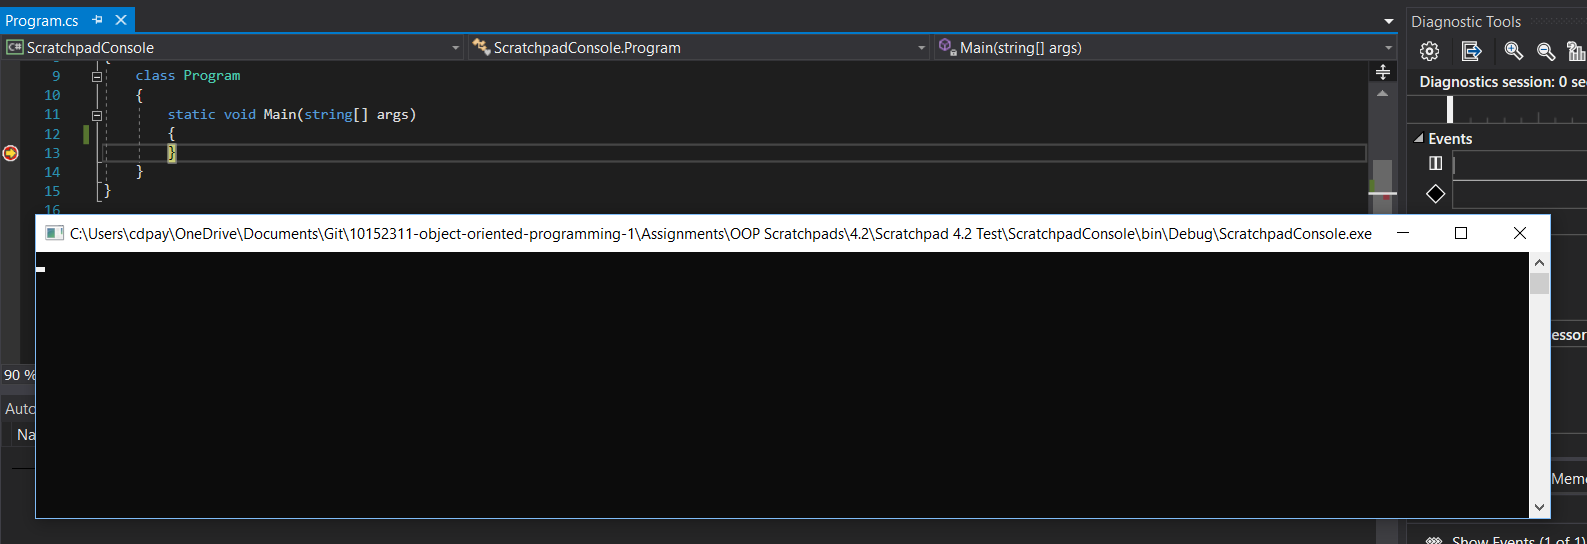
  • The completed implementation satisfies this requirement: Set a breakpoint at the end of the the Main method and run the application. Note that the title bar has a long path to the executable. Stop the application, but don't remove the breakpoint.
  • Required result: Right click on the solution and select Add.. > New Project...
  • Required result: From the Add New Project dialog, select Console App (.NET Framework), name it ScratchpadConsole and click OK.
Instructions
2.Add a console project.
A Right click on the solution and select Add.. > New Project...
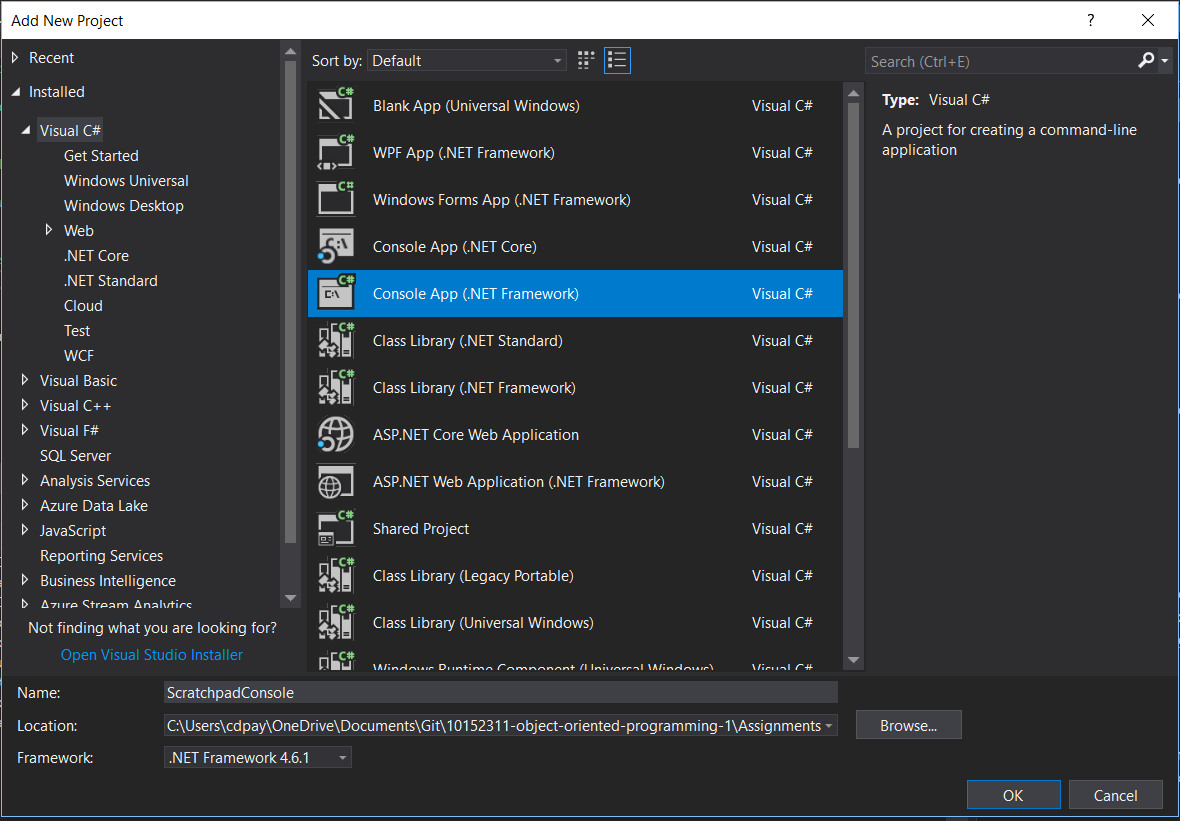
B From the Add New Project dialog, select Console App (.NET Framework), name it ScratchpadConsole and click OK.
Snip: Add New Project for 4.2 Scratchpad Learning Activity. Use the adjacent task instructions to identify the required controls, output, or debugger values.
Snip: Add New Project
C Change the startup project.
1 Press Start or F5 to run the application. Note that the WPF window pops up. This is because it is designated as the startup…

Press Start or F5 to run the application. Note that the WPF window pops up. This is because it is designated as the startup project. Also note that the Scratchpad project in the Solution Explorer is bold.

2 Right-click the ScratchpadConsole project and select Set as Startup Project. The ScratchpadConsole project should now be…

Right-click the ScratchpadConsole project and select Set as Startup Project. The ScratchpadConsole project should now be bold instead of Scratchpad. The entry point of the console application is the Main method, which is currently empty.

3 Press Start or F5. The console window should pop up and then disappear. This is normal behavior since we have not written…

Press Start or F5. The console window should pop up and then disappear. This is normal behavior since we have not written anything to tell the console that it should wait for a command.

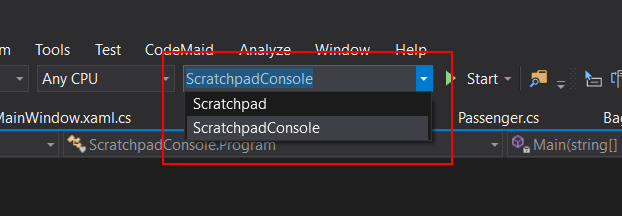
4 You can also change the startup project by selecting the project you want from the dropdown on the top toolbar.
Snip: Startup Drowdown for 4.2 Scratchpad Learning Activity. Use the adjacent task instructions to identify the required controls, output, or debugger values.
Snip: Startup Drowdown
D Change the title bar
1 Set a breakpoint at the end of the the Main method and run the application. Note that the title bar has a long path to the…

Set a breakpoint at the end of the the Main method and run the application. Note that the title bar has a long path to the executable. Stop the application, but don't remove the breakpoint.

Snip: Title Bar for 4.2 Scratchpad Learning Activity. Use the adjacent task instructions to identify the required controls, output, or debugger values.
Snip: Title Bar
2 In the Main method, paste the code below:
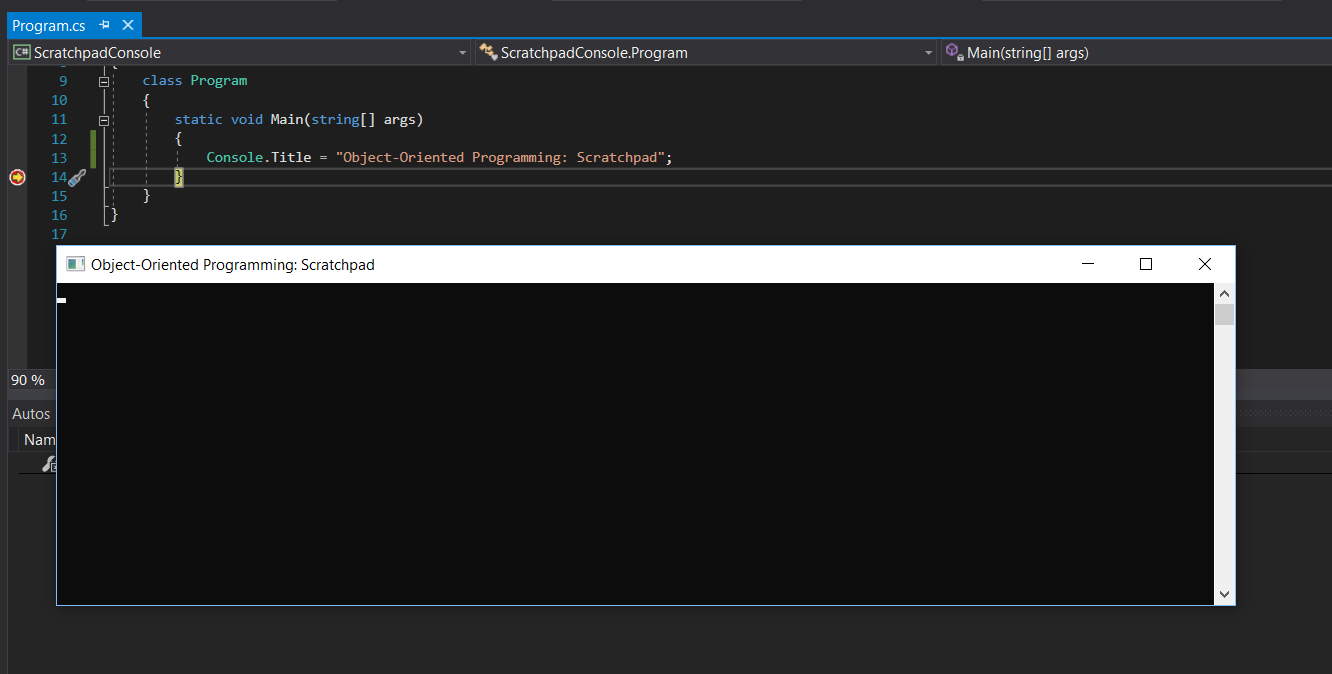
Console.Title = "Object-Oriented Programming: Scratchpad";
3 Run the application. The title should now be more readable.
Snip: Title Bar 2 for 4.2 Scratchpad Learning Activity. Use the adjacent task instructions to identify the required controls, output, or debugger values.
Snip: Title Bar 2
"Pause" the application to accept user input.
Acceptance Criteria
Acceptance criteria
  • The completed implementation satisfies this requirement: Assign the Console.ReadLine to a local variable named command of type string.
  • The completed implementation satisfies this requirement: Set a breakpoint on the closing curly brace of the while loop and run the application.
Instructions
3."Pause" the application to accept user input.
A In the Main method after setting the title, type Console.ReadLine(); and run the application. Note that now the console…

In the Main method after setting the title, type Console.ReadLine(); and run the application. Note that now the console window stays open.

B Hit the Enter key and the application will shut down.
C Put the ReadLine in a while loop.
1 Surround the Console.ReadLine in a while loop with the boolean true as the condition.
2 Assign the Console.ReadLine to a local variable named command of type string.
3 Set a breakpoint on the closing curly brace of the while loop and run the application.
4 Type in a command and hit Enter. When the breakpoint is hit you should see your command assigned to the command variable.
5 Click Continue or press F5, type and additional command and hit Enter. That new command will be assigned to the command…

Click Continue or press F5, type and additional command and hit Enter. That new command will be assigned to the command variable because the while loop continues to execute.

6 Close the console window to stop the application.
Create a way to break out of the while loop.
Acceptance Criteria
Acceptance criteria
  • Press F10 a few more times. The application should stop.
  • The completed implementation satisfies this requirement: Set a breakpoint on the line of code that assigns exit to false and start the application.
Instructions
4.Create a way to break out of the while loop.
A Above the while loop, define a local boolean type variable named exit and assign it to false.
B In the while condition, replace true with !exit (the equivalent to true)
C In the while loop after the Console.ReadLine, assign the exit variable to true.

Doing this makes the while condition switch to false so the next time the while loop tries to execute it will breakout and not execute the code inside.

D Check Your Work:
1 Set a breakpoint on the line of code that assigns exit to false and start the application.
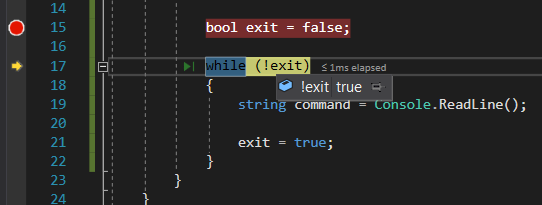
2 Press F10. Note that the while condition evaluates to true, meaning the while loop will execute.
Snip: While Condition for 4.2 Scratchpad Learning Activity. Use the adjacent task instructions to identify the required controls, output, or debugger values.
Snip: While Condition
3 Press F10 until you are prompted for an input and enter a test command.
4 Step over the line of code that assigns exit to true. Note that now the while condition evaluates to false, meaning the…

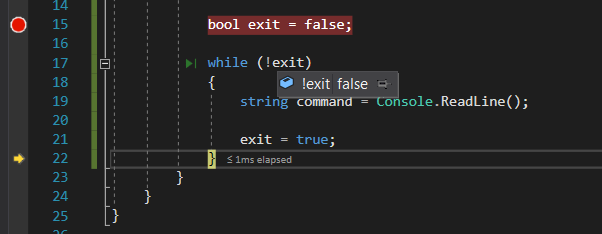
Step over the line of code that assigns exit to true. Note that now the while condition evaluates to false, meaning the while loop will not execute the next time and the application will stop.

Snip: While Condition 2 for 4.2 Scratchpad Learning Activity. Use the adjacent task instructions to identify the required controls, output, or debugger values.
Snip: While Condition 2
5 Press F10 a few more times. The application should stop.

This is the basic control-break structure that console applications use to control user input and flow.

Use the user input to exit the application.
Acceptance Criteria
Acceptance criteria
  • The completed implementation satisfies this requirement: Set a breakpoint on the line that sets exit to true and start the application.
  • Required result: Surround the line that sets exit to true in a conditional statement that checks if the command variable is "exit".
  • Required result: Enter 'test' as the input. Note that the application doesn't close and the cursor moves to the next line. The breakpoint is never hit, the while condition isn't changed and the while loop is still looping.
Instructions
5.Use the user input to exit the application.
A Surround the line that sets exit to true in a conditional statement that checks if the command variable is "exit".
B Set a breakpoint on the line that sets exit to true and start the application.
C Enter 'test' as the input. Note that the application doesn't close and the cursor moves to the next line. The breakpoint is…

Enter 'test' as the input. Note that the application doesn't close and the cursor moves to the next line. The breakpoint is never hit, the while condition isn't changed and the while loop is still looping.

D Enter 'exit' as the input. The breakpoint will now be hit because the condition has been met.
E Click Continue or press F5. The application will close because the while condition is false and the loop stops.
Add additional control commands.
Acceptance Criteria
Acceptance criteria
  • Start the application and type new as a command and press Enter. The breakpoint should be hit.
  • Press F10 and a new Airport object should be instantiated.
  • Type in the exit command and press enter. The application should close.
Instructions
6.Add additional control commands.
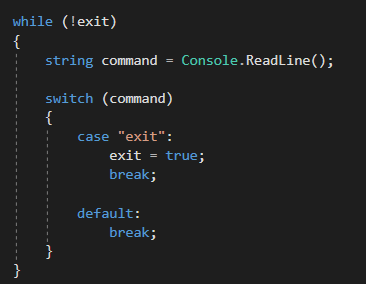
A Replace the if statement with a switch statement that switches on the command variable.

A quick way to create a switch statement is to type switch and then hit tab tab. You will then need to replace switch_on with the command variable.

B Create a case for the "exit" command that assigns exit to true and then breaks.
Snip: Exit Command for 4.2 Scratchpad Learning Activity. Use the adjacent task instructions to identify the required controls, output, or debugger values.
Snip: Exit Command
C Add a 'new' case.
1 Add a case to the switch statement for a "new" command.
2 In the case, define an Airport type named dfw and instantiate it to a new Airport.
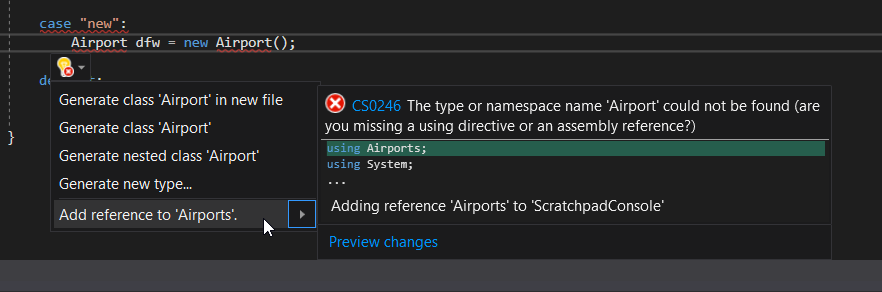
3 The Airports project is not referenced yet so it does not recognize Airport as a type/class. Add a reference to the Airports…

The Airports project is not referenced yet so it does not recognize Airport as a type/class. Add a reference to the Airports project by either right-clicking the References in the Scratchpad project and adding it that way or using the Quck Actions to add a reference to Airports (Quick Actions does not always work).

Snip: Add Reference for 4.2 Scratchpad Learning Activity. Use the adjacent task instructions to identify the required controls, output, or debugger values.
Snip: Add Reference
4 Add a break statement.
D Check Your Work:
1 Set a breakpoint on the line that instantiates the Airport.
2 Start the application and type new as a command and press Enter. The breakpoint should be hit.
3 Press F10 and a new Airport object should be instantiated.

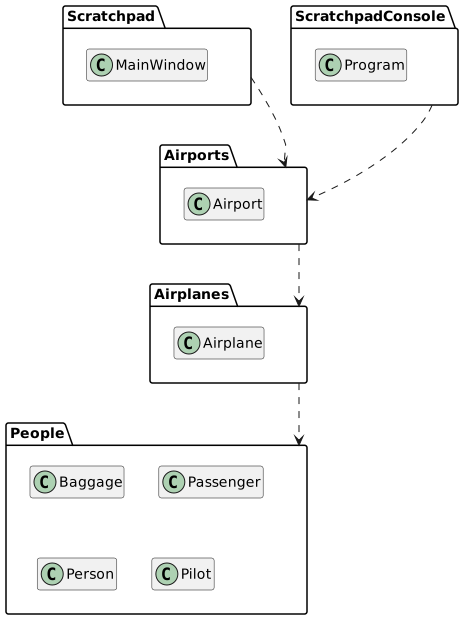
Now we have two different projects using the same class (Airport) and doing the same thing (instantiating an Airport), but in two different ways. If the Airport class was not in a shared DLL (project) that Airport class would need to be duplicated in each project.

Package Diagram: Console; Members and relationships are shown in the editable reference; unrelated members may be omitted.
Package Diagram: Console
  • New
  • Changed
  • Removed
4 Type in a command other than 'exit' or 'new' and press Enter. The default case will be hit and break and the while loop will…

Type in a command other than 'exit' or 'new' and press Enter. The default case will be hit and break and the while loop will start over again.

5 Type in the exit command and press enter. The application should close.
Use Console.Write and Console.WriteLine()
Acceptance Criteria
Acceptance criteria
  • The console should appear with a right bracket and a space where you can type a command.
  • Enter an unrecognized command and press Enter. The default case should write our message to the console with the user's input and the while loop should start again.
  • The completed implementation satisfies this requirement: Remove all breakpoints and start the application.
Instructions
7.Use Console.Write and Console.WriteLine()
A Before the ReadLine call, paste the code below:
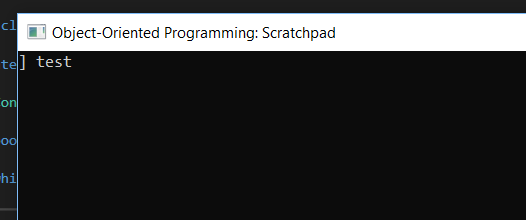
Console.Write("] ");

This will write a ] and a space to the console every time the loop runs. The Write call keeps the cursor on the same line.

B In the default case, paste the code below above the break;
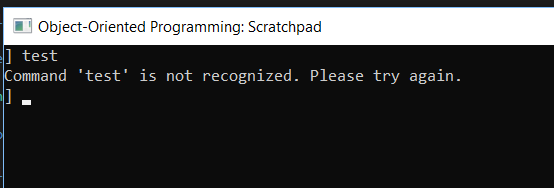
Console.WriteLine($"Command '{command}' is not recognized. Please try again.");

The $ sign followed by a string is called string interpolation. You can use curly braces within the string to print out the value of a variable. We use this tool to make message to the user unique/dynamic to their input.

WriteLine is different than Write in that it puts the cursor on the line below.

C Check Your Work:
1 Remove all breakpoints and start the application.
2 The console should appear with a right bracket and a space where you can type a command.
Snip: Console.Write for 4.2 Scratchpad Learning Activity. Use the adjacent task instructions to identify the required controls, output, or debugger values.
Snip: Console.Write
3 Enter an unrecognized command and press Enter. The default case should write our message to the console with the user's…

Enter an unrecognized command and press Enter. The default case should write our message to the console with the user's input and the while loop should start again.

Snip: WriteLine for 4.2 Scratchpad Learning Activity. Use the adjacent task instructions to identify the required controls, output, or debugger values.
Snip: WriteLine
Submit a zipped Visual Studio solution after completing the following:
8.Submit a zipped Visual Studio solution after completing the following:
A Ensure that the application has no compiler errors or warnings.
B Remove all bin and obj folders from the entire solution.
Completion review
9.Review the feature acceptance criteria
A Confirm the required results

Return to each story and verify its acceptance criteria. Preserve the submission format and destination stated in the activity; a reading, setup guide, lab, video demonstration, and oral final may require different evidence.

Add a console project. "Pause" the application to accept user input. Create a way to break out of the while loop. Use the user input to exit the application. Add additional control commands. Use Console.Write and Console.WriteLine()