Overview
Classes and Reusable Object Blueprints
Zoo 1.2 shifts from working mainly with individual objects to defining the class blueprints
those objects use. You will add BirthingRoom and VendingMachine, create Como Zoo
objects from those definitions, and reuse the same class design for a separate San Diego Zoo.
A class defines a reusable kind of object. Multiple objects can be created from the same class, and each object can maintain its own state.
Getting Started
Make a copy of your code at the beginning of each week and rename the folder and .sln file to
the appropriate week number. Doing so will help you maintain a record of your work and keep a working copy of
your code in case you need to revert your changes.
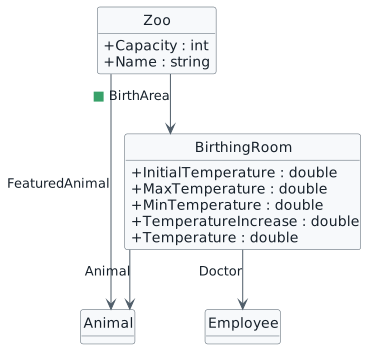
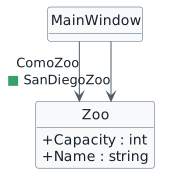
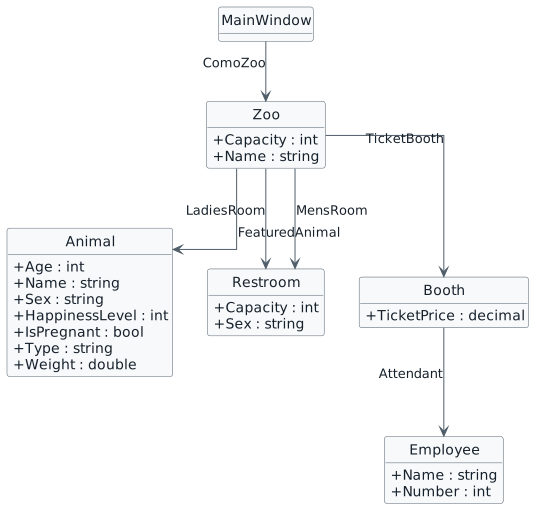
Starting Point — End of Zoo 1.1
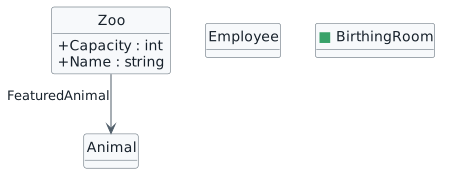
This class structure already exists. Zoo 1.2 extends it.
Acceptance Criteria
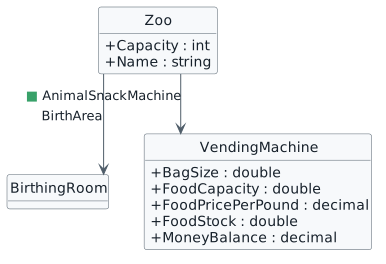
BirthingRoomandVendingMachineuse only the current Zoo 1.2 fields.ZoocontainsBirthArea : BirthingRoomandAnimalSnackMachine : VendingMachine.- Como Zoo has its own configured birthing-room and vending-machine objects.
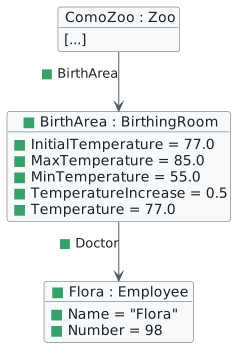
BirthArea.Doctorrefers to Flora, number 98.MainWindowcontainsSanDiegoZoo : Zoo.- San Diego Zoo reuses the same class definitions while maintaining separate object state.
- No later-course design techniques are added.
User Story 1 — Use a birthing room for animal care
As a zoo employee using the application, I want the zoo to have a birthing room with the information needed for animal care so that the room can be represented as its own part of the zoo.
Task 1 — Add the birthing room to the zoo model
The current project has no reusable class that represents the information belonging to a birthing room.
Define BirthingRoom and add only the current Zoo 1.2 fields and class relationships required by
the scenario.
Step 1 — Add the BirthingRoom class
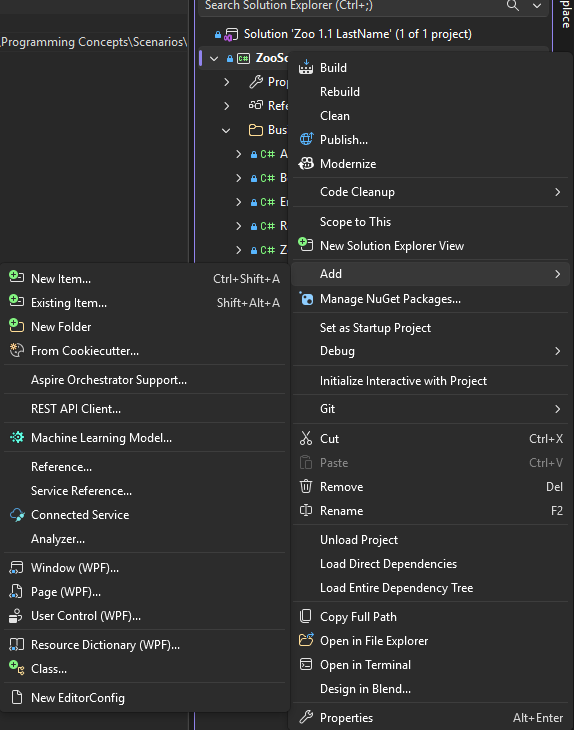
Before you write the new class, use Solution Explorer to add the class file to the ZooScenario
project.
Add a class through Solution Explorer
ZooScenario project, choose Add, then
choose Class....Now continue with the class structure for BirthingRoom.
Insert the following suppression pattern. Keep the two attributes together in one horizontally scrollable code frame and keep each attribute on one physical source line:
C#
[System.Diagnostics.CodeAnalysis.SuppressMessage("Microsoft.StyleCop.CSharp.NamingRules", "SA1300:ElementMustBeginWithUpperCaseLetter", Justification = "Event handlers may begin with lower-case letters.")]
[System.Diagnostics.CodeAnalysis.SuppressMessage("Microsoft.StyleCop.CSharp.MaintainabilityRules", "SA1401:FieldsMustBePrivate", Justification = "Encapsulation not yet taught.")]
Step 2 — Add the temperature fields
BirthingRoom exists, but it does not yet describe the temperature information the current
scenario needs.
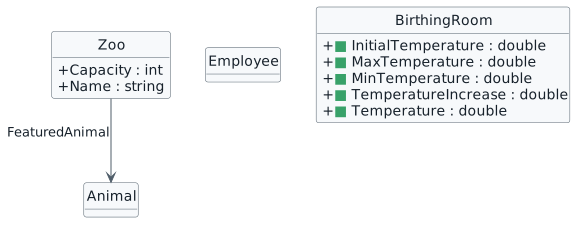
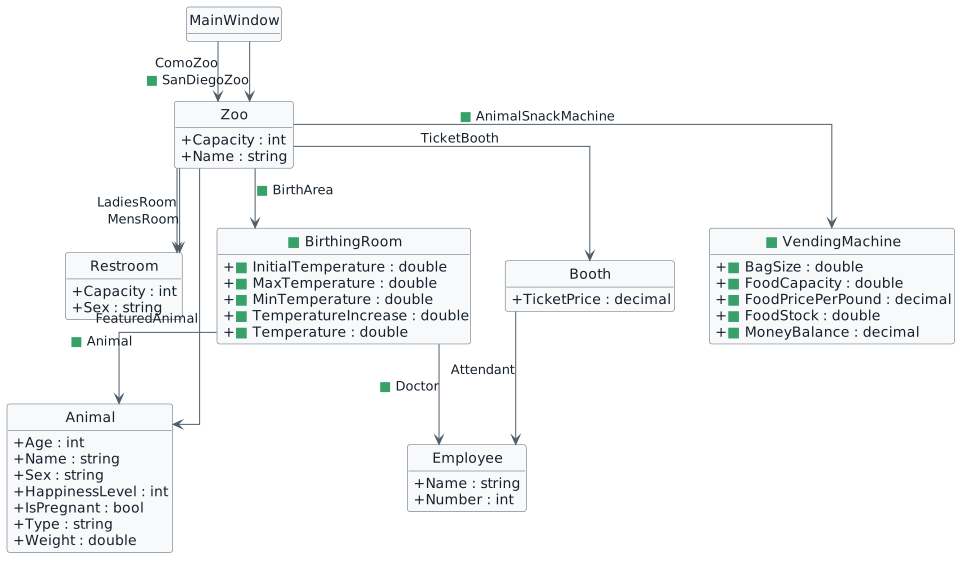
Add the five current scalar fields shown in the class diagram.
These values belong to one birthing-room object's state. double supports the current fractional
values such as 77.0 and 0.5.
Check Your Work
- Build.
- Confirm all five members use the names and types shown by the diagram.
Step 3 — Add the Animal relationship
A birthing-room object must be able to refer to an animal when the scenario requires one.
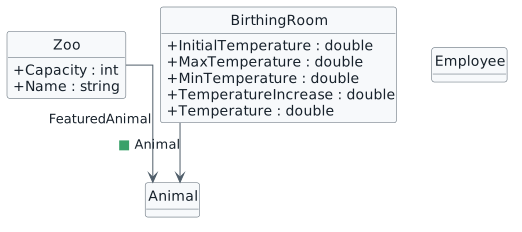
Add the current Animal-typed field represented as a class relationship.
Animal is the class/type and also the field/role name. The class relationship describes what a
BirthingRoom can reference; it does not create an Animal object.
Check Your Work
- Build.
- Confirm the field uses the existing
Animalclass and exact current field name.
Step 4 — Add the Doctor relationship
The room also needs a reference to the employee serving as the doctor.
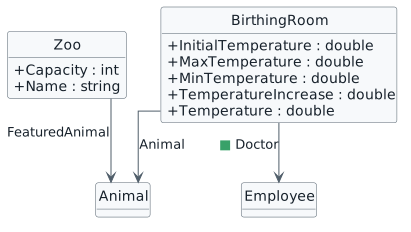
Add the current Employee-typed Doctor field.
Check Your Work
- Build.
- Confirm no separate
Doctorclass was introduced.
Task 2 — Set up the Como Zoo birthing room
The class now defines what a birthing room can contain, but Como Zoo still needs its own actual birthing-room object and current state.
Connect Zoo to BirthingRoom, then create and configure the Como
BirthArea.
Step 1 — Add BirthArea to Zoo
Declaring BirthArea creates the class relationship. It does not create the runtime BirthingRoom
object.
Check Your Work
- Build.
- Confirm the new relationship compiles and the existing Zoo 1.1 members remain intact.
Step 2 — Create and configure the Como BirthArea
This focused source line adds separate meaning because it shows that the current temperature is initialized from the initial temperature:
C#
this.ComoZoo.BirthArea.Temperature = this.ComoZoo.BirthArea.InitialTemperature;
Check Your Work
- Inspect
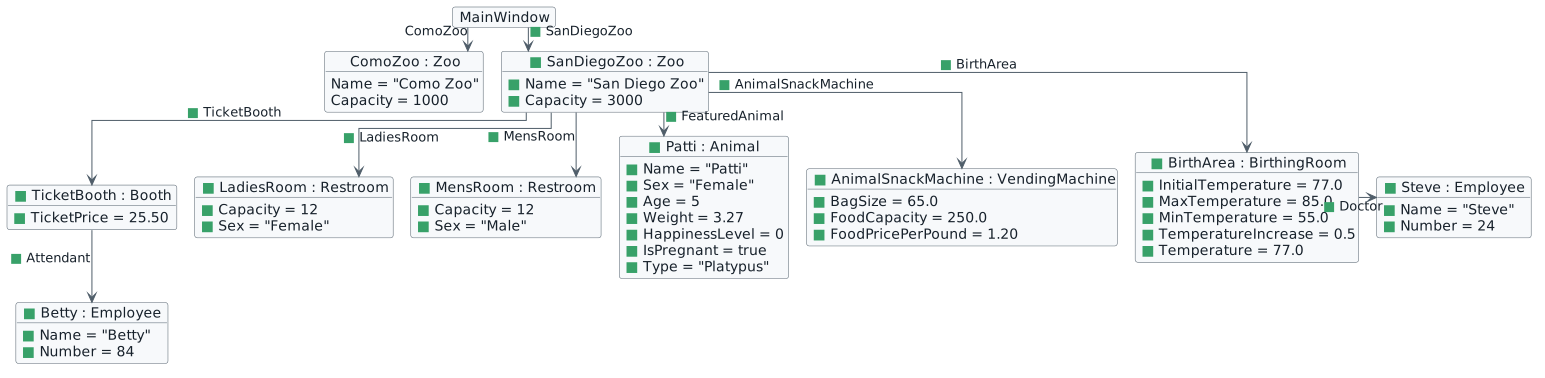
ComoZoo.BirthArea. - Confirm all five numeric values match the object diagram.
- Confirm
BirthArea.Doctorrefers to anEmployee. - Confirm the doctor is Flora, number 98.
User Story 2 — Provide animal food through a vending machine
As a zoo guest, I want the zoo to have a vending machine that represents the food, inventory, and money information needed for the current zoo experience so that the machine is part of the zoo model.
Task 1 — Add the vending machine to the zoo model
The zoo model has no reusable class for the animal-food vending machine.
Define VendingMachine with the current five fields and connect it to Zoo.
Step 1 — Add VendingMachine
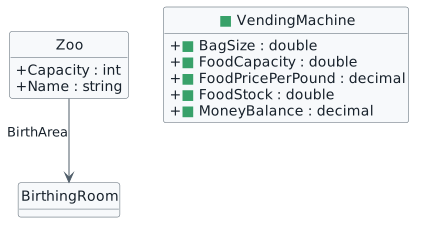
BagSize, FoodCapacity, and FoodStock use double.
FoodPricePerPound and MoneyBalance use decimal.
Check Your Work
- Build.
- Confirm
VendingMachinecontains the five current fields and no methods.
Step 2 — Add AnimalSnackMachine to Zoo
Check Your Work
- Build.
- Confirm the relationship compiles and
BirthArearemains intact.
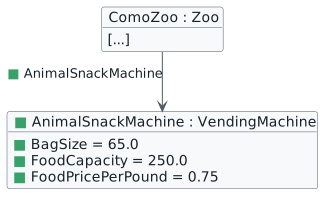
Task 2 — Set up the Como Zoo vending machine
The class exists, but Como Zoo still needs its own actual vending-machine object and current state.
Create the Como AnimalSnackMachine and configure the authoritative current state.
Step 1 — Create and configure the Como vending-machine object
Check Your Work
- Inspect
ComoZoo.AnimalSnackMachine. - Confirm
BagSize = 65.0,FoodCapacity = 250.0, andFoodPricePerPound = 0.75.
User Story 3 — Add the San Diego Zoo to the application
The director of the San Diego Zoo has been talking with the Como Zoo director about the zoo application. The San Diego Zoo would like to use the same program structure rather than create a separate application.
As the San Diego Zoo director, I want the application to represent the San Diego Zoo as a separate zoo with its own animals, staff, facilities, and service objects so that our zoo can use the same class design without changing Como Zoo's information.
Task 1 — Reuse the same class design for the San Diego Zoo
The application needs to represent a second zoo with different state without creating a second set of domain class definitions.
Use the existing Zoo, Animal, Employee, Restroom,
Booth, BirthingRoom, and VendingMachine classes to create a separate
San Diego object graph.
Step 1 — Add SanDiegoZoo
Check Your Work
- Build.
- Confirm both Zoo relationships exist.
Step 2 — Use the supplied San Diego button path
The UI markup is not represented by the UML, so use the exact current button source:
XML
<Button x:Name="newSanDiegoZooButton" Content="New San Diego Zoo" Click="newSanDiegoZooButton_Click"/>
Check Your Work
- Confirm the
New San Diego Zoobutton is present in the supplied UI path. - Do not add unrelated UI behavior.
Step 3 — Use the supplied San Diego event-handler path
The current one-line handler signature is:
C#
private void newSanDiegoZooButton_Click(object sender, RoutedEventArgs e)
The event path coordinates creation of a separate object graph. Do not copy a complete finished handler body from this walkthrough.
Step 4 — Create the San Diego Zoo and supporting objects
Create the separate San Diego objects using the same class definitions and the current source values.
ComoZoo and SanDiegoZoo are different Zoo objects that use the same
class. Their supporting objects hold separate state, so a second zoo does not require duplicate domain
classes.
Check Your Work
- Inspect both
ComoZooandSanDiegoZoo. - Confirm both are
Zooobjects. - Confirm the San Diego values match the object diagram/current source.
- Confirm Como retains its own existing state.
- Confirm no San-Diego-specific duplicate domain classes were introduced.
Final Check
Class structure
BirthingRoomhasInitialTemperature,MaxTemperature,MinTemperature,TemperatureIncrease,Animal,Doctor, andTemperaturewith the current types.VendingMachinehasBagSize,FoodCapacity,FoodPricePerPound,FoodStock, andMoneyBalancewith the current types.ZooincludesBirthArea : BirthingRoomandAnimalSnackMachine : VendingMachine.MainWindowincludesSanDiegoZoo : Zoo.- No later-course design techniques were added.
Como Zoo state
- Original Zoo 1.1 Como state remains intact.
BirthAreahas 77.0 / 85.0 / 55.0 / 0.5 / 77.0.BirthArea.Doctoris Flora #98.AnimalSnackMachinehas 65.0 / 250.0 / 0.75.
San Diego Zoo state
- Name =
San Diego Zoo; Capacity =3000. - Ticket =
25.50; attendant = Betty #84. - Both restroom capacities =
12with the supplied Female/Male values. - Featured animal = Patti, Female, age 5, weight 3.27, happiness 0, pregnant true, type Platypus.
- Vending machine = 65.0 / 250.0 / 1.20.
- Birth area = 77.0 / 85.0 / 55.0 / 0.5 / 77.0; doctor = Steve #24.
- Como Zoo state remains independent.
Use the normal build/error-reading and already-taught inspection paths. This page does not claim your project built or ran successfully; verify that in your own project.
Zoo 1.2 End-Structure Class Diagram
This final view compares the complete Zoo 1.2 class structure with the authoritative Zoo 1.1 End baseline.
Submit
Open the Feedback System to continue with the current submission/readiness process.