Acceptance criteria
- The DELETE endpoint removes the requested record.
- A successful deletion returns HTTP 204 with no response body.
- A subsequent query confirms the record is absent.
12.5 Lab - Securing API With JWT
In this lab we will be updating the Netflix Titles application from the 12.4 lab. We will be adding the ability to delete a title from the database using an HttpDelete request. We will also learn how to secure our API with a JSON Web Token.
Work through the stories in order. Use the acceptance criteria to check each feature, and complete the nested tasks using the specified names, values, and scenarios.
| Operation | Checkpoint response |
|---|---|
| GET | 200 OK with the requested data. |
| POST | 200 OK with the created result, as required here. |
| PUT (12.4 onward) | 200 OK after the update. |
| DELETE (12.5) | 204 No Content after deletion. |
In most cases, we would want to archive a record in a database instead of completely removing it, however, to utilize an HttpDelete request, we will be removing a Netflix title from the database instead of archiving it.
Use Int32.Parse() to parse the id parameter from type string to type int.
The 204 status code indicates that the request was successful and that there is no additional content to send in the request body.
{{domain}}/api/delete/title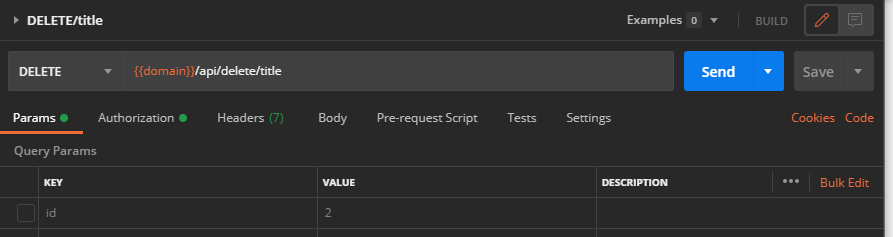
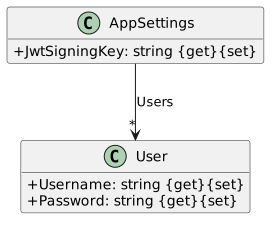
"AppSettings": {
"JwtSigningKey": "bPeShVmYq3t6w9z$C&F)H@McQfTjWnZr",
"Users": [
{
"Username": "admin",
"Password": "tomatoes"
}
]
}
You can use the below link to generate a random 256-bit key.
Encryption Key Generator
Encryption Key GeneratorConfigure the appsettings.json file.
// Configures the appsettings config file.
var appSettingsSection = Configuration.GetSection("AppSettings");
services.Configure<AppSettings>(appSettingsSection);
Add authentication settings to the JWT signing key.
// Adds authentication settings to the JWT signing key.
var appSettings = appSettingsSection.Get<AppSettings>();
var key = Encoding.ASCII.GetBytes(appSettings.JwtSigningKey);
services.AddAuthentication(x =>
{
x.DefaultAuthenticateScheme = JwtBearerDefaults.AuthenticationScheme;
x.DefaultChallengeScheme = JwtBearerDefaults.AuthenticationScheme;
})
.AddJwtBearer(x =>
{
x.RequireHttpsMetadata = false;
x.SaveToken = true;
x.TokenValidationParameters = new TokenValidationParameters
{
ValidateIssuerSigningKey = true,
IssuerSigningKey = new SymmetricSecurityKey(key),
ValidateIssuer = false,
ValidateAudience = false
};
});Install the AutoMapper.Extensions.Microsoft.DependencyInjection package.
Add the below code after adding authentication to the JWT signing key in the ConfigureServices method, to map the appsettings.json file to the AppSettings class.
// Maps the appsettings and start up to the application to allow the use of the appsettings class.
services.AddAutoMapper(typeof(Startup));
services.AddScoped<AppSettings>(serviceProvider => appSettings);In the Configure method, in the Startup class, add the below code after the app.UseAuthorization() call, and before the app.UseEndpoints() call.
app.UseAuthentication();The Controller class is derived from the ControllerBase class and supports views. It is used for handling web pages and not API requests, or web pages and API requests. Because we will not be using the AuthenticationController to support a view or handle a web page, we will have it implement the ControllerBase class.
Add a using for Microsoft.IdentityModel.Tokens
[Route("api/[controller]")]
[ApiController, AllowAnonymous]
The ApiController attribute enables certain API specific behaviors, such as automatic HTTP 400 responses and attribute routing requirements.
The AllowAnonymous attribute allows access to non-authenticated users.
Set the appSettings parameter to the _appSettings field.
Set the appSettings parameter's Users property to the _users field.
Create a method named GetToken that returns type IActionResult and accepts two parameters, both of type string, one named username and the other named password.
Add a HttpPost attribute, with a route of "token" at the method level.
Get the user from the AuthenticationController's list of users whose username and password properties matches the passed in parameters.
User authenticateUser = _users.FirstOrDefault(user => user.Password == password && user.Username.ToLower() == username.ToLower());Authenticate the found user by verifying that they exist. If the found user is equal to null, return a call to Unauthorized.
if (authenticateUser == null)
{
// If they do not exist return unauthorized access.
return Unauthorized();
}
The Unauthorzied method is a built in method from the ApiController class that the ApiController attribute provides access to, and creates a 401 unauthorized result.
Create a new instance of the JWTSecurityTokenHandler class which will be used for creating and validating a JWT token.
var tokenHandler = new JwtSecurityTokenHandler();Add the below code after creating a new token handler to encode the JwtSigningKey into a series of bytes, storing the result in a key variable.
var key = Encoding.ASCII.GetBytes(_appSettings.JwtSigningKey);Create a new SecurityTokenDescriptor to act as a placeholder for all attributes of the JWT.
var tokenDescriptor = new SecurityTokenDescriptor
{
Subject = new ClaimsIdentity(new Claim[]
{
new Claim(ClaimTypes.Name, username)
}),
Expires = DateTime.UtcNow.AddDays(7),
SigningCredentials = new SigningCredentials(new SymmetricSecurityKey(key), SecurityAlgorithms.HmacSha256Signature)
};
A claim holds the facts about the user that holds the token, in this instance the user would be "claiming" to be an admin.
The Expires property sets the length of time that the token is valid for, in this instance the token will expire in 7 days.
The SigningCredentials class is used to define the security key and the algorithm used to generate the digital signature.
To create the token that will be generated for the user, call the tokenHandler's CreateToken method, passing in the tokenDescriptor variable. Set the result to variable named token.
var token = tokenHandler.CreateToken(tokenDescriptor);Return the generated token.
return Content(tokenHandler.WriteToken(token));[ApiController, Authorize(AuthenticationSchemes = JwtBearerDefaults.AuthenticationScheme)]The above Authorize attribute secures the APIController with JWT Bearer Authentication, restricting access to only users that hold a valid JWT token.
{{domain}}/authentication/tokenThe POST/token call should look like the below image.
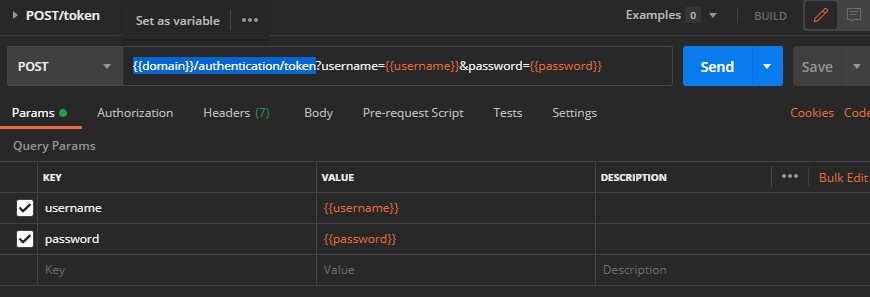
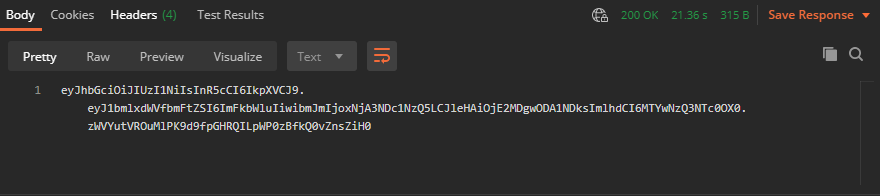
If you would like, you can look at your JWT token decoded by pasting it into the Debugger found at the below link.
https://jwt.io/
https://jwt.io/For each request in Postman, besides the POST/token request, change the call's Authorization from Inherit auth from parent to Bearer Token. Set the JWT variable as the token value, as shown in the below image.
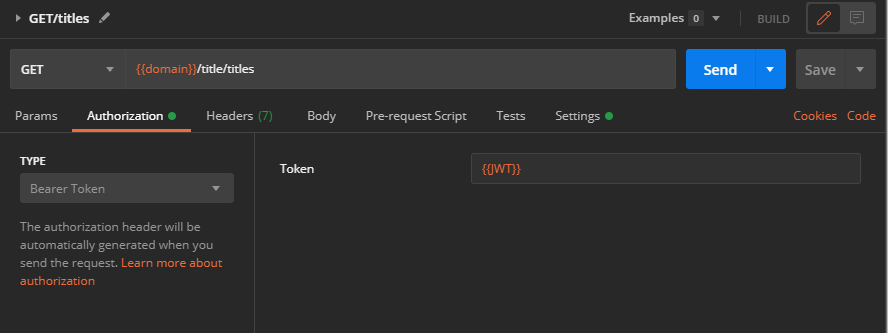
Submit a zipped folder of a copy of your application containing your completed application and the Word document, and with the node_modules folder removed.
Submit a zipped folder of a copy of your application containing your completed application and the Word document, and with the node_modules folder removed.
Return to each story and verify its acceptance criteria. Preserve the submission format and destination stated in the activity; a reading, setup guide, lab, video demonstration, and oral final may require different evidence.
Delete a record Issue and validate JSON Web Tokens Protect and verify the API endpoints Deploy and document the secured service