12.4 Lab - Deploying API Web Service

Overview

12.4 Lab - Deploying API Web Service

In this lab, we will be using our Netflix Titles web service application, created in 12.3 Lab and get it ready for deployment, then we will deploy the readied service using FTP and Microsoft Azure.

Work through the stories in order. Use the acceptance criteria to check each feature, and complete the nested tasks using the specified names, values, and scenarios.

Checkpoint reference
Operation Checkpoint response
GET 200 OK with the requested data.
POST 200 OK with the created result, as required here.
PUT (12.4 onward) 200 OK after the update.
DELETE (12.5) 204 No Content after deletion.
Use SQLite for the deployed service
Acceptance Criteria
Acceptance criteria
  • The SQLite database is created and populated as directed.
  • Configuration and context registration use the SQLite provider and correct database path.
  • Existing GET and POST operations still reach the intended data.
Instructions
1.For the sake of deployment we will be switching our Netflix Titles database connection from SQL server to SQLite.
A Download the SQL database file and save in the same location as your .csproj file.

NetflixTitles.db

NetflixTitles.db
B In the appsettings.json file, remove the SQL Connection string and replace it with the following code, to point to the database file.
"ConnectionStrings": {
"DefaultConnection": "Data Source=./NetflixTitles.db"
}
C Install the Microsoft.EntityFrameworkCore.Design and Microsoft.EntityFrameworkCore.Sqlite packages
D Change the DataContext configuration in the Startup class to use SQLite instead of SQL Server.
_ = services.AddDbContext<DataContext>
(options => options.UseSqlite(Configuration.GetConnectionString("DefaultConnection")));
E Uninstall the Microsoft.EntityFrameworkCore.SqlServer package.
F Execute the initial EF migration using the Visual Studio Command Prompt tool.
1 In the Visual Studio Command Prompt tool change the directory to the path where your database file and .csproj file are located.
2 Install the Entity Framework CLI tools, if not already installed.
dotnet tool install --global dotnet-ef --version 5.0.0install --global dotnet-ef --version 5.0.0

You may need to update your framework and packaged to the 5.0.0 versions.

3 Run the EF command to create/generate the initial migration
dotnet ef migrations add InitialCreatemigrations add InitialCreate
4 Run the EF command to execute the migration
dotnet ef database updatedatabase update
Update a title
Acceptance Criteria
Acceptance criteria
  • The update endpoint accepts the required title information.
  • Postman confirms the update response.
  • Reading the title again shows the changed values.
Instructions
2.Add the ability to update a title.
A In the DataService class
1 Add a method named UpdateTitle. Have it accept a parameter of type Title named title.

Call the _dataContext's field Update method, passing in the title parameter.

Call the _dataContext's field SaveChanges method.

B In the APIController
1 Create a method named UpdateTitle that returns an IActionResult and accepts a parameter of type TitleDTO named titleDTO. Add…

Create a method named UpdateTitle that returns an IActionResult and accepts a parameter of type TitleDTO named titleDTO. Add the [FromBody] attribute to the parameter.

Add an HttpPut attribute to the method with a route of update/title.

Call the _dataService field's GetTitles method and set the result to a new list of Title named title.

Find the title with the same Id as the titleDTO Id in the titles list.

Title title = titles.Find(x => x.Id == titleDTO.Id);

Set all the titleDTO properties to the corresponding title properites

You do not need to set the title's TitleCategory property.

Call the _dataService's UpdateTitle method passing in the title variable.

2 return a new status code result 200
3.Check your work.
A Start your application.
B In Postman, create a PUT reqeust named PUT/update/title.
C In the URL of the request add the below url.
{{domain}}/api/update/title
D In the body tab of the request, select the raw radio button and JSON from the dropdown menu. Paste in the below JSON object,…

In the body tab of the request, select the raw radio button and JSON from the dropdown menu. Paste in the below JSON object, that updates the dateAdded property of the existing title, Norm of the North: King Sized Adventure.

{
"id": 1,
"categories": [
{
"id": 1,
"category": "Children & Family Movies"
},
{
"id": 2,
"category": "Comedies"
}
],
"dateAdded": "12/9/2019",
"description": "Before planning an awesome wedding for his grandfather, a polar bear king must take back a stolen artifact from an evil archaeologist first.",
"duration": "90 min",
"title": "Norm of the North: King Sized Adventure",
"rating": "TV-PG",
"releaseYear": 2019,
"showId": 81145628,
"type": {
"id": 1,
"type": "Movie"
}
}
E Send the request. Ensure that the response is empty with a status of 200.
F Send the GET/titles request, ensure that title with an id of 1, has a dateAdded value of 12/9/2019.
Publish and deploy the Netflix Titles API
Acceptance Criteria
Acceptance criteria
  • The build script produces the required output.
  • The course Azure application runs the deployed service.
  • The endpoint document records the domain and API URLs; the submitted project copy excludes node_modules.
Instructions
4.Create a build script to prepare for deployment.
A Add the following code to the NetflixTitles.csproj file to ignore the duplicate dist folder when building:
<ItemGroup>
<Content Remove="dist\**"/>
</ItemGroup>
B If you do not already have it installed, download and install the LTS (Long-Term Support) version of Node.js. If you are on…

If you do not already have it installed, download and install the LTS (Long-Term Support) version of Node.js. If you are on Windows, you'll want the Windows Installer (.msi) 64-bit. If you are on a different platform, select the appropriate alternative.

Node.js Downloads

Node.js Downloads
C Create a new text file named package.json in your NetflixTitles project folder, parallel to your NetflixTitles.csproj. Copy…

Create a new text file named package.json in your NetflixTitles project folder, parallel to your NetflixTitles.csproj. Copy the provided JSON below into the package.json file and save it.

{
"scripts": {}
}
D Install the Node.js packages that will be used to build the project and prepare it for deployment.
1 In the terminal (you can use Git Bash, Command Line, Powershell, etc.) navigate to your project folder - where you copied…

In the terminal (you can use Git Bash, Command Line, Powershell, etc.) navigate to your project folder - where you copied the package.json file to. Keep this terminal window open for use throughout this step.

2 Install the npx package.

Click on this link if you would like more information about the npx package

Click on this link if you would like more information about the npx package

Run the following command to install the npx package.

npm install npx

Check your work: Open the package.json file in your project folder and confirm that there is an entry under dependencies for the package you just installed.

E Script out the tasks that should be performed when the script is ran. The scripts will prepare our application for…

Script out the tasks that should be performed when the script is ran. The scripts will prepare our application for deployment by building and publishing it to a dist folder.

dist is short for distribution, and is a common practice name to use for the folder that will get distributed to the users.

1 Add a script to the package.json file under the scripts area to publish the necessary project files into a folder named dist.
"publish-to-folder": : "dotnet publish --configuration Release --output ./dist"

Check your work: In the terminal, run the following command to run the script you just added. If it is successful, you should have a folder named dist with the compiled application files in it.

npm run publish-to-folderpublish-to-folder
2 Add a script to the package.json file under the scripts area that can be used to bundle any scripts that you may want to add…

Add a script to the package.json file under the scripts area that can be used to bundle any scripts that you may want to add in the future, so that you would not need to run each of them individually every time you wanted to run the build.

"build": "npm run publish-to-folder"

Use a comma (,) to separate the scripts.

Check your work: Delete the dist folder created by running the previous script. In the terminal, run the following command to run the script that contains the other script. If it is successful, you should see the dist was re-created.

npm run buildbuild
5.Deploy the Netflix Titles web service.
A Login to your Microsoft Azure Account.

Microsoft Azure Portal

Microsoft Azure Portal
B Select App Services to see the list of your active App Services.

Each App Service would act as its own web host.

C Create an App Service.
1 Click the Add Button
2 Select your Azure for Students plan as the subscription.
3 You will need to create a resource group as part of the subscription.

A resource group is a collection of resources. It is used to help organize your Apps and its resources (Database servers, VMS, etc.) You can use the same group for all App Services.

4 Choose a unique name for your App Service. The name will become part of the URL for your website e.g.…

Choose a unique name for your App Service. The name will become part of the URL for your website e.g. https://YourName.azurewebsites.net/
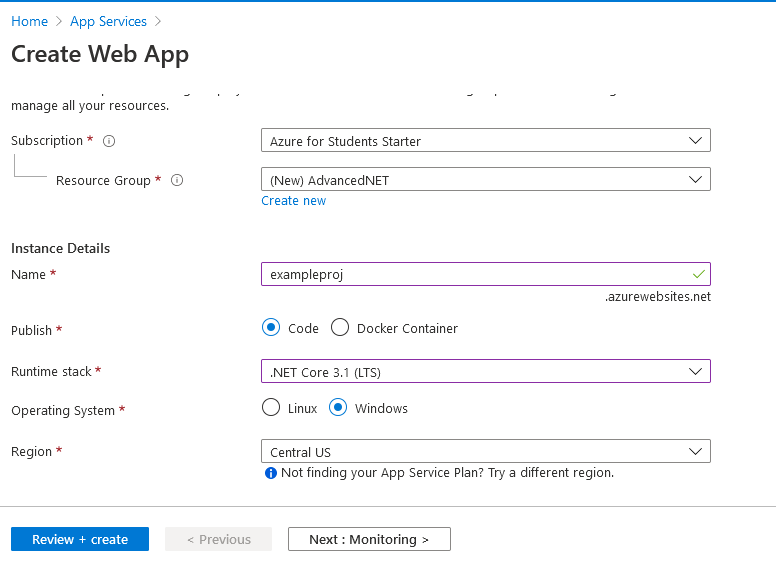
5 For the publish slider, choose Code.
6 For the runtime stack, choose .NET Core 3.1 (LTS)
7 If it asks for an operating system, either Windows or Linux will work for our purposes.
8 Choose a region for the server.
create app service for 12.4 Lab - Deploying API Web Service. Use the adjacent task instructions to identify the required controls, output, or debugger values.
create app service
9 Once you are satisfied with your options, go to the Review and Create page, then create the App.

Depending on server load, it may take a few minutes to create the App Service.
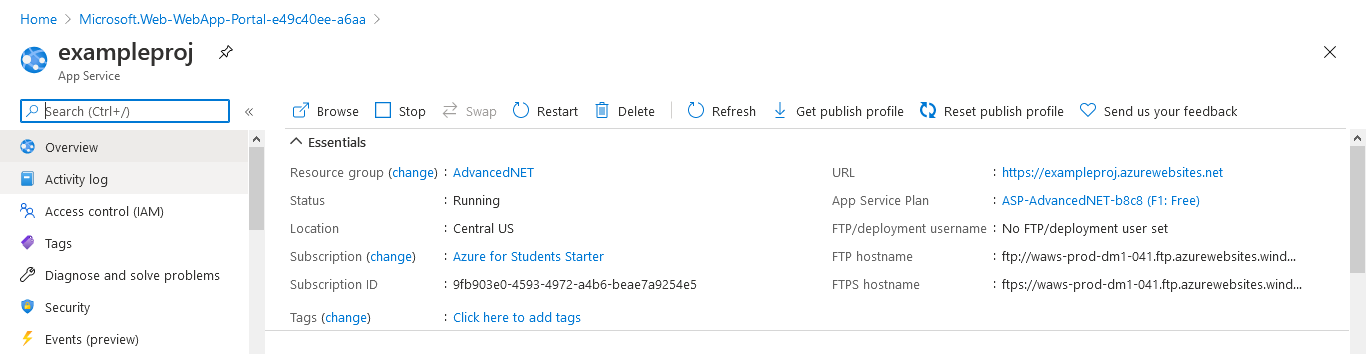
D Check your work.
App Service Dashboard for 12.4 Lab - Deploying API Web Service. Use the adjacent task instructions to identify the required controls, output, or debugger values.
App Service Dashboard
1 Visit your site through the URL given in the dashboard to ensure that the site is up.

Until you deploy your application, you will see a placeholder page.
E Uploading to the server.
1 Open your App Service's dashboard.
2 Open the Deployment Center found on the left menu.
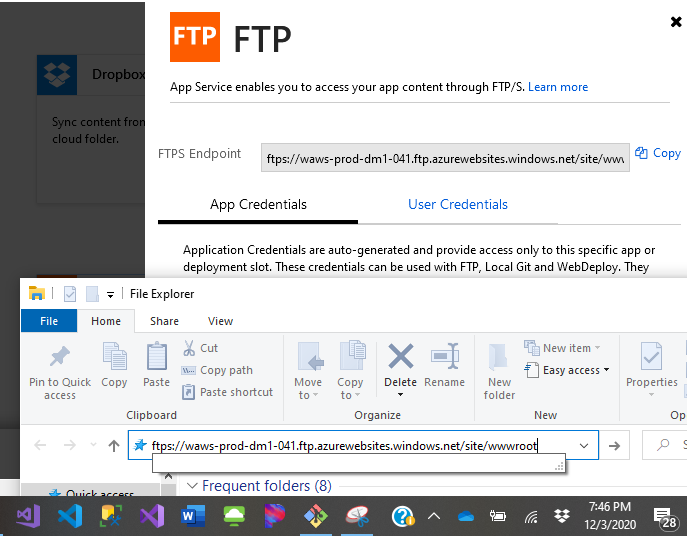
3 Towards the bottom, click into the FTP's dashboard.
4 The dashboard will give you your application's FTP URL, username, and password.
5 Open a new Windows Explorer window and paste the URL into the address bar.
FTP Host for 12.4 Lab - Deploying API Web Service. Use the adjacent task instructions to identify the required controls, output, or debugger values.
FTP Host
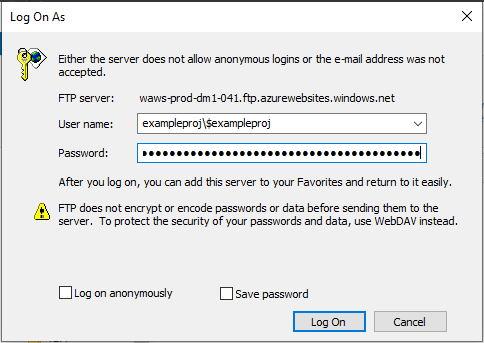
6 Enter the provided username and password credentials given by the dashboard into the Log On pop-up in Windows Explorer
Log On for 12.4 Lab - Deploying API Web Service. Use the adjacent task instructions to identify the required controls, output, or debugger values.
Log On
7 Delete the hostingstart.html file that comes with the server.
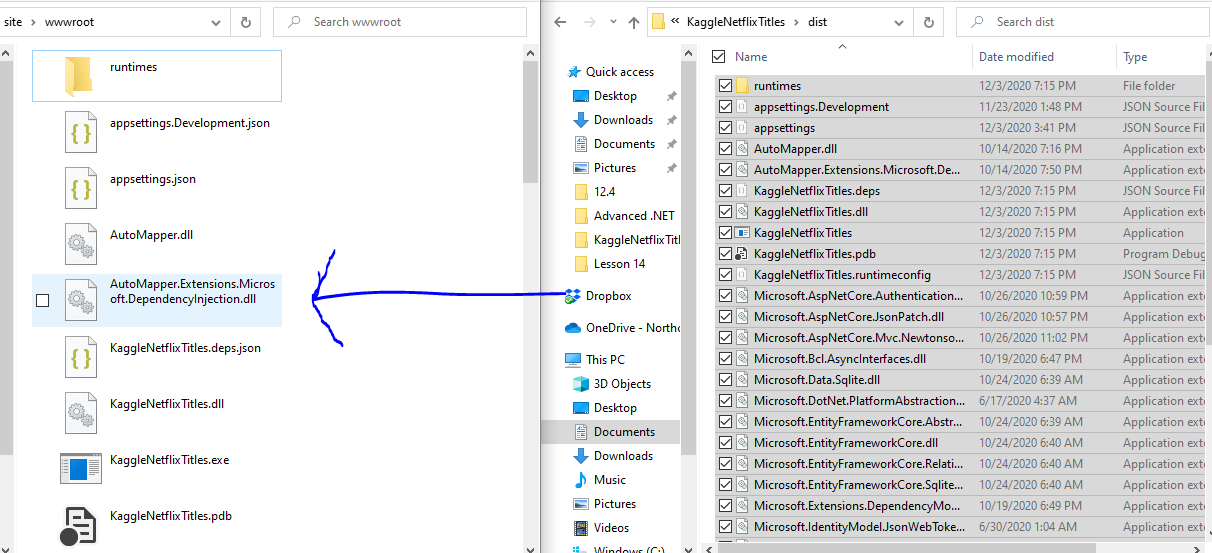
8 Copy the contents of the dist folder in your NetflixTitles application to the server.
Transfer Files for 12.4 Lab - Deploying API Web Service. Use the adjacent task instructions to identify the required controls, output, or debugger values.
Transfer Files
9 Copy the database file from your project file where your .csproj file is located to the server.
10 Go back to the Overview tab, and restart the App Service.
11 Check your work in Postman

Create a new environment

Click on the Manage Environments button in the right hand corner, next to the button with the eye.

In the Manage Environments screen, click the Add button.

Name the environment Production

In the Variable section add a new variable named Domain and set the initial value to your websites name/api, similar to what is shown below.

https://knt.azurewebsites.net/api

Click Add.

Test each of the calls in Postman and ensure that they work correctly.

6.Create a Word document that documents the domain name of your deployed application, and the URL of each of the API calls.
A Create a Word document that documents the domain name of your deployed application, and the URL of each of the API calls.
7.Make a copy of your project folder, in the copy of your project, delete the node_modules folder located in the same…

Make a copy of your project folder, in the copy of your project, delete the node_modules folder located in the same directory as your .csproj file location.

The node_modules folder enables you to run your build script for your application, however the file names are too long to allow windows to zip the containing folder. This is why you will be submitting a copy of your application with the node_modules folder removed.

A Make a copy of your project folder, in the copy of your project, delete the node_modules folder located in the same…

Make a copy of your project folder, in the copy of your project, delete the node_modules folder located in the same directory as your .csproj file location.

8.Submit a zipped folder of the copy containing your completed application and the Word document.
A Submit a zipped folder of the copy containing your completed application and the Word document.
Completion review
9.Review the feature acceptance criteria
A Confirm the required results

Return to each story and verify its acceptance criteria. Preserve the submission format and destination stated in the activity; a reading, setup guide, lab, video demonstration, and oral final may require different evidence.

Use SQLite for the deployed service Update a title Publish and deploy the Netflix Titles API