Currently, the only way for animals to reproduce involves giving birth to live young, but birds lay eggs and then hatch those eggs. In this task, you will define an interface for things that are hatchable, override the reproduce method for birds, and add methods for laying and hatching eggs. You will check your work by birthing a pregnant hummingbird and ensuring that the hummingbird lays an egg and hatches it and that the hatched baby is added to the zoo's list of animals.
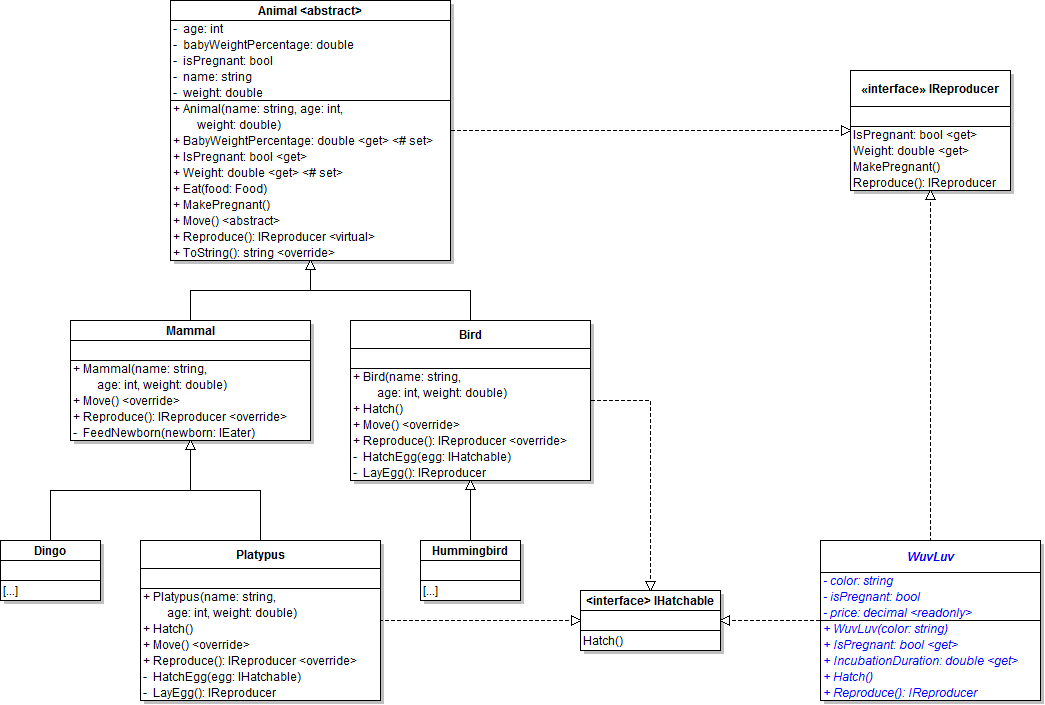
- Define an IHatchable interface as shown in the class diagram below.
- Update the Bird class to implement the IHatchable interface, as shown in the class diagram above.
- Check your work: Build the solution and ensure that the code compiles without errors or warnings.
- Define the HatchEgg and LayEgg methods in the Bird class, as shown in the class diagram above.
- Override the animal's Reproduce method in the Bird class, as shown in the class diagram above.
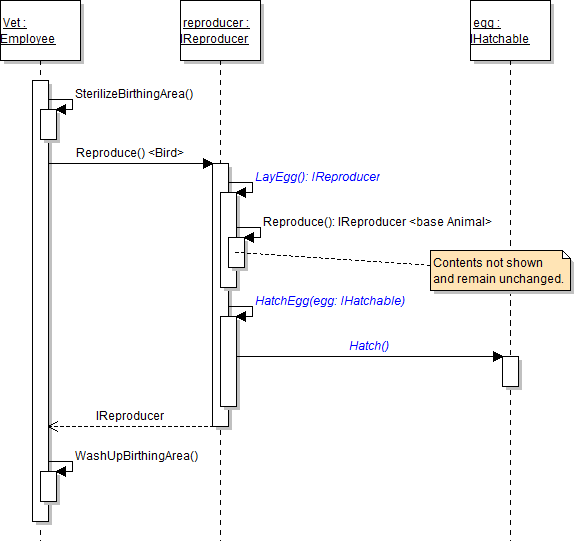
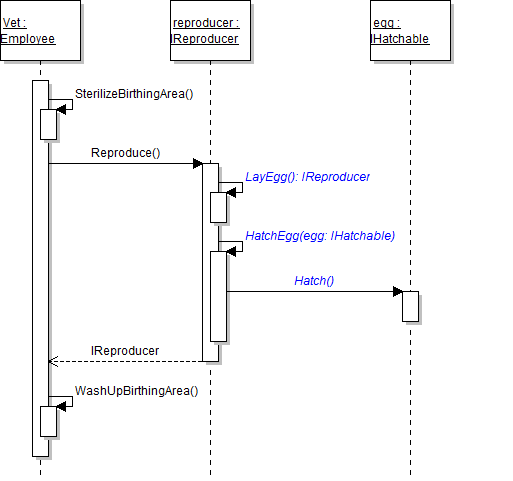
- Within the Bird class, call methods as specified in the following sequence diagram.
- In the HatchEgg method, call the passed-in egg's Hatch method.
- In the LayEgg method, return the result of calling base on the Reproduce method, as shown in the code below.
- In the bird's overridden Reproduce method, call the LayEgg method and store the result in a variable called baby. Then, use type-checking to check if the baby implements the IHatchable interface; if so, call the HatchEgg method, as shown in the code below.
- Ensure that all code is StyleCop compliant.
- Check your work:
- Change the newZooButton_Click event handler to instantiate a pregnant female hummingbird.
- In the birthDingoButton_Click, change the call to the FindAnimal method to pass in a type of Hummingbird.
- Set a breakpoint in the employee's DeliverAnimal method on the line that calls the reproducer's Reproduce method.
- Start the application. Click the New zoo button, then click the Birth dingo button.
- Step through the method calls, and ensure that the bird overrides the animal's Reproduce method, lays an egg, and then hatches the egg. Also ensure that the hatched baby is added to the zoo's list of animals.
- Remove the pregnant hummingbird from the newZooButton_Click event handler code.
- In the birthDingoButton_Click, change the call to the FindAnimal method to pass in a type of Dingo.

private IReproducer LayEgg()
{
    // Return a baby (in egg form)
    return base.Reproduce();
}// Lay an egg
IReproducer baby = this.LayEgg();
// If the baby is hatchable...
if (baby is IHatchable)
{
// Hatch the baby out of its egg
this.HatchEgg(baby as IHatchable);
}
// Return the hatched baby
return baby;Even though platypuses are mammals, they also lay eggs rather than giving birth to live young. In this task, you will have the Platypus class implement the IHatchable interface so that platypuses can lay eggs. You will check your work by birthing a pregnant platypus and ensuring that the platypus lays an egg and hatches it and that the hatched baby is added to the zoo's list of animals.
- Update the Platypus class to implement the IHatchable interface, as shown in the class diagram below.
- Check your work: Build the solution and ensure that the code compiles without errors or warnings.
- Define the HatchEgg and LayEgg methods in the Platypus class, as shown in the class diagram above.
- Override the mammal's Reproduce method in the Platypus class, as shown in the class diagram above.
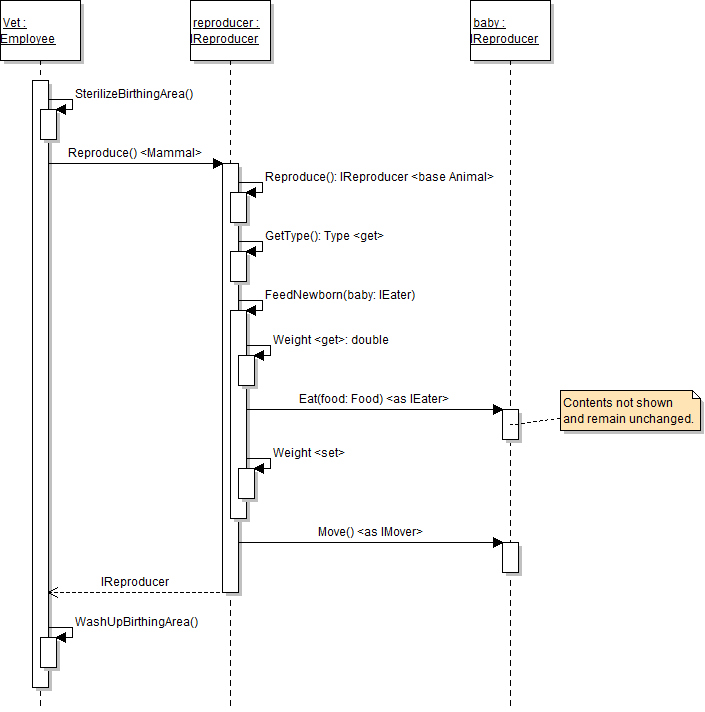
- Move the baby's movement code from the animal's Reproduce method to the Reproduce method of the Mammal class. Place the code inside of the existing if statement that checks if the animal is not a platypus.
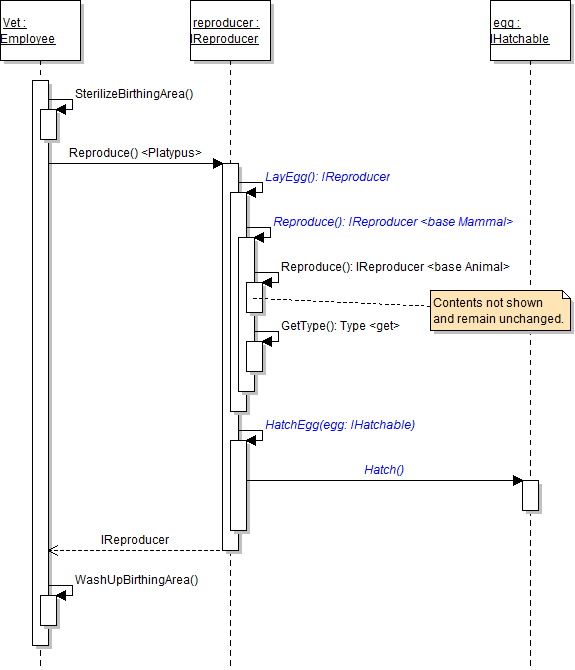
- Within the Platypus class, call methods as specified in the following sequence diagram. The sequence of method calls is the same as in the Bird class. Be sure to use type-checking and casting when calling the HatchEgg method (as in the Bird class).
- Ensure that all code is StyleCop compliant.
- Check your work:
- Set a breakpoint in the employee's DeliverAnimal method on the line that calls the reproducer's Reproduce method.
- In the birthDingoButton_Click, change the call to the FindAnimal method to pass in a type of Platypus.
- Start the application. Click the New zoo button, then click the Birth dingo button.
- Step through the method calls and ensure that the platypus overrides the mammal's Reproduce method and lays and hatches an egg.
- Stop the application. In the birthDingoButton_Click, change the call to the FindAnimal method to pass in a type of Dingo.
- Start the application. Click the New zoo button, then click the Birth dingo button.
- Step through the method calls and ensure that the dingo calls the mammal's Reproduce method and feeds and moves the newborn, as shown in the sequence diagram below.

The zoo's store now sells a toy called a WuvLuv, which can give birth by laying an egg and hatching it but is not an animal. In this task, you will define a class to represent WuvLuvs, have that class implement the necessary interfaces to reproduce, and then have the WuvLuv lay an egg and hatch it. You will check your work by instantiating a WuvLuv, having it give birth, and ensuring that it lays an egg and hatches the egg without adding the baby to the zoo's list of animals.
- Add a class to represent a WuvLuv.
- Create a Toys folder in the ZooScenario project.
- Define the WuvLuv class in the Toys folder as shown in the class diagram below. Have the class implement the IHatchable and IReproducer interfaces.
- Set the readonly price field to 19.99m at the field definition.
- In the Weight property, return the hard-coded value of 2.1. The other properties simply return the value of the underlying field.
- In the MakePregnant method, set the isPregnant field to true.
- In the LayEgg method, simply return a new WuvLuv of the same color as the parent (i.e. the current object).
- Call the methods in the WuvLuv's Reproduce and HatchEgg methods as specified in the sequence diagram below. The sequence is similar to that in the bird's and platypus's Reproduce methods.
- Check your work: Build the solution and ensure that the code compiles without errors or warnings.
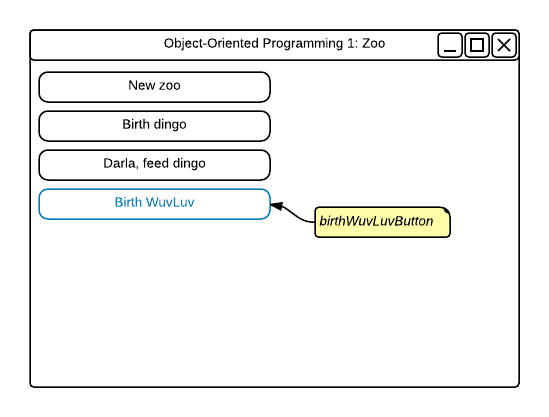
- Create the Birth WuvLuv button as shown in the wireframe below. Name the button birthWuvLuvButton. Give the button click event.
- Write the following code within the birthWuvLuvButton_Click event handler.
- Instantiate a WuvLuv and store it in a variable. Pass in "Purple" when calling the WuvLuv's constructor. Make the WuvLuv pregnant.
- Birth the pregnant WuvLuv by calling the zoo's BirthAnimal method and passing the WuvLuv in.
- Ensure that all code is StyleCop compliant.
- Check your work:
- Set a breakpoint in the employee's DeliverAnimal method on the line that calls the reproducer's Reproduce method.
- Start the application. Click the New zoo button, then click the Birth WuvLuv button.
- Ensure that the reproducer is a WuvLuv. Then step through the method calls and ensure that the WuvLuv lays an egg and hatches it. Also ensure that the hatched WuvLuv is not added to the zoo's list of animals (because it is not an animal, but a toy).
- Ensure that all code is StyleCop compliant.
- Browse to the project folder and add it to a newly created zip archive.
- Submit the zipped project folder to the correct assignment in Blackboard.