You will be adding functionality to the zoo to have animals give birth; this functionality will be triggered by clicking a button. In this task, you will add a button to the MainWindow for use in birthing animals. You will check your work by ensuring that the solution builds without compiler errors or warnings.
Creating Button Controls (8:07)
- Open the MainWindow's designer by double-clicking on MainWindow.xaml (not MainWindow.xaml.cs) in the Solution Explorer.
- Navigate to the Toolbox and expand the Common WPF Controls section. Click the Button control in the Toolbox to make it the active control type.
- Place a new button on the window by clicking on the background of the window with the Button control selected, as specified in the previous step.
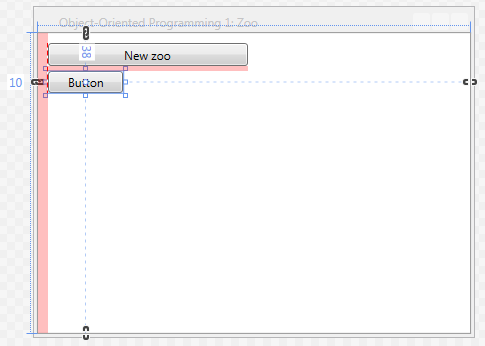
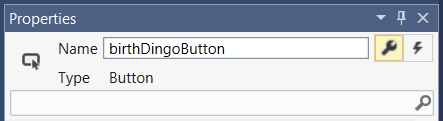
- Position the new button beneath the existing button so that the left edges align. The button should snap into place, showing a recommended margin in red, as shown in the first image below. Then stretch the button to be the same width as the existing button, as shown in the wireframe below.
- Navigate to the Properties Window and ensure that it is in "property mode" by clicking on the wrench icon in the top right corner. Ensure that the new button is the selected control.
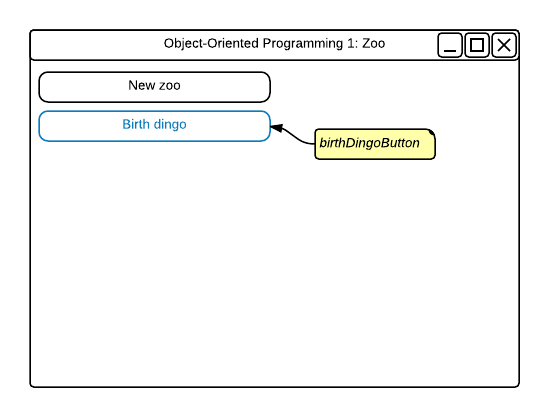
- In the Properties Window, enter a Name of birthDingoButton.
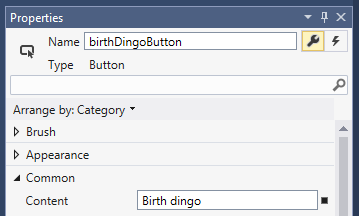
- Enter Content of "Birth dingo".
- Change the Properties Window to be in "event mode" by clicking on the lightning bolt icon in the upper right corner.
- Double-click in the Click event's text box, which will create an event handler for the button and immediately navigate to MainWindow.xaml.cs, which is the code view for MainWindow.xaml.
- Ensure that all code is StyleCop compliant.
- Check your work: Build the solution and ensure that the code compiles without errors or warnings.
Tip: If the Toolbox is hidden, restore it by clicking View | Toolbox.
Tip: If the Properties Window is hidden, restore it by clicking View | Properties Window.
Note: Use the following code to document the button click event handler, making it StyleCop compliant.
/// <summary>
/// Requests that Flora help a pregnant dingo to give birth.
/// </summary>
/// <param name="sender">The object that initiated the event.</param>
/// <param name="e">The event arguments for the event.</param>
private void birthDingoButton_Click(object sender, RoutedEventArgs e)
{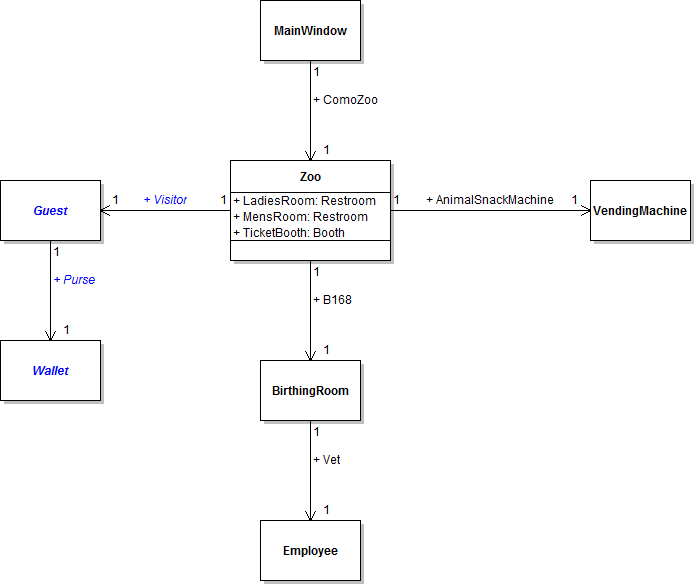
}The zoo needs a way - a method - to tell the birthing room that an animal needs to give birth. In this task, you will define a method in the Zoo class for use in birthing animals. You will check your work by ensuring that the solution builds without compiler errors or warnings.
Introduction to Methods (12:41)
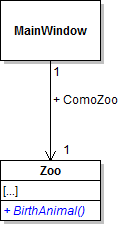
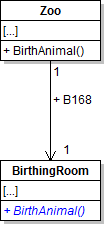
- Define the BirthAnimal method in the Zoo class as specified in the code and class diagram below.
- Ensure that all code is StyleCop compliant.
- Check your work: Build the solution and ensure that the code compiles without errors or warnings.
/// <summary>
/// Aids an animal in giving birth.
/// </summary>
public void BirthAnimal()
{

}
Now that the zoo has a method for use in birthing animals, that method needs to be called in order for it, and the code inside of it, to run. In this task, you will call the zoo's BirthAnimal method from the Birth dingo button. You will check your work by setting a breakpoint, stepping into the method call, and ensuring that you stepped into the correct method and the correct object.
Interpreting this Course's Sequence Diagrams (7:04)
How to Write Code from Sequence Diagrams (33:07)
Calling Method Between Objects (13:37)
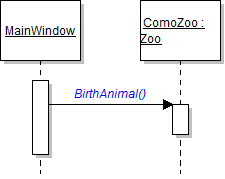
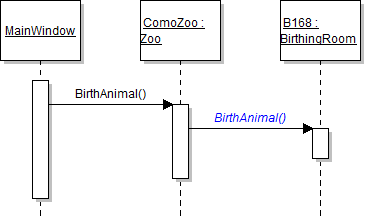
- In birthDingoButton_Click in MainWindow.xaml.cs, call the zoo's BirthAnimal method on the ComoZoo field, as shown in the code and sequence diagram below.
- Check your work:
- Set a breakpoint in birthDingoButton_Click on the line that calls the zoo's BirthAnimal method.
- Start the application.
- Click the New zoo button. Then click the Birth dingo button.
- Press F11 to step into the BirthAnimal method call. You should step into the ComoZoo object and be taken to the Zoo.cs file. Examine the Locals window - the "this" object should be the ComoZoo, which you can check by ensuring that the value of the Name field is "Como Zoo".
private void birthDingoButton_Click(object sender, RoutedEventArgs e)
{
    this.ComoZoo.BirthAnimal();
}
The birthing room needs a method for birthing animals that the zoo can call when an animal needs to be birthed. In this task, you will define and call a method on the BirthingRoom class for use in birthing an animal. You will check your work by setting a breakpoint, stepping into the method call, and ensuring that you stepped into the correct method and the correct object.
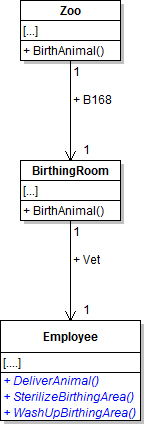
- Define the BirthAnimal method in the BirthingRoom class as specified in the class diagram and code documenation below.
- In the zoo's BirthAnimal method, call the birthing room's BirthAnimal method on the B168 field, as shown in the sequence diagram below.
- Ensure that all code is StyleCop compliant.
- Check your work:
- Set a breakpoint in birthDingoButton_Click on the line that calls the zoo's BirthAnimal method.
- Start the application.
- Click the New zoo button. Then click the Birth dingo button.
- Press F11 to step into the zoo's BirthAnimal method call. You should step into the ComoZoo object.
- Press F11 to step into birthing room's BirthAnimal method call. You should step into the B168 object. Use the Locals window to ensure that the current object - "this" - is the B168 birthing room.
- Open the Call Stack window at the bottom of the debugging window. The call stack is the list of method calls that have occurred during the current session. The stack should have four entries, one for [External Code] and three for the three method calls (including the one for the button's click event handler).
- In the Call Stack, double-click on the call to the zoo's BirthAnimal method (the second entry). Doing so should take you back to the Zoo.cs file. The line that called the birthing room's BirthAnimal method should be highlighted.
/// <summary>
/// Births an animal.
/// </summary>
Tip: If the Call Stack window is hidden, restore it by clicking Debug | Windows | Call Stack or pressing Ctrl + D, C.
Using the Call Stack (coming soon)

When the birthing room is told that an animal needs to give birth, it needs to let its vet know this information so that the vet can deliver the animal. In this task, you will define and call methods on the Employee class for use in cleaning the birthing area and delivering an animal. You will check your work by setting a breakpoint, stepping into the method calls, and ensuring that you stepped into the correct methods and the correct object.
- Define methods in the Employee class.
- Define the DeliverAnimal, SterilizeBirthingArea, and WashUpBirthingArea methods in the Employee class as specified in the class diagram below.
- In the SterilizeBirthingArea method, simply write a comment stating what the employee might do, as shown in the code below:
- Inside of the WashUpBirthingArea method, simply write a comment stating what the employee might do.
- In the birthing room's BirthAnimal method, call the employee's DeliverAnimal method on the Vet field, as shown in the sequence diagram below.
- In the employee's DeliverAnimal method, call the SterilizeBirthingArea and WashUpBirthingArea methods, as shown in the code below and the sequence diagram above. The methods are defined on the same class, and so they must be called on the same object using "this." notation.
- Ensure that all code is StyleCop compliant.
- Check your work:
- Set a breakpoint in the birthing room's BirthAnimal method on the line that calls the vet's DeliverAnimal method.
- Start the application.
- Click the New zoo button. Then click the Birth dingo button.
- Press F11 to step into the employee's DeliverAnimal method. Ensure that you stepped into the Vet object by checking that the name of the current object is "Flora" and the number of the current object is 98.
- Press F11 to step into the SterilizeBirthingArea method. You should stay in the Vet object but move to the opening curly brace of the SterilizeBirthingArea method.
- Press F11 to step through the rest of the SterilizeBirthingArea method. You should be taken back to the DeliverAnimal method.
- Press F11 to step into the WashUpBirthingArea method. You should stay in the Vet object but move to the opening curly brace of the WashUpBirthingArea method.
/// <summary>
/// Sterilizes the birthing area in preparation for delivering a baby.
/// </summary>
public void SterilizeBirthingArea()
{
    // Sterilize birthing area.
}/// <summary> /// Washes up the birthing area after having delivered a baby. /// </summary>

/// <summary>
/// Aids the specified animal in delivering its baby.
/// </summary>
public void DeliverAnimal()
{
    // Sterilize birthing area.
    this.SterilizeBirthingArea();

    // Wash up birthing area.
    this.WashUpBirthingArea();
}A zoo has little reason for existing if there are no guests to visit it. In this task, you will define classes to represent guests and their wallets; you will also add a field to the zoo to hold a visitor. You will check your work by ensuring that the solution builds without compiler errors or warnings.
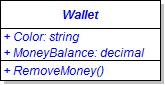
- Create the Wallet class in the Business Classes folder and define its fields and methods as specified in the class diagram below.
- Check your work: Build the solution and ensure that the code compiles without errors or warnings.
- Create the Guest class in the Business Classes folder and define its fields and methods as specified in the class diagram below.
- Check your work: Build the solution and ensure that the code compiles without errors or warnings.
- Define the Visitor field in the Zoo class as specified in the class diagram below.
- Ensure that all code is StyleCop compliant.
- Check your work: Build the solution and ensure that the code compiles without errors or warnings.
/// <summary>
/// The color of the wallet.
/// </summary>

/// <summary>
/// The amount of money currently contained within the wallet.
/// </summary>

/// <summary>
/// Removes a specified amount of money from the wallet.
/// </summary>
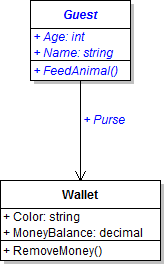
/// <summary>
/// The age of the guest.
/// </summary>

/// <summary>
/// The name of the guest.
/// </summary>

/// <summary>
/// The guest's purse.
/// </summary>

/// <summary>
/// Feeds the specified animal.
/// </summary>
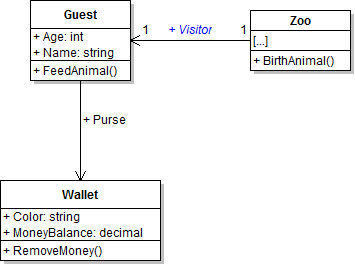
/// <summary>
/// The zoo's current visitor.
/// </summary>
In this task, you will instantiate the zoo's Visitor field to hold a new guest. You will check your work by setting a breakpoint, stepping through the instantiation code, and ensuring that the visitor is instantiated and its fields are set to the correct values.
- In newZooButton_Click in MainWindow.xaml.cs, instantiate the zoo's Visitor field to a new instance of the Guest class. Do this after instantiating and setting the ComoZoo's other fields.
- Set the visitor's fields.
- Underneath the code that sets the attendant's fields, write the following code comment:
- Underneath the code comment, set or instantiate the Age, Name, and Purse fields as specified in the object diagram below.
- Set the visitor's purse's fields.
- Underneath the code that sets the attendant's fields, write the following code comment:
- Underneath the code comment, set the Color and MoneyBalance fields as specified in the object diagram above.
- Check your work:
- Set a breakpoint in the newZooButton_Click on the line of code that sets the Age field of the Visitor field.
- Start the application.
- Click the New zoo button.
- Press F10 to step over the lines of code that set the field values of the Visitor and Purse fields. Use the Locals window to ensure that the fields are set to the correct values.
// Set field values of the visitor.

// Set field values of the visitor's purse.
The application needs a button to launch the sequence of method calls that will allow the zoo's visitor to feed an animal. In this task, you will add a button, give it a click event handler, and call the appropriate methods to have a guest remove money to feed an animal. You will check your work by setting a breakpoint, stepping into the method calls, and ensuring that you stepped into the correct methods and the correct object.
- Add a button for feeding an animal.
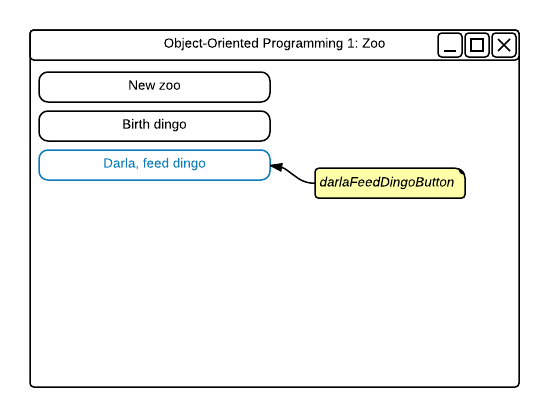
- Add a button to the MainWindow underneath the Birth dingo button, as specified in the wireframe below.
- Align the button with the other buttons. Give it the same height and width as the other buttons.
- Name the button darlaFeedDingoButton.
- Add a Click event handler to the button.
- Starting in the darlaFeedDingoButton_Click in MainWindow.xaml.cs, call the guest's FeedAnimal method and the wallet's RemoveMoney method as specified in the sequence diagram below.
- Check your work:
- Set a breakpoint in darlaFeedDingoButton_Click on the line that calls the visitor's FeedAnimal method.
- Start the application.
- Click the New zoo button. Then click the Darla, feed dingo button.
- Press F11 to step into the guest's FeedAnimal method. Ensure that you stepped into the Visitor object by checking that the name of the current object is "Darla" and the age of the current object is 11.
- Press F11 to step into the wallet's RemoveMoney method. Ensure that you stepped into the Purse object by checking that the color of the current object is "Salmon" and the money balance of the current object is 5.25m.

// Get money from purse.
this.Purse.RemoveMoney();
- Ensure that all code is StyleCop compliant.
- Browse to the project folder and add it to a newly created zip archive.
- Submit the zipped project folder to the correct assignment in Blackboard.