- Download this starting zip file.
- Extract the contents of the zip file to a location of your choice.
- Rename the "OOP 1 Zoo 1.2 LastName" folder, replacing LastName with your last name.
- Within the folder renamed in the previous step, rename the file "OOP 1 Zoo 1.2 LastName.sln" file, replacing LastName with your last name.
1.2 Zoo starting code (download)
Warning: This starting code is intended for use with Visual Studio 2015 or later. If you have an earlier version of Visual Studio, please upgrade to 2015. If you need to use an earlier version of Visual Studio, you may need to change project settings (e.g. TargetFrameworkVersion) in the provided starting code.
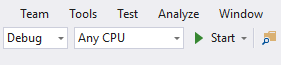
Use Visual Studio to create a New Zoo button click event handler. Set a breakpoint in the event handler and ensure that the code is hit.
Introduction to Visual Studio (11:33)
- Open the renamed file OOP 1 Zoo 1.2-Last Name.sln contained within the renamed folder.
- Double-click on MainWindow.xaml in the Solution Explorer.
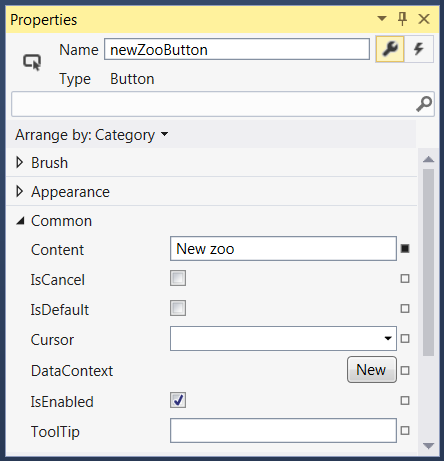
- Select the (first/only) New Zoo button by single-clicking it.
- Navigate to the Properties Window.
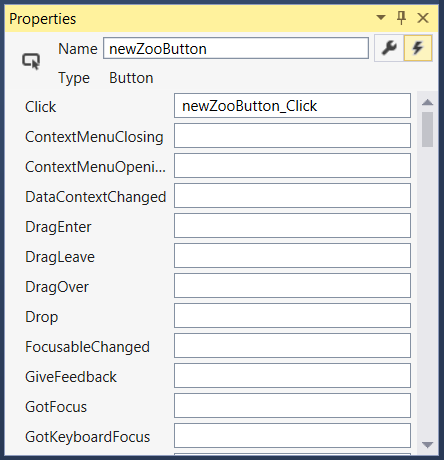
- Change the Properties Window to show events (click on its lightning bolt icon).
- Double-click on the Click event. This should open a new tab called MainWindow.xaml.cs and take you to this assignment's button-click event handler.
- Check your work:
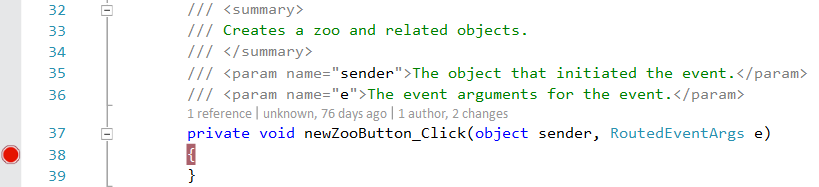
- Set a breakpoint at the opening curly brace of the newZooButton_Click. The resulting breakpoint should look like the image below.
- Start the application by clicking the Start button in the top toolbar.
- Click the New zoo button and ensure that the event handler code is hit. The hit breakpoint should look similar to the image below.
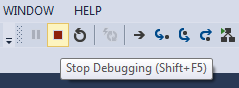
- Stop the application by clicking the red square in the top toolbar or pressing Shift + F5.
- Remove the breakpoint by clicking on the red circle in the margin.
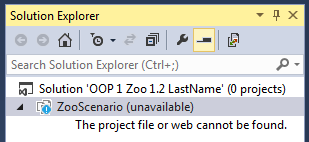
Warning: Make sure that you are opening the .sln file inside the extracted folder. Visual Studio solutions are made up of multiple files, and the .sln file cannot find the other required files if it is opened from inside a compressed, or zipped, folder. If you have opened the .sln file from inside the compressed folder, you will get a warning about Visual Studio being unable to load projects, and your Solution Explorer will look similar to the image below.
Tip: If hidden, restore it by clicking View | Solution Explorer.
Tip: If hidden, restore it by clicking View | Properties Window.
Debugging in Visual Studio (13:21)

The application needs a zoo object to be instantiated. In this task, you will create a zoo instance and assign it to a variable. You will check your work by making sure the zoo instantiates without errors.
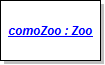
- In the newZooButton_Click, create a Zoo instance and assign it to a local variable named comoZoo, as shown in the code below. The code below includes a comment (the line that starts with the two forward slashes) explaining what the code is doing. Include the comment in your code.
- Check your work:
- Set a breakpoint in the newZooButton_Click.
- Start the application.
- Observer the instantiation of the zoo.
- Click the New zoo button and press the F10 key.
- Navigate to the Locals window near the bottom of the Visual Studio application interface.
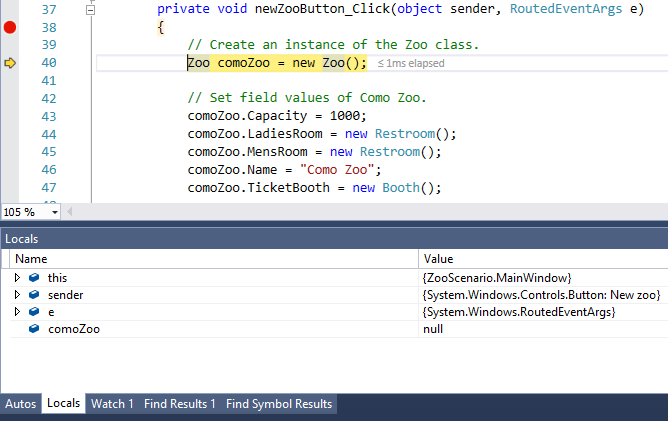
- Ensure that the comoZoo variable is null.
- Press the F10 key again.
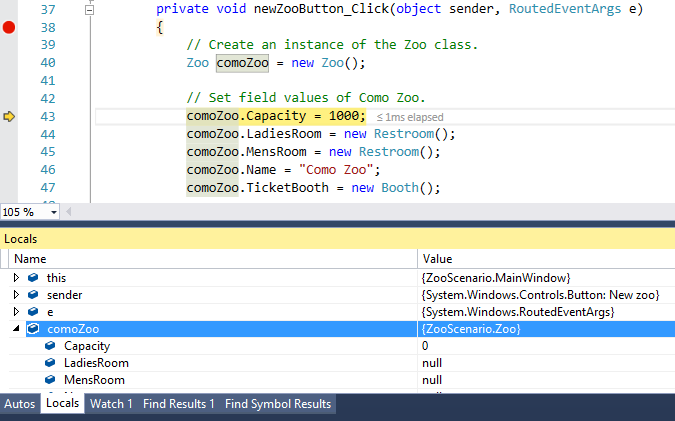
- Navigate to theLocals window again. Click the triangle next to comoZoo to expand that node and view the values it contains.
- Ensure that the comoZoo variable is now set to a ZooScenario.Zoo, though its fields are not set.
- Stop the application and remove the breakpoint.
Object Instantiation and Assignment (21:07)
Instantiating Objects per Object Diagrams (3:42)
Add the following code comment to the beginning of newZooButton_Click method.
// Create an instance of the Zoo class.
Write the following line of code beneath the code comment.
Zoo comoZoo = new Zoo();

Tip: If you do not see the Locals window near the bottom of the screen, click Window in the file menu and choose Reset Window Layout.
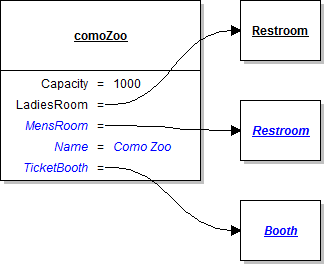
Now that the zoo exists (i.e. has been instantiated), it needs a value for its capacity. In this task, you will assign an integer value to the zoo's Capacity field. You will check your work by setting a breakpoint, stepping over the code that sets the capacity, and using the Locals window to ensure that the field value is set correctly.
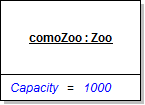
Use the object diagram below as a guide as you complete the steps.
Primitive vs. Custom Types (10:49)
Variables, Fields, and Scope (12:36)
- Set the zoo's Capacity field to an integer of 1000, as shown in the code below.
- Check your work:
- Set a breakpoint on the opening curly brace in the newZooButton_Click.
- Start the application.
- Click the New zoo button.
- Press F10 to step through the code. Step over the line of code that instantiates the comoZoo. Then step over the line of code that sets the comoZoo's Capacity field. Notice in the Locals window that the value of the Capacity field changes from 0 to 1000 after stepping over the line of code that sets the field.
- Stop the application.
Add the following code comments to the method.
// Set field values of Como Zoo.
Write the following code beneath the code comment.
comoZoo.Capacity = 1000;
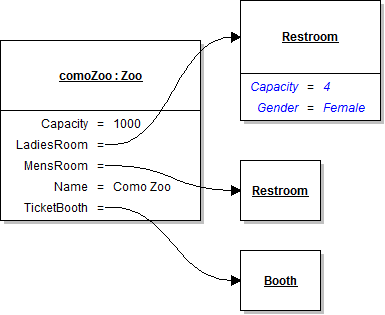
The zoo also has a ladies' restroom that needs to be created. In this task, you will create an instance of the Restroom class and assign it to the zoo's LadiesRoom field. You will check your work by setting a breakpoint, stepping over the code that instantiates the ladies' room, and using the Locals window to ensure that the field value is set correctly.
Use the object diagram below as a guide as you complete the steps.
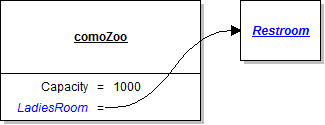
- Create a Restroom instance and assign it to the zoo's LadiesRoom field, as shown in the code below. Because this code sets another of the zoo's fields, you can put this line of code directly underneath the line that sets the zoo's capacity.
- Check your work:
- Start the application.
- Click the New zoo button.
- Press F10 to step through the code. Step over the lines of code that instantiate the comoZoo and set the Capacity field. Then step over the line of code that instantiates the comoZoo's LadiesRoom field. Notice in the Locals window that the value of the LadiesRoom field changes from null to a new Restroom instance, represented as {ZooScenario.Restroom}.
- Stop the application.
comoZoo.LadiesRoom = new Restroom();
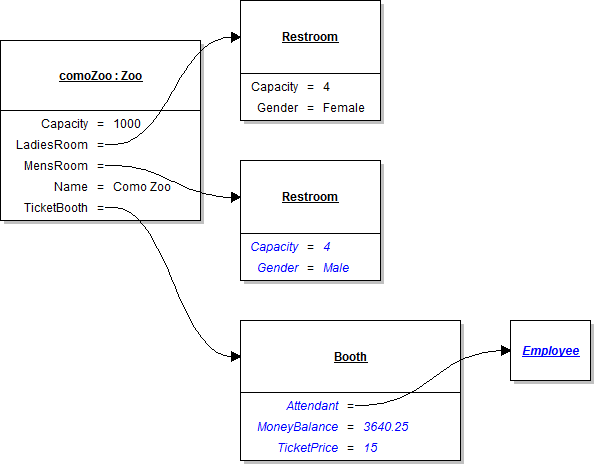
The zoo has other fields that need to be set, including its name, a men's restroom, and a ticket booth. In this task, you will assign the specified value or object to each field. You will check your work by stepping through the code to ensure the zoo is instantiated and all of its fields are set to the correct values.
Use the object diagram below as a guide as you complete the steps.
- Create a Restroom instance and assign it to the zoo's MensRoom field.
- Set the zoo's name to a string of "Como Zoo", as shown in the code below.
- Create a Booth instance and assign it to the zoo's TicketBooth field.
- Check your work:
- Start the application.
- Click the New zoo button.
- Press F10 to step through the code. Step over the lines of code that instantiate the comoZoo, set its Capacity field, and instantiate its LadiesRoom field. Then step over the lines of code that instantiate the comoZoo's MensRoom field, sets its name, and instantiates its TicketBooth field. Notice in the Locals window that the value of the MensRoom field changes from null to a new Restroom instance, the value of the Name field changes from null to "Como Zoo", and the value of the TicketBooth field changes from null to a new Booth instance.
- Stop the application.
comoZoo.Name = "Como Zoo";
The zoo's ladies' room has fields that need to be set. In this task, you will set each field to the specified value. You will check your work by setting a breakpoint, stepping through the code, and ensuring that the ladies' room is instantiated and all of its fields are set to the correct values.
Use the object diagram below as a guide as you complete the steps.
- Underneath the code that sets the comoZoo's fields, write the following code comment:
- After the code comment, set the LadiesRoom capacity and gender fields as shown in the object diagram above.
- Check your work:
- Set a breakpoint in the newZooButton_Click on the line of code that sets the LadiesRoom capacity.
- Start the application.
- Click the New zoo button.
- Press F10 to step through the code. Step over the lines of code that set the LadiesRoom Capacity and Gender fields. Use the Locals window to ensure that the values of the fields are set correctly.
- Stop the application and remove the breakpoint.
// Set field values of the ladies' restroom.
The zoo contains two other objects - the mens' room and the ticket booth - with fields that need to be set. In this task, you will assign the specified value to each field in the MensRoom and TicketBooth fields. You will check your work by setting a breakpoint, stepping through the code, and ensuring that all of the fields of the mens' room and ticket booth are set to the correct values.
Use the object diagram below as a guide as you complete the steps.
- Set the fields of the men's room.
- Add the following code comment after the code that sets the fields of the ladies' room.
- After the code comment, set the MensRoom Capacity and Gender fields as shown in the object diagram above.
- Set the fields of the ticket booth.
- Add the following code comment after the code that sets the fields of the men's room.
- Underneath the code comment, create an Employee instance and assign it to the ticket booth's Attendant field.
- Set the MoneyBalance field to a decimal of 3640.25, as shown in the code below:
- Set the TicketPrice field to a decimal of 15.00.
- Check your work:
- Set a breakpoint in the newZooButton_Click on the line of code that sets the capacity of the men's room.
- Start the application.
- Click the New zoo button.
- Press F10 to step through the code. Step over the lines of code that set the fields of the MensRoom and TicketBooth fields. Use the Locals window to ensure that the values of the fields are set correctly.
- Stop the application and remove the breakpoint.
// Set field values of the men's restroom.
// Set field values of the ticket booth.
comoZoo.TicketBooth.MoneyBalance = 3640.25m;
There is one last object, the ticket booth's Attendant field, that has fields that need to be set. In this task, you will assign the specified value to each of the attendant's fields. You will check your work by setting a breakpoint, stepping through the code, and ensuring that all of the attendant's fields are set to the correct values.
Use the object diagram below as a guide as you complete the steps.
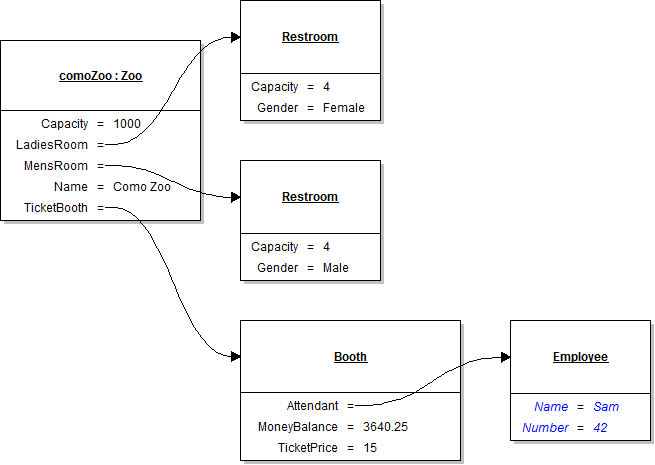
Note: The employee has the ability to have the AnimalDeliveryCount value set, but it is intentionally be allowed to default to zero.
- Add the following code comment after the code that sets the fields of the ladies' room.
- Underneath the code comment, set the Name and Number fields of the Attendant field to the values specified in the object diagram above.
- Check your work:
- Set a breakpoint in the newZooButton_Click on the line of code that sets the name of the ticket booth attendant.
- Start the application.
- Click the New zoo button.
- Press F10 to step through the code. Step over the lines of code that set the fields of the Attendant field. Use the Locals window to ensure that the values of the fields are set correctly.
- Stop the application and remove the breakpoint.
// Set field values of the ticket booth's attendant.
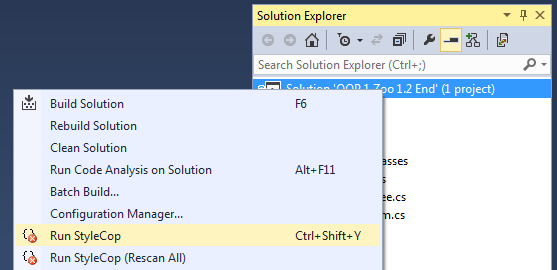
- Run StyleCop by right-clicking on the solution name in Solution Explorer and selecting Run StyleCop, as shown in the image below. Address all StyleCop warnings that are generated.
- Browse to the project folder and add it to a newly created compressed, or zipped, archive.
- Submit the compressed, or zipped, project folder to the correct assignment in Blackboard.
Tip: You can also run StyleCop by pressing Ctrl + Shift + Y.
Note: If you do not know how to compress a folder, contact your instructor, instructional assistant, or ITEC tutors to assist you in completing this step.