10-152-311 - Object-Oriented Programming 1

5.3 School Test: Class Diagram

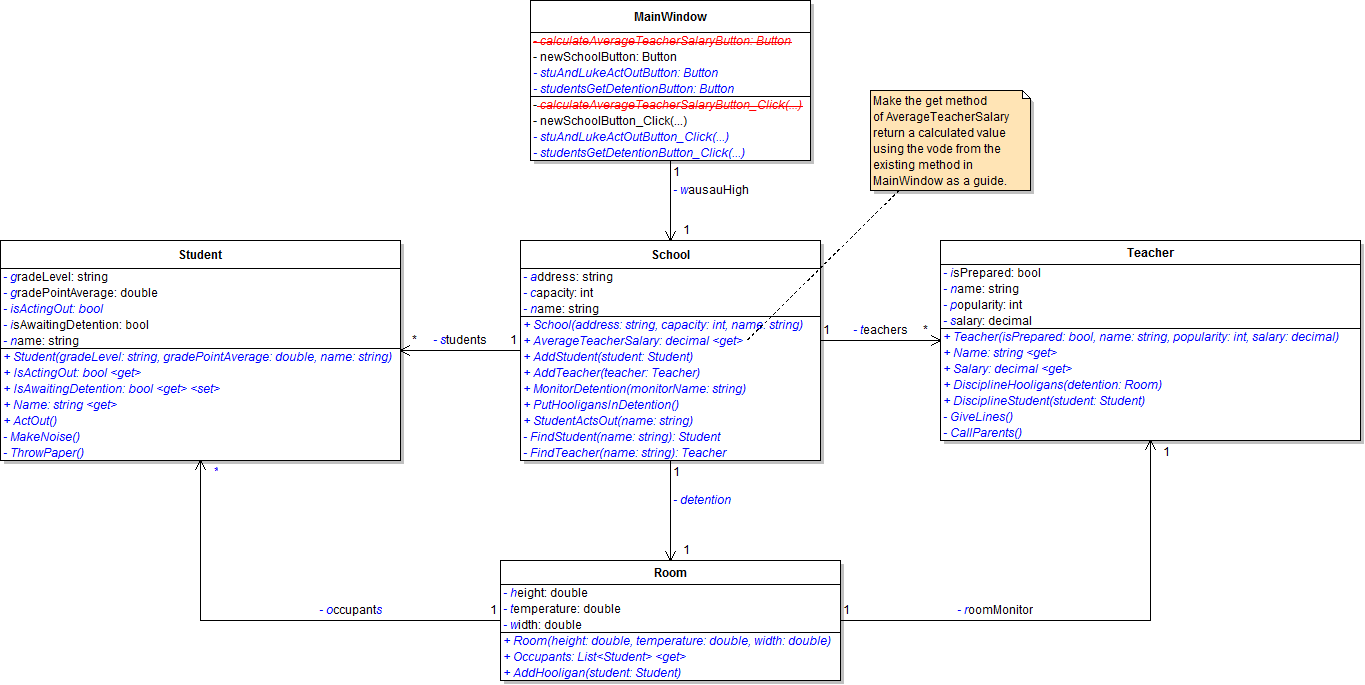
Implement the changes specified in the following UML class diagram.

PNG image of 5.3  School UML class diagram
  1. When creating classes be sure to:
    1. Ensure the class in the root namespace. This can be done in one of two ways. Either by adding the class in the project, i.e. scenario, or by adding the class to the business classes folder and removing the ".Business_Classes" designation from the namespace.
  2. Open the main window (MainWindow.xaml) in designer mode (right-click and click "View Designer" or press Shift-F7 to go to designer mode).

5.3 School Test: Object Diagram

Instantiate the objects and set their field values as specified in the following UML object diagram.

PNG image of 5.3 School UML object diagram

5.3 School Test: Code Snippet

Within the newSchoolButton click event handler use the following code snippet as your guide to writing the code.

5.3 School Test: Sequence Diagram 1

stuAndLukeActOutButton

PNG image of the 5.3 School UML sequence diagram #1

5.3 School Test: Sequence Diagram 2

stuAndLukeGetDetentionButton

PNG image of the 5.3 School UML sequence diagram #2

5.3 School Test: Final Steps

Button details:

  1. Write code in the "Stu and Luke act out" button click event handler to implement the code specified in the sequence diagram.
  2. Write code in the "Stu and Luke get detention" button click event handler to implement the code specified in the sequence diagram.

Test script:

  1. Click the "New theater" button.
  2. Click the "Stu and Luke act out" button.
  3. Use the debugger to ensure that methods are called and fields are set as specified on the sequence diagram.
  4. Click the "Stu and Luke get detention" button.
  5. Use the debugger to ensure that methods are called and fields are set as specified on the sequence diagram.

Starting Zip File

Unzip the Test 2-Retake zip file, rename both the folder and the solution file to contain your last name, and use it as the starting point for your test.

Test Rubric

PNG image of the Test 2-Retake rubric

Test, Complete and Submit

  1. Build your program - Eliminate compiler errors and warnings
  2. Debug/Test your program - Set breakpoints, step through code, monitor values
  3. Make your code StyleCop-compliant
  4. Close your Visual Studio solution.
  5. Compress your Visual Studio solution to a zip file.
  6. Submit the zip file via Blackboard.

Grading Rubric

PNG image of the 5.3 School rubric