10-152-311 - Object-Oriented Programming 1

3.1 Zoo Lab: Overview

ComoZoo has a new list of Animals and a list of Guests. Each Guest has a wallet.

This week you will be creating button clicks to find Fred's age and to calculate the average animal weight of all the animals in the Zoo. Implement the changes in your code as shown in the following class and object diagrams. Create the new classes and the lists needed in your newZooButton code.

3.1 Zoo Lab: Class Diagram

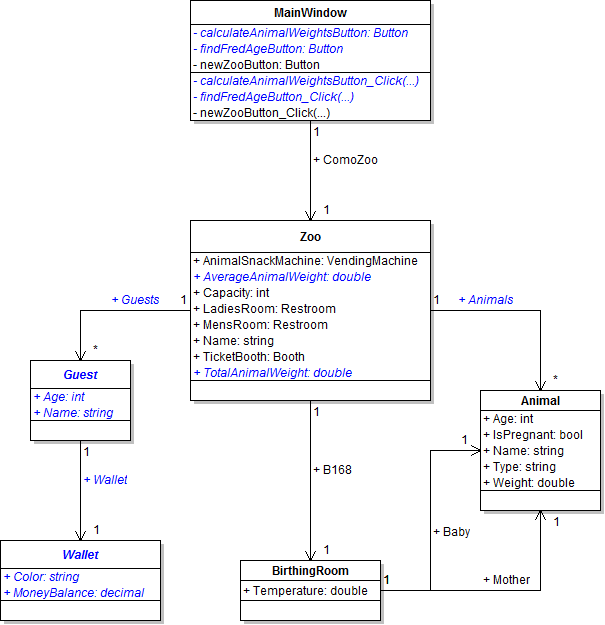
Implement the changes specified in the following UML class diagram.

Create any button(s) and button click event handler(s) in the WPF window designer (if specified in the class diagram).

  1. Open the MainWindow's designer by double-clicking on the file MainWindow.xaml (not MainWindow.xaml.cs) in the Solution Explorer.
  2. Navigate to the Toolbox (if hidden, restore it by clicking View | Toolbox).
  3. Expand the Common WPF Controls section of the Toolbox.
  4. Click the Button control in the Toolbox, making it the active control type.
  5. Place a new button on the window by clicking on the background of the window with the Button control selected per "step d" above.
  6. Position the new button immediately beneath and aligned with the left of the existing button(s) (it will snap in place, showing a recommended margin in red).
  7. Stretch the button to be the same width as the previous button(s) (it will snap to the correct width).
  8. Navigate to the Properties Window (if hidden, restore it by clicking View | Properties Window).
  9. Ensure that the Properties Window is in "property mode" (click on its wrench icon)
  10. Ensure that the new button is the currently-focused control.
  11. Enter a Height in the Properties Window (under the Layout section) of 23.
  12. Enter a Name in the Properties Window as specified in the class diagram.
  13. Enter Content in the Properties Window as a friendly version of the name (e.g. "newZooButton" as "New zoo").
  14. Change the Properties Window to "event mode" (click on its lightning bolt icon)
  15. Double-click in the Click event's text box, which will:
    1. Create an event handler for the button.
    2. Navigate to code view. (You can alternately navigate to code view by right-clicking on the designer and selecting "View Code", or by pressing F7).

PNG image of 3.1  Zoo UML class diagram
  1. When creating classes be sure to:
    1. Ensure the class in the root namespace. This can be done in one of two ways. Either by adding the class in the project, i.e. scenario, or by adding the class to the business classes folder and removing the ".Business_Classes" designation from the namespace.
    2. insert the following line of code immediately above the class definition:
      [System.Diagnostics.CodeAnalysis.SuppressMessage("Microsoft.StyleCop.CSharp.MaintainabilityRules", "SA1401:FieldsMustBePrivate", Justification = "Encapsulation not yet taught.")]
  2. Open the main window (MainWindow.xaml) in designer mode (right-click and click "View Designer" or press Shift-F7 to go to designer mode).

3.1 Zoo Lab: Object Diagram

Instantiate the objects and set their field values as specified in the following UML object diagram.

PNG image of 3.1 Zoo UML object diagram

3.1 Zoo Lab: Code Snippet

Within the newZooButton click event handler use the following code snippet as your guide to writing the code.

// Create an instance of the Zoo class.

// Set field values of Como Zoo.

// Set field values of the animal snack machine.

// Set field values of the dingo food.

// Set field values of the platypus food.

// Set field values of room B168.

// Set field values of the baby animal.

// Set field values of the mother animal.

// Add the baby animal to the zoo's animal list.

// Add the mother animal to the zoo's animal list.

// Define a temporary animal variable.

// Create an instance of the Animal class (Paddy).

// Set field values of Paddy.

// Add Paddy to the zoo's animal list.

// Create an instance of the Animal class (Bella).

// Set field values of Bella.

// Add Bella to the zoo's animal list.

// Define a temporary guest variable.

// Create an instance of the Guest class (Sally).

// Set field values of Sally.

// Set field values of Sally's wallet.

// Add Sally to the zoo's guest list.

// Create an instance of the Guest class (Fred).

// Set field values of Fred.

// Set field values of Fred's wallet.

// Add Fred to the zoo's guest list.

// Set field values of the ladies' restroom.

// Set field values of the men's restroom.

// Set field values of the ticket booth.

// Set field values of the ticket booth attendant.

3.1 Zoo Lab: Final Steps

On the two additional buttons, write code to perform the following:

Test, Complete and Submit

  1. Build your program - Eliminate compiler errors and warnings
  2. Debug/Test your program - Set breakpoints, step through code, monitor values
  3. Make your code StyleCop-compliant
  4. Close your Visual Studio solution.
  5. Compress your Visual Studio solution to a zip file.
  6. Submit the zip file via Blackboard.

Grading Rubric

PNG image of the 3.1 Zoo rubric